
DIY TRD Supercharger Blower Rebuild
 04-15-2011, 04:48 AM
#1

First a disclaimer, do not attempt a rebuild if you are not confident. This is for reference purposes.
Ok that said lets talk first about parts, beyond what the Scion Life community has done to support bearing availablity there are some other sources I have mention before:
For upgraded seals for your blower I recommend 928 Motorsports. They have developed a better output seal than what is stock from Vortech.
http://www.928motorsports.com/parts/vortech_seals.php
If you need stock parts for the blower I recommend Supercharger Rebuilds. They have seals, o rings for the blower housing and the gear housing. They even have impellers!
http://www.superchargerrebuild.com/
First things first you need to get the supercharger off. Since this has been covered by other sources on this site before I will just show my truncated version of getting the unit off. If you haapen you have a header or have the heat shield removed you can bypass pulling off the shaft and pulley side if you do not need to rebuild it. Here is our target.

You will want to drain some collant or if you are careful you can use a container to capture the fluid as you pull the radiator hose off. Here are the items you need to disconnect:
The O2 sensor wire clip, squeeze it with some pliers to free it. Then disconnect the radiator hose.


Disconnect the oil feed line and the your vent line to the intake. Pull off those intake hoses as well.

As well as the oil drain line to the oil pan.

Even if you do not pull off the pulley side you will still need to loosen the 2 bolts holding it place for realignment during reinstall. You will need to pull the belt off as well but if you clamp it you can avoid having to reroute the belt. You will need to remove the overflow tank to do this as well.


So that should be all the lines now we need to un bolt the blower. If you need to pull the pulley side off you need to hit those two bolt I talked about earlier here..

and here bewteen the oil cap and pulley.

Now there are 3 bolts holding the blower to the horseshoe bracket. Those 3 bolts are located here just across from where the radiator hose goes, this is why we removed it. The two front bolts are easy enough to get an allen wrench on but the back can be slow getting off using a normal allen wrench. To tackle this I used an allen bit in a small ratcheting wrench. They are cheap and save a lot of headache.

With these bolts out and either your pulley side removed or your shaft to blower bolts removed you should be able to pull the blower out now. Some may find it easier to remove the battery as well which I have done int he past.
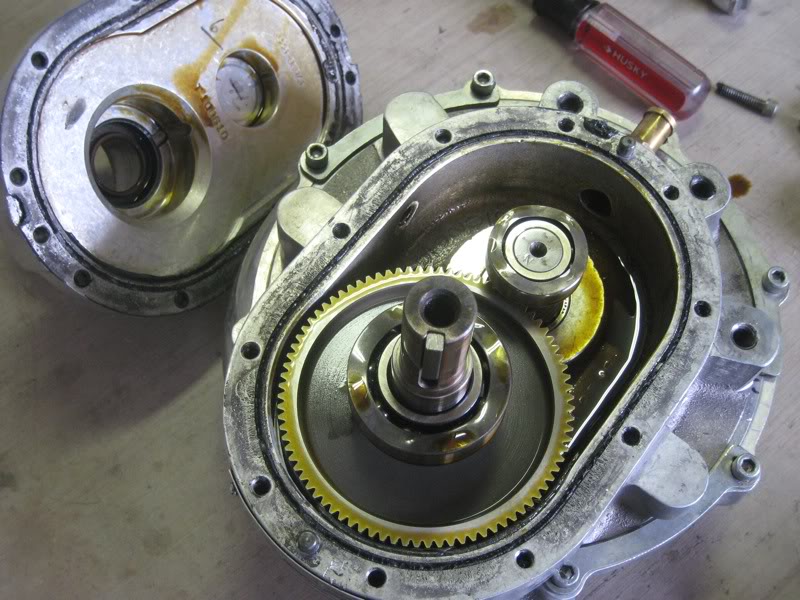
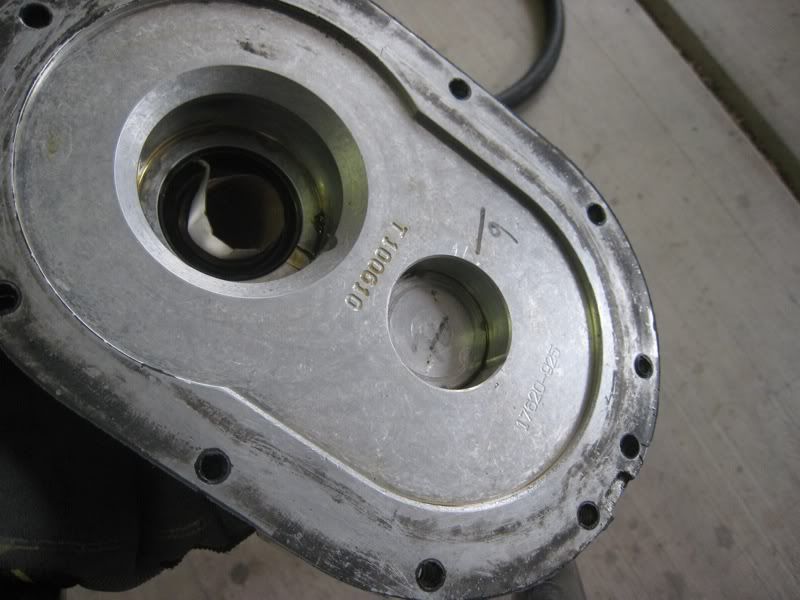
So now you have your blower out. First thing to do before we start tearing into is note two clock references. The first is the intake cover, these is an arrow to align to the top bolt. Remove thse three bolts, I recommend screwing them back in after removing the cover.


The other reference mark you need to make, this is for the clocking of the gear drive to the blower housing. I just scratched a mark on the backside so you couldn't see it after installed! This will prevent you have to reinstall multiple times because you bolted it back together clocked wrong.

Remove the oil feeder to the housing, you do not want to damage this or the bearings because you left it sticking in.

Time to start tearing into it, remove the input drive. Impact wrench works great for this part.

Remove all the bolts holding the drive gears cover on.

Grab a screw driver and gently remove the cover to reveal the guts. If you are still using the O ring you this seal take care of it, I now use RTV. Don't loose those spring washers for the bearings!
Remove the impeller nut. This is REVERSE threaded. Sorry for the picture reuse but did not take one with it off.
Time to pop the blower housing off, remove the three clamps holding it in place and pull it off to reveal the impeller.

Now for the tricky part, removing the impeller and shafts. You will want to set up something like this so that the gears and free float. Not shown in this picture is the rags I stuck under to safe gaurd the shafts as I removed them. Notice it is supporting on the dog ears of the housing.

As you drive the output shaft out you will want to make sure the input shaft is hanging free like so.

Take your time slowly driving the shaft out, at the end you will need something to finish driving it out like a screwdriver. You may have a small spacer washer under your impeller in addition to the large stell washer that presses against your seal.

You should now have you shafts out! Take them to a local shop to have the bearings removed and new installed. Keep your old bearings, never know when you will need them as backups.

If you are replacing the seals now would be the time to pound out the old and install the new.
NOTE: Depending on your source of bearings you may need to verify the bearing is installed in the correct direction. This is a result of some bearing races being angled and pressed together, if you have any doubt ask your supplier.
I should have taken a picture of reinstalling the shafts but here is what I did. Stick the shafts in your freezer, stick your housing in the oven at 300 degrees for about 15 mins. This will allow for easy install, we want to avoid any pressure on the output bearings because they are delicate.

Stick those spring washers on the bearings and intall the other half the housing on. This part should be oven heated as well. Either reuse the O ring or use RTV but make sure you do use too much since it will squeeze inside the case and get in the gears.

You may want to roll some material to allow for easier shaft to seal seating.

Install the bolts holding the gear housing together, do not forget anti seize.
Here is that steel washer that goes below the impeller, I have the 928 seal on.
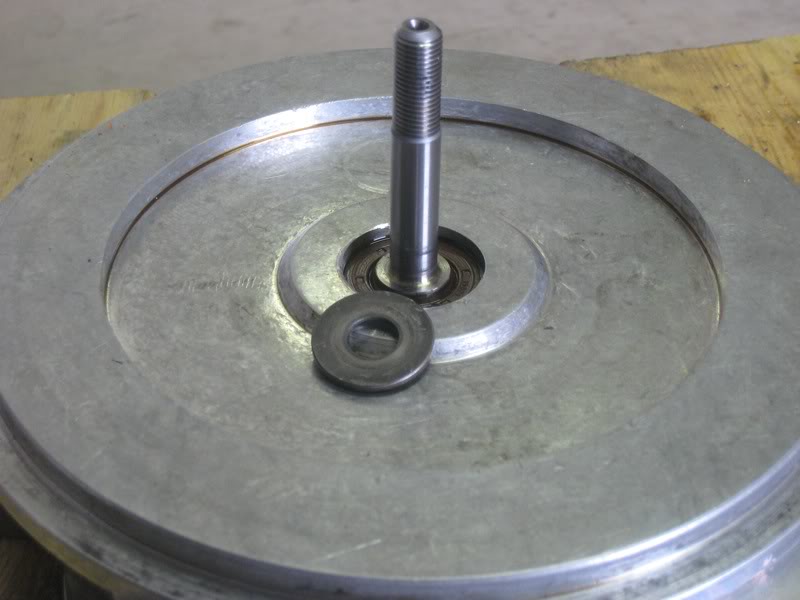

Stick the impeller on and use a brass driver to gently drive in on till you can get the nut on. I use the impact wrench turned down, don't over tighten, to finish driving it down.


Here is how the impeller should be sitting.

Do not forget the blower housing O ring.

Reverse the previous steps you reassemble and referense the TRD instruction for your bolt tighening sequence and do not forget anti seize on those bolts! I hope this helps those out there and will update if I have missed, forgotten or glossed over details people need.
Happy boosting.
Ok that said lets talk first about parts, beyond what the Scion Life community has done to support bearing availablity there are some other sources I have mention before:
For upgraded seals for your blower I recommend 928 Motorsports. They have developed a better output seal than what is stock from Vortech.
http://www.928motorsports.com/parts/vortech_seals.php
If you need stock parts for the blower I recommend Supercharger Rebuilds. They have seals, o rings for the blower housing and the gear housing. They even have impellers!
http://www.superchargerrebuild.com/
First things first you need to get the supercharger off. Since this has been covered by other sources on this site before I will just show my truncated version of getting the unit off. If you haapen you have a header or have the heat shield removed you can bypass pulling off the shaft and pulley side if you do not need to rebuild it. Here is our target.
You will want to drain some collant or if you are careful you can use a container to capture the fluid as you pull the radiator hose off. Here are the items you need to disconnect:
The O2 sensor wire clip, squeeze it with some pliers to free it. Then disconnect the radiator hose.
Disconnect the oil feed line and the your vent line to the intake. Pull off those intake hoses as well.
As well as the oil drain line to the oil pan.
Even if you do not pull off the pulley side you will still need to loosen the 2 bolts holding it place for realignment during reinstall. You will need to pull the belt off as well but if you clamp it you can avoid having to reroute the belt. You will need to remove the overflow tank to do this as well.
So that should be all the lines now we need to un bolt the blower. If you need to pull the pulley side off you need to hit those two bolt I talked about earlier here..
and here bewteen the oil cap and pulley.
Now there are 3 bolts holding the blower to the horseshoe bracket. Those 3 bolts are located here just across from where the radiator hose goes, this is why we removed it. The two front bolts are easy enough to get an allen wrench on but the back can be slow getting off using a normal allen wrench. To tackle this I used an allen bit in a small ratcheting wrench. They are cheap and save a lot of headache.
With these bolts out and either your pulley side removed or your shaft to blower bolts removed you should be able to pull the blower out now. Some may find it easier to remove the battery as well which I have done int he past.
So now you have your blower out. First thing to do before we start tearing into is note two clock references. The first is the intake cover, these is an arrow to align to the top bolt. Remove thse three bolts, I recommend screwing them back in after removing the cover.
The other reference mark you need to make, this is for the clocking of the gear drive to the blower housing. I just scratched a mark on the backside so you couldn't see it after installed! This will prevent you have to reinstall multiple times because you bolted it back together clocked wrong.
Remove the oil feeder to the housing, you do not want to damage this or the bearings because you left it sticking in.
Time to start tearing into it, remove the input drive. Impact wrench works great for this part.
Remove all the bolts holding the drive gears cover on.
Grab a screw driver and gently remove the cover to reveal the guts. If you are still using the O ring you this seal take care of it, I now use RTV. Don't loose those spring washers for the bearings!
Remove the impeller nut. This is REVERSE threaded. Sorry for the picture reuse but did not take one with it off.
Time to pop the blower housing off, remove the three clamps holding it in place and pull it off to reveal the impeller.
Now for the tricky part, removing the impeller and shafts. You will want to set up something like this so that the gears and free float. Not shown in this picture is the rags I stuck under to safe gaurd the shafts as I removed them. Notice it is supporting on the dog ears of the housing.
As you drive the output shaft out you will want to make sure the input shaft is hanging free like so.
Take your time slowly driving the shaft out, at the end you will need something to finish driving it out like a screwdriver. You may have a small spacer washer under your impeller in addition to the large stell washer that presses against your seal.
You should now have you shafts out! Take them to a local shop to have the bearings removed and new installed. Keep your old bearings, never know when you will need them as backups.
If you are replacing the seals now would be the time to pound out the old and install the new.
NOTE: Depending on your source of bearings you may need to verify the bearing is installed in the correct direction. This is a result of some bearing races being angled and pressed together, if you have any doubt ask your supplier.
I should have taken a picture of reinstalling the shafts but here is what I did. Stick the shafts in your freezer, stick your housing in the oven at 300 degrees for about 15 mins. This will allow for easy install, we want to avoid any pressure on the output bearings because they are delicate.
Stick those spring washers on the bearings and intall the other half the housing on. This part should be oven heated as well. Either reuse the O ring or use RTV but make sure you do use too much since it will squeeze inside the case and get in the gears.
You may want to roll some material to allow for easier shaft to seal seating.
Install the bolts holding the gear housing together, do not forget anti seize.
Here is that steel washer that goes below the impeller, I have the 928 seal on.
Stick the impeller on and use a brass driver to gently drive in on till you can get the nut on. I use the impact wrench turned down, don't over tighten, to finish driving it down.
Here is how the impeller should be sitting.
Do not forget the blower housing O ring.
Reverse the previous steps you reassemble and referense the TRD instruction for your bolt tighening sequence and do not forget anti seize on those bolts! I hope this helps those out there and will update if I have missed, forgotten or glossed over details people need.
Happy boosting.
Last edited by AZGuy; 02-05-2012 at 10:19 PM.


 04-17-2011, 04:53 PM
#4
Just hope it proves useful for the folks still running SCs, it really is pretty easy to keep them up and running you just need to do bearing maintinance probably every 40-50k miles assuming you took take of the pulley side issue.
 10-20-2011, 07:28 AM
#7
Senior Member
SL Member
Scinergy

Join Date: Jun 2004
Posts: 248
Thanks for the writeup! Sorry for bringing thread back from the dead, but i have a couple questions, i'm trying to do the same thing.
1) how did you get your heat shield off with the s/c shaft in the way? Is it OK for the S/C to be running without that on?
2) my oil feed line had old oil caked all over it, what can i do on this line to prevent leaks in the future?
3) how did you get the oil drain line off of the s/c? I didn't see any kind of edge to ratchet, mine looks like all rubber tubing. I might be looking at the wrong line.. lol
Thanks!
 10-22-2011, 06:26 AM
#10
Member

Join Date: Oct 2011
Location: Omaha, NE
Posts: 16
Thanks for the writeup! Sorry for bringing thread back from the dead, but i have a couple questions, i'm trying to do the same thing.
1) how did you get your heat shield off with the s/c shaft in the way? Is it OK for the S/C to be running without that on?
2) my oil feed line had old oil caked all over it, what can i do on this line to prevent leaks in the future?
3) how did you get the oil drain line off of the s/c? I didn't see any kind of edge to ratchet, mine looks like all rubber tubing. I might be looking at the wrong line.. lol
Thanks!
1) how did you get your heat shield off with the s/c shaft in the way? Is it OK for the S/C to be running without that on?
2) my oil feed line had old oil caked all over it, what can i do on this line to prevent leaks in the future?
3) how did you get the oil drain line off of the s/c? I didn't see any kind of edge to ratchet, mine looks like all rubber tubing. I might be looking at the wrong line.. lol
Thanks!
2) I had the same problem and there is a paste you can get but I would just check it periodically and tighten it down to the proper measurements.
3) There is a little clamp/clip that you have to pinch together with pliers (it is kind of hard).
Hope that helps I just got done with mine and am putting the blower back together. I would recommend getting the 928 seal because that is where mine was leaking oil from. Here is where to get it: http://www.928motorsports.com/parts/vortech_seals.php
Also 928 Motor Sport can do the whole rebuild for you if you want. I tried doing it myseld and wished I would have just went to them.
Good luck and post any other questions you might have.
10-22-2011, 02:45 PM
#12
Member
Join Date: Oct 2011
Location: Omaha, NE
Posts: 16
If you have all the tools its not that hard. Just make sure you get all the bearings and seals first. I was able to get most of it locally but the seals you should get from 928 because hey are the best. I think 928 will rebuild the blower including the cost of bearings and seals for around $450 or so, which really isn't that bad. For your shaft rebuild you can send it to gompka and he can rebuild it all, his website is: http://www.tcsuperchargers.com/ (he is very helpful and can answer all your questions).
Really the whole thing can be done in one day if you have it all parts and tools on hand. If you just take your time you should be fine. I however don't have a strong enough impact wrench so I have to go to a shop for that. But its really not that hard just take your time.
10-23-2011, 02:07 AM
#13
Looks like things were covered while I was gone. What I did for my heat shield once it was off because I have a header on now was gold tape on the shaft itself since this gets most of the heat. I took heat readerings outside that area and it wasn't much higher but the shaft tube did get much hotter. Once I get done with my more recent mods Ill take some pics of what I did for my heat shield. But if you are staying stock I would just use the stock heat shield.
As stated do not skimp on seals, get the 928s.
As stated do not skimp on seals, get the 928s.
10-23-2011, 06:31 PM
#14
Senior Member
SL Member
Scinergy
Join Date: Jun 2004
Posts: 248
So the only extra tools i need is an impact wrench, how many lbs is the input drive bolt held on with?
Is there an online retailer that sells better than stock bearings? At the step where the shafts are out, how do i get the bearings removed? A member Kik mentioned that the bearing will be pressed into the housing when everything gets bolted back up.
Is there an online retailer that sells better than stock bearings? At the step where the shafts are out, how do i get the bearings removed? A member Kik mentioned that the bearing will be pressed into the housing when everything gets bolted back up.
10-23-2011, 08:04 PM
#15
So the only extra tools i need is an impact wrench, how many lbs is the input drive bolt held on with?
Is there an online retailer that sells better than stock bearings? At the step where the shafts are out, how do i get the bearings removed? A member Kik mentioned that the bearing will be pressed into the housing when everything gets bolted back up.
Is there an online retailer that sells better than stock bearings? At the step where the shafts are out, how do i get the bearings removed? A member Kik mentioned that the bearing will be pressed into the housing when everything gets bolted back up.
10-24-2011, 01:02 AM
#16
Senior Member
SL Member
Scinergy
Join Date: Jun 2004
Posts: 248
The bolts can be a _____, you just want a decent impact wrench to get it off. I provided links at the beginning for parts sources. The bearings need to be pulled off with a press, can get the off otherwise but ensures you damage anything else. While you can use the housing to press the bearings on I wouldn't recommend it, especially the smaller bearings are delicate when it comes to side loads. You can get a press for about 100 bucks than can do this work, I would invest in one and then you have no excuse to do regular maintenance.
Is the o-ring also a weak area of the s/c? Are there beefier o-rings, and would it be wise to use RTV + o-ring?
Does the impeller nut (reverse threaded one) require impact to take it off?
Sorry for all my newbie questions, i just want to make sure i dont f' anything up.
 10-24-2011, 07:42 PM
#18
Thanks, I took off the intake cover of the blower. And i'm gonna pick up a impact wrench hopefully 250lbs can take that bolt on the drive shaft off. You mentioned u used RTV in place of the o-ring.
Is the o-ring also a weak area of the s/c? Are there beefier o-rings, and would it be wise to use RTV + o-ring?
Does the impeller nut (reverse threaded one) require impact to take it off?
Sorry for all my newbie questions, i just want to make sure i dont f' anything up.
Is the o-ring also a weak area of the s/c? Are there beefier o-rings, and would it be wise to use RTV + o-ring?
Does the impeller nut (reverse threaded one) require impact to take it off?
Sorry for all my newbie questions, i just want to make sure i dont f' anything up.
The impeller does require an impact wrench, just helps you avoid damaging the blower trying to hold it in place.
10-25-2011, 05:06 AM
#19
Senior Member
SL Member
Scinergy
Join Date: Jun 2004
Posts: 248
https://www.scionlife.com/forums/sho...d.php?t=208849
I am also contemplating just sending in the blower to 928 Motorsports, but if nothing is wrong with my s/c i don't want to unnecessarily rebuild it.
02-04-2012, 12:20 AM
#20
Senior Member
SL Member

Join Date: Mar 2006
Location: Kansas City
Posts: 205
AZGUY!!! you should have put a disclaimer on the DYI for the bearings..., the bearings need to be pressed in a certain way, the words imprinted on the input bearings need to face "out" away from the gear, both bearings need to be that way, the inner part of the bearing has a thick flange on one side and a thinner flange on the other side, thicker part faces out. i didnt know this until a few hrs ago, i called superchargerrebuilds.com and talked with todd, he was a big help and has given me lots of advice over the past few months, however i wish i had know about the directional bearing before i put them in.
my supercharger sounds a little louder after the rebuild so now ill have to open the housing back up and check to see if the bearings are pressed in the right way
WARNING!!!!!!DISCLAIMER!!!!!!!!!!!! TO ALL TRD SUPERCHARGER ONWERS IF REBUILDING A TRD SUPERCHARGER MAKE SURE THE BEARINGS ARE FACING THE CORRECT DIRECTION!!!!!