
* tC : Gauge Cluster LED Conversion Guide by LEDmod.com


Thread Starter
Former Sponsor
SL Member

Joined: Apr 2006
Posts: 2,093
From: Anaheim, CA & Las Vegas
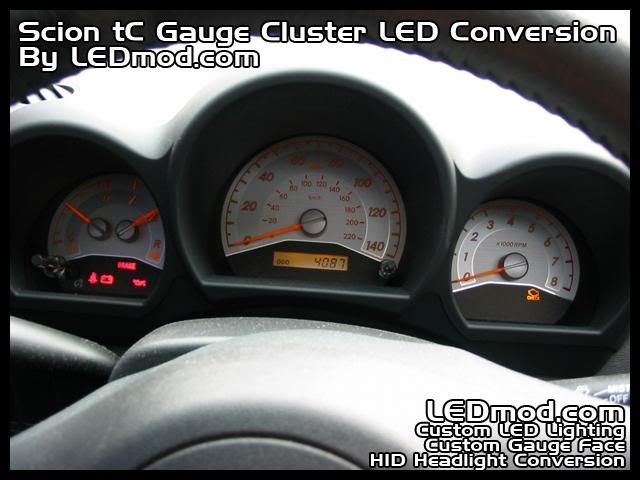
Scion tC Gauge Cluster LED Conversion/Swap Installation Guide
by LEDmod.com
** NOTE : This isn't for beginner, so if you aren't sure you can do this then, please seek professional help.
I also offer installation for Local and Out of state customers
Local installstion service available (Follow the link for more information)
- Southern California
- Las Vegas
- New York (currently not available)
- For out of state customers, please e-mail me for information Sean@LEDmod.com
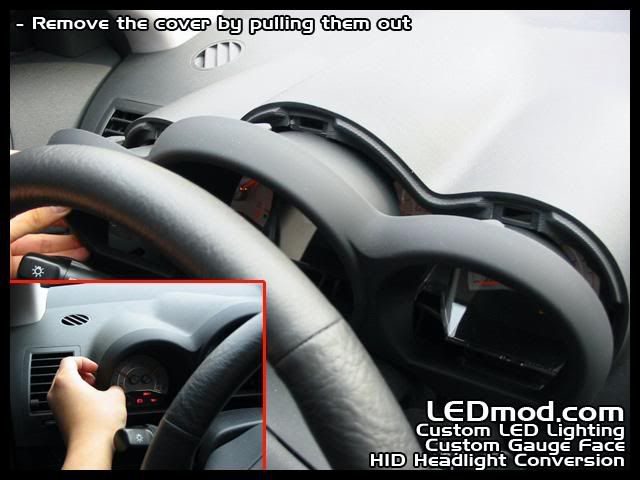
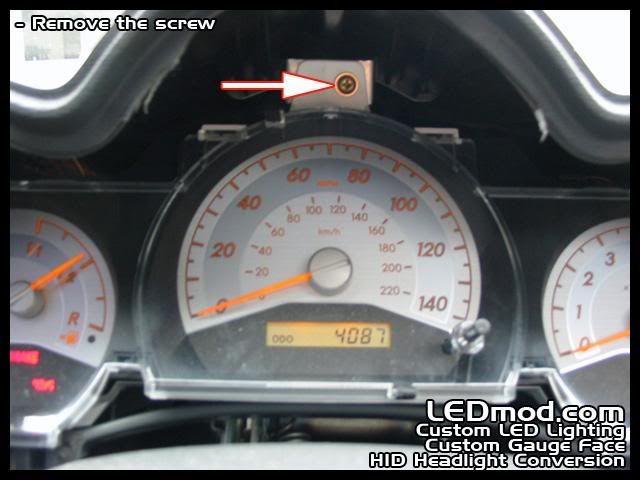
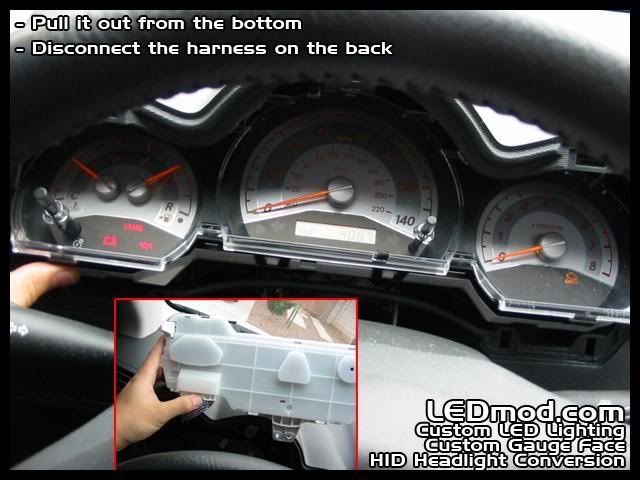
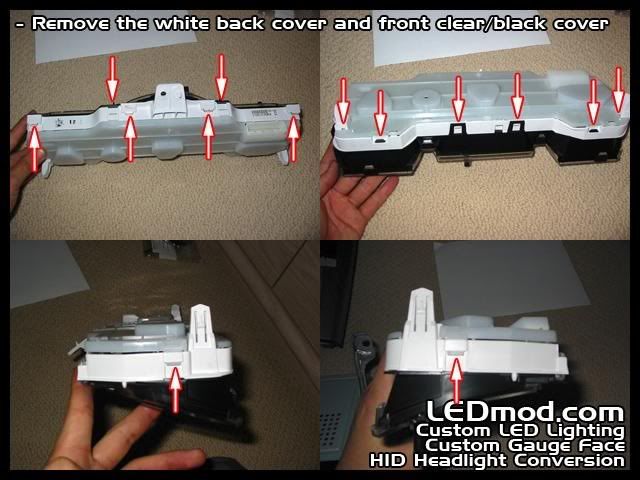
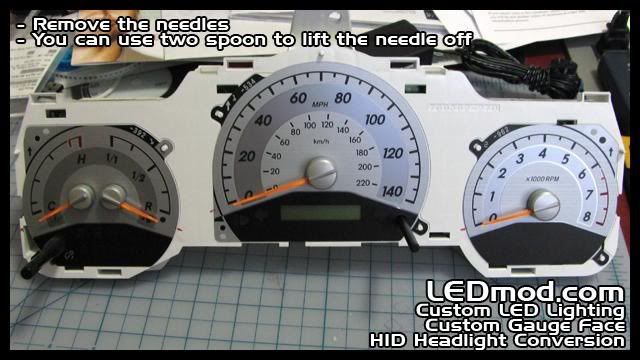
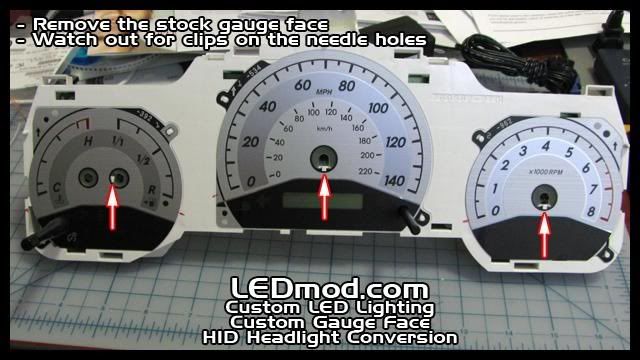
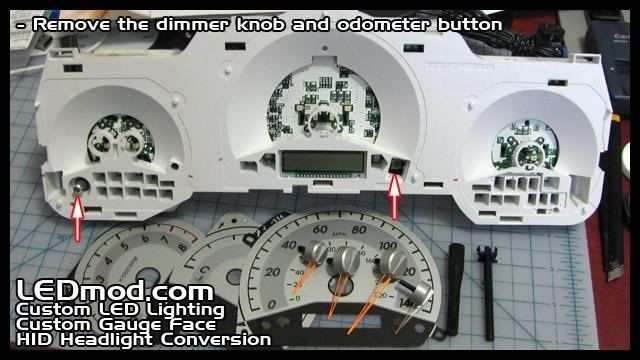
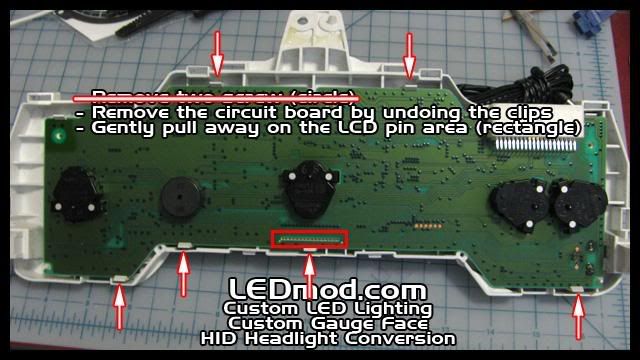
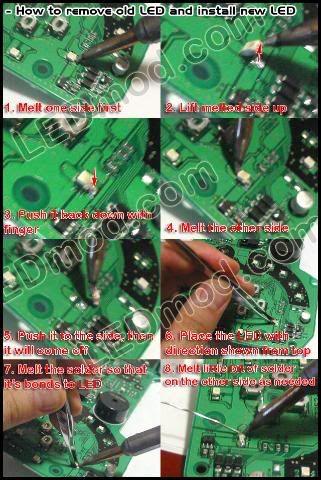
Here is a step by step guide for LED Conversion/Swap
Things you'll need (Mostly available at RadioShack)
- Fine point Pencil Soldering Iron (Recommend 15-30 watt)
- Solder : Prefer silver-bearing solder or rosin core solder (Thinner the better, easier to work with)
- Soldering accesories
- Philips screw driver
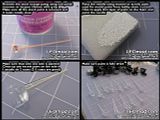
- Surface mount LED and resistor (Available at LEDmod.com)
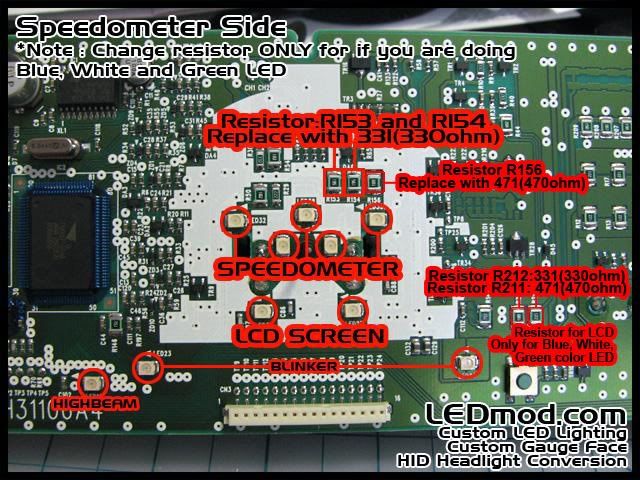
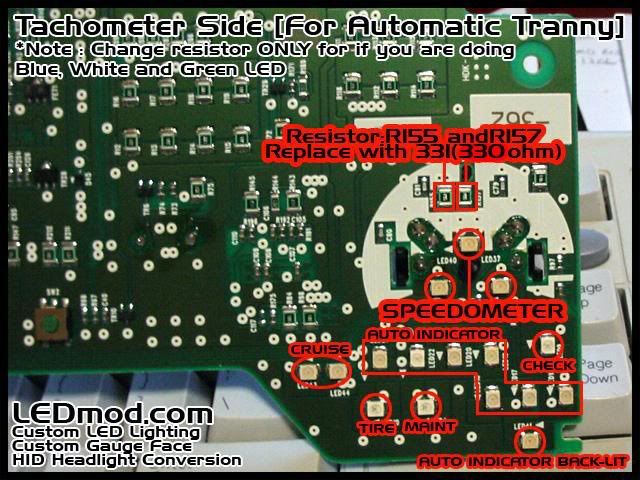
*** NOTE : If you are doing Red LED conversion, you can skip the resistor swap.
Resistor is NOT required, but for White, Blue and Green LED to light up brighter resistor swap is recommended!!


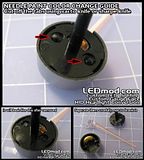
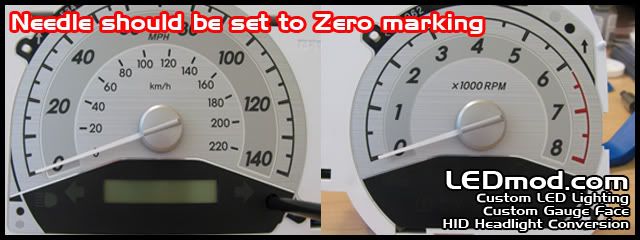
Needle Paint Color Change

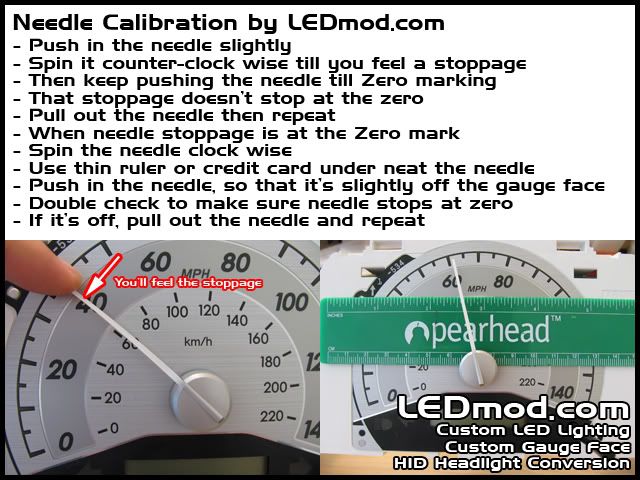
Needle Calibratio Guide

Put everything back together
Click on the image below to goto the Reverse LCD Screen Installation Guide
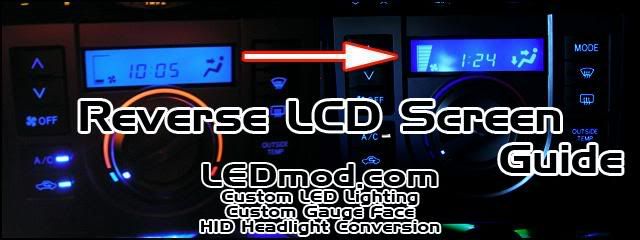
by LEDmod.com
** NOTE : This isn't for beginner, so if you aren't sure you can do this then, please seek professional help.
I also offer installation for Local and Out of state customers
Local installstion service available (Follow the link for more information)
- Southern California
- Las Vegas
- New York (currently not available)
- For out of state customers, please e-mail me for information Sean@LEDmod.com
Here is a step by step guide for LED Conversion/Swap
Things you'll need (Mostly available at RadioShack)
- Fine point Pencil Soldering Iron (Recommend 15-30 watt)
- Solder : Prefer silver-bearing solder or rosin core solder (Thinner the better, easier to work with)
- Soldering accesories
- Philips screw driver
- Surface mount LED and resistor (Available at LEDmod.com)
*** NOTE : If you are doing Red LED conversion, you can skip the resistor swap.
Resistor is NOT required, but for White, Blue and Green LED to light up brighter resistor swap is recommended!!
Needle Paint Color Change


Needle Calibratio Guide
Put everything back together
Click on the image below to goto the Reverse LCD Screen Installation Guide
Last edited by LEDmod; Feb 25, 2012 at 05:00 PM.


Thread Starter
Former Sponsor
SL Member
Joined: Apr 2006
Posts: 2,093
From: Anaheim, CA & Las Vegas
Originally Posted by Ty_Max
Who in my area wants to do this for some extra cash O_o...
I am a retard when it comes to this stuff.
I am a retard when it comes to this stuff.


Senior Member
Scikotics
SL Member
Joined: Nov 2004
Posts: 9,731
From: Minneapolis, MN
Originally Posted by davedavetC
is this the same led guy that got banned for stealing peoples **** or am just confused?
I would recommend, if you are doing this yourself, to try it without swapping the gauge cluster resistors first. I know most (including myself) do not want the gauges any brighter. Due to the higher voltage that the cluster leds run on, they will not be dim (they will be nice and bright) without swapping the resistors, so for some, it may be a bit bright to have right in your face at night if you do. I have my needles a bit bright now, which looks cool, but if I were driving too far at night it would probably get a bit distracting (which is why I make my backlit needle mods for others a bit more tamed down unless they want them super bright).
The main point is to know that it will look great either way. Dont confuse this with the HVAC though. You HAVE to do the circuit mod on it or it will be very dim. The difference is that it runs on a regulatd 8V supply stock while the gauge leds are running on battery power.


Senior Member
SL Member
Team ScioNRG
Joined: Jul 2006
Posts: 559
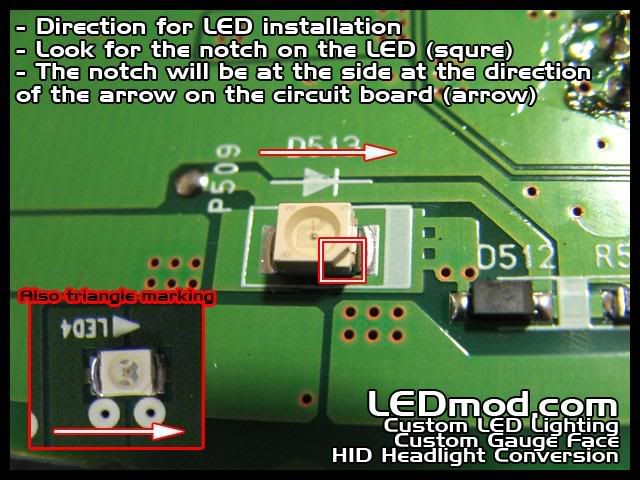
If you have a second soldering iron, the process for removing each SMD LED gets a whole lot easier. Position each soldering iron tip on the outside of the metal contacts on the SMD LED, and "grab" it as though you were using a pair of tongs. When the solder melts, you can lift it clear in one step. You'll only need one iron for soldering on the new LED.
And of course, don't heat the part for too long, or you'll cook the circuit board, which isn't pretty. Get some practice on a Radio Shack perfboard first.
And of course, don't heat the part for too long, or you'll cook the circuit board, which isn't pretty. Get some practice on a Radio Shack perfboard first.
Thread Starter
Former Sponsor
SL Member
Joined: Apr 2006
Posts: 2,093
From: Anaheim, CA & Las Vegas
Originally Posted by arbnpx
If you have a second soldering iron, the process for removing each SMD LED gets a whole lot easier. Position each soldering iron tip on the outside of the metal contacts on the SMD LED, and "grab" it as though you were using a pair of tongs. When the solder melts, you can lift it clear in one step. You'll only need one iron for soldering on the new LED.
And of course, don't heat the part for too long, or you'll cook the circuit board, which isn't pretty. Get some practice on a Radio Shack perfboard first.
And of course, don't heat the part for too long, or you'll cook the circuit board, which isn't pretty. Get some practice on a Radio Shack perfboard first.
Thread Starter
Former Sponsor
SL Member
Joined: Apr 2006
Posts: 2,093
From: Anaheim, CA & Las Vegas
Originally Posted by engifineer
I would recommend, if you are doing this yourself, to try it without swapping the gauge cluster resistors first. I know most (including myself) do not want the gauges any brighter. Due to the higher voltage that the cluster leds run on, they will not be dim (they will be nice and bright) without swapping the resistors, so for some, it may be a bit bright to have right in your face at night if you do. I have my needles a bit bright now, which looks cool, but if I were driving too far at night it would probably get a bit distracting (which is why I make my backlit needle mods for others a bit more tamed down unless they want them super bright).
The main point is to know that it will look great either way. Dont confuse this with the HVAC though. You HAVE to do the circuit mod on it or it will be very dim. The difference is that it runs on a regulatd 8V supply stock while the gauge leds are running on battery power.
The main point is to know that it will look great either way. Dont confuse this with the HVAC though. You HAVE to do the circuit mod on it or it will be very dim. The difference is that it runs on a regulatd 8V supply stock while the gauge leds are running on battery power.
I've did side by side comparison...
Yes, LED does light up enough without resistor swap... but they aren't running at "Typical" level...
Most of my customers prefer to be brighter... since they can always use dimmer...
But it is always good to have option....


