NEW!!! Domelight project. You'll like it once it's done
 06-01-2007, 11:02 PM
#1
Senior Member
Scionetics
SL Member
Thread Starter

Ok so here are some pics still need to figure out how I'm gonna mount to th ceiling to replace the dome.
#1

#2

#3

#4 And in the holes will be mounted super white LED bulbs.

#5 On this pic you can see where i chewed out the center of the symbol for the wires

#6And on this you can see where the power suply will go through in the hole on the right..

#7

#8

So now all I have to do is wait till I redo my headliner and mount it.
If i can figure out how to. Keep in mind it is going to be a finish product and the plexy is clear
so I can't drill two hole and just put two screws. Plus gluing the plexi up is out do to the weight and smoothness. Common start thinkin yall. help me
Any thoughts......

#1
#2
#3
#4 And in the holes will be mounted super white LED bulbs.
#5 On this pic you can see where i chewed out the center of the symbol for the wires
#6And on this you can see where the power suply will go through in the hole on the right..
#7
#8
So now all I have to do is wait till I redo my headliner and mount it.
If i can figure out how to. Keep in mind it is going to be a finish product and the plexy is clear
so I can't drill two hole and just put two screws. Plus gluing the plexi up is out do to the weight and smoothness. Common start thinkin yall. help me
Any thoughts......

 06-01-2007, 11:25 PM
#3
Senior Member
SL Member
Join Date: Sep 2005
Location: - AZ -
Posts: 1,326
That is a cool looking project. I'm working on some similar stuff just not dome light. Maybe I need to do some of that resistance training
to clear my mind so I can come
up with something. I'm kind of thinking you need to have some kind of a opaque base
between the clear acrylic and the headliner/roof. I need to go workout.
to clear my mind so I can come
up with something. I'm kind of thinking you need to have some kind of a opaque base
between the clear acrylic and the headliner/roof. I need to go workout.


 06-02-2007, 12:35 AM
#6
Senior Member
Scionetics
SL Member
Thread Starter
The wife is a personal trainer sorry not my homework. As for the pics. I have a MAC and this pos suks. I can't figure anything out. If i had Microsoft image veiwer i could easily resize. F APPLE 

06-02-2007, 02:33 AM
#7
Originally Posted by BAMFXB
The wife is a personal trainer sorry not my homework. As for the pics. I have a MAC and this pos suks. I can't figure anything out. If i had Microsoft image veiwer i could easily resize. F APPLE
Mac is different but good. If your using I photo just click on SHARE and resize it to 600 or so instead of just moving over to desktop.
The mod looks great tho
 06-02-2007, 04:11 AM
#10
Senior Member
SL Member

Join Date: Sep 2006
Location: Fargo, ND
Posts: 344

Sorry for the sloppy diagram, I just drew it up with Paint real quick.
The bottom piece is your headliner with a hole cut in it.
The second piece is a solid material (wood, plastic, metal, whatever) with a hole cut in it. The hole is slightly smaller than the base diameter of your dome light. This will allow the dome light to go through it, but not all the way through since it will get caught on the bevel. This solid piece can be mounted to your roof with whatever method (screws, bolts, a butt-load of super-duper glue, etc) that will hold the weight. If you use a glue, you may need to add shims to keep the top of the light flush with this bracket.
Next is obviously your dome light. Glue the edges to the solid material to keep it from twisting.
The top piece is a backing made out of the same material as your headliner.
Nice work on the dome light. That looks good.
06-09-2007, 06:25 PM
#12
Senior Member
Scionetics
SL Member
Thread Starter
Alright I have made the mount now all I need is the right LED's and hardware. ent to Fry's E. today and nobody could help me in info for the resistors if any and whatever else I'll need.
DOES ANYONE KNOW ANYTHING ABOUT LEDS. I need to 55mm with the best veiw angle availible possibe. All I can find is 20 degrees. Also I need to know if I need any resisters. I don't want to hook all this up and they burn out.
Any help is appriciated.
DOES ANYONE KNOW ANYTHING ABOUT LEDS. I need to 55mm with the best veiw angle availible possibe. All I can find is 20 degrees. Also I need to know if I need any resisters. I don't want to hook all this up and they burn out.
Any help is appriciated.
06-09-2007, 11:11 PM
#13
Senior Member
SL Member

Join Date: May 2007
Posts: 125
if you want to do it right you have to subtract the led voltage from the supply voltage.
and then divide by something else.....
Not really good at explaining things but it is easy to learn and ge info.
Just go to google, and type in something like LED wiring info, or Led wiring.
something like that. you should be able to get to a page that tells you all about the specific formulas and what not so you can fugure out how to wire it up
Im currently wiring my xb2 with leds and have all those pages printed out to help me along.
Hope that helps and make sure to post pics when your done!!
06-10-2007, 12:15 AM
#14
Senior Member
SL Member
Join Date: Sep 2006
Location: Fargo, ND
Posts: 344
http://www.oznium.com/led
Their LEDs are pretty bright (mcd rating), and they have a viewing angle of 30 degrees. You could also put some type of reflective material on the backside to reflect the light downwards. Just not too mirror-like or you�ll see the LEDs, wires, and back of the emblem.
How hard was it to make that? If it would be easy to make another one, you could drill the holes for 3mm LEDs so you could fit a lot more of them in. With enough LEDs, it won�t matter as much how wide the viewing angle is.
The resistor size will depend on what color you use since they break over at different voltages. It will also depend on how you wire them, series or parallel. If you wire them all in parallel, it will save you some extra wires (and space) and you could get away with adding 1 resistor in series with the power wire.
Let me know what LEDs you decide on using. I�d be more than happy to help you figure out how you should hook them up.
General rule. Subtract the LED voltage from the Supply voltage. Divide this number by .020 (20 mA). This will result in the Ohm value of the resistor you need. This is for 1 LED with 1 resistor. The formula changes for multiple LEDs and how you wire them, but isn�t much more complicated.
 06-10-2007, 05:49 PM
#16
Senior Member
Scionetics
SL Member
Thread Starter
I will have( 7) 5mm leds. and the peice behind is a peice of flashing so it's not quite a perfect mirror.
Plus I may ruff it up to look like stainless if possible. Might leave it to. Any who this will be a completely cosmetic peice.
Anywho...
I will have an LED fixture above each seat for optimal lighting.
All of which will be ran on the factor door switch relocated and modified to preclude the light.
I'll be mounting it near the mirror still got to figure that one out.
But once I get rollin on this headliner It will all fall in place.
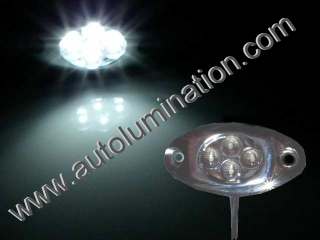
In case yor curious here are the lights I'm gonna put above each seat.

And yes they are festoons and the mounts will stick out and actually allow for ajustment well a little.
Don't know if I'm gonna punch them in front to back or side to side.
Either way there will be plenty O light in the car.
Or these what do you guys think???
Plus I may ruff it up to look like stainless if possible. Might leave it to. Any who this will be a completely cosmetic peice.
Anywho...
I will have an LED fixture above each seat for optimal lighting.
All of which will be ran on the factor door switch relocated and modified to preclude the light.
I'll be mounting it near the mirror still got to figure that one out.
But once I get rollin on this headliner It will all fall in place.
In case yor curious here are the lights I'm gonna put above each seat.
And yes they are festoons and the mounts will stick out and actually allow for ajustment well a little.
Don't know if I'm gonna punch them in front to back or side to side.
Either way there will be plenty O light in the car.
Or these what do you guys think???

