
2AZ Engine Assembly
 05-02-2011, 02:41 AM
#1
Senior Member
SL Member
Thread Starter
iTrader: (-1)

Join Date: Aug 2009
Location: Milton
Posts: 1,940
2AZ-FE Engine Assembly
This is a breakdown of how I assembled my engine. Not every single bolt is shown. You can use this as a guide if you want or if you need any assistance simply post in this thread. Take this guide and do what you want with it. I did not create it to get into arguments on engine assembly so do not take this thread in that direction. You have your methods I have mine. I am not responsible for what you do to your car.
Parts/Supplies List
WD40
Brake cleaner (2-3 cans)
Paper towels (2 rolls)
30 weight non detergent oil (5qts)
Valvoline 10w30 oil (5qts)
Synthetic oil of your choice (5qts)
3 Toyota oil filters 90915‑10004
Drain plug gaskets 90430‑12031
Toyota camshaft housing/oil pan sealant
Toyota: Oil pump gasket 15119‑28020
Toyota: Oil strainer gasket 15193‑28010
Toyota: Rear main seal 90311‑89003
Toyota: Front main seal 90311‑38089
Toyota: O-ring for shortblock (pictured) 96761-24020
Toyota: O-ring for dipstick tube 96721‑19010
Toyota: 16 valve spring seats
Toyota: intake cam bearings – upper, lower
Toyota: Exhaust manifold gasket
Toyota: Intake manifold gasket
Toyota: Throttle body gasket
Toyota: O-ring for VVTI
Toyota: Timing chain tensioner gasket
Toyota: O-ring for Cam Position Sensor
Toyota: O-ring for Crank position sensor
Toyota: Oil pressure relief valve plug filter 15678‑28010
Toyota: Valve cover gasket 11213‑28021
Piston Set with rings
Connecting rod set with rod bolts
Main bearing set
Rod bearing set
Thrust washers
ARP assembly lube
Permatex Ultra Slick/Torco assembly lube
Thread sealant
Red threadlocker
ARP head studs
Head gasket
Piston ring compressor (not the adjustable ones)
Valve Seals
Valve Grinding compound
Valve lapping tool
Tools List
Complete socket set
Complete wrench set
30mm 12pt deep socket (axel nuts)
12mm allen key (oil filter stud)
12pt � inch deep socket (head studs)
12pt 7/16 socket (rod bolts)
12pt 14mm socket (main caps)
Torque wrench
3/16 allen key
Magnet
Torque Spec & Clearances Quick Reference Guide
ARP Head Studs - 75ft-lbs final. 3 step sequence
OEM Main Bolts - 30ft-lbs final. 2 step sequence
ARP Rod Bolts - 25ft-lbs final + 55 degrees. 2 step sequence
Main bearing clearances - Recommended .0014-.0018
Rod bearing clearances - Recommended .0015-.0020
Valve lash clearances - Intake - .007 - .011 / Exhaust - .015 - .019
Looser tolerances will be a bit more forgiving (to a point) but will also make more noise and cost a bit of power (again to a point). More power = more heat = looser tolerances.
Last edited by trd07tc; 02-20-2014 at 01:07 AM.
 05-02-2011, 02:41 AM
#2
Senior Member
SL Member
Thread Starter
iTrader: (-1)
Join Date: Aug 2009
Location: Milton
Posts: 1,940
Shortblock Assembly
I am beginning this tutorial assuming your block is honed/machined and piston to wall clearance has already been measured. I am also assuming you have measured for your bearings already. This is just a small tutorial for assembly.
I am also assuming that you have cleaned every part at least 3 times if not more – cleanliness is the most important thing. You want to use a clean paper towel and a small amount of brake cleaner on every single part and wipe it off several times until it cannot possibly get any cleaner. Your hands should be clean as well.
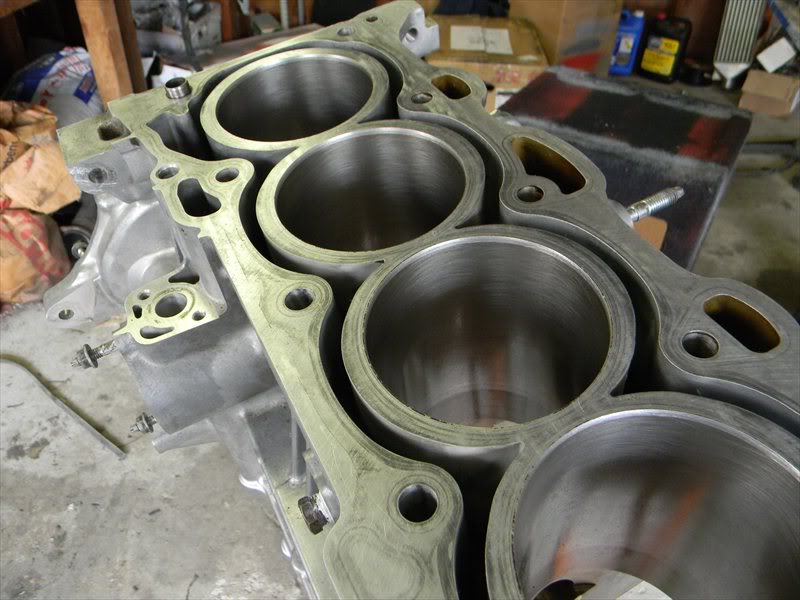
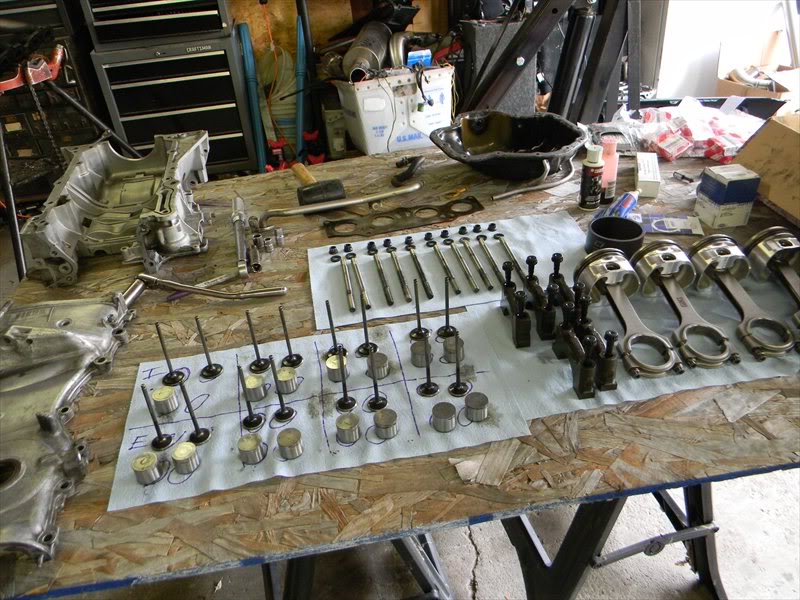
We are starting with the bare shortblock on the engine stand and all of your parts and tools laid out neatly nearby.
We are going to install our main bearings and put some ultra slick on them
Crankshaft gets dropped in place
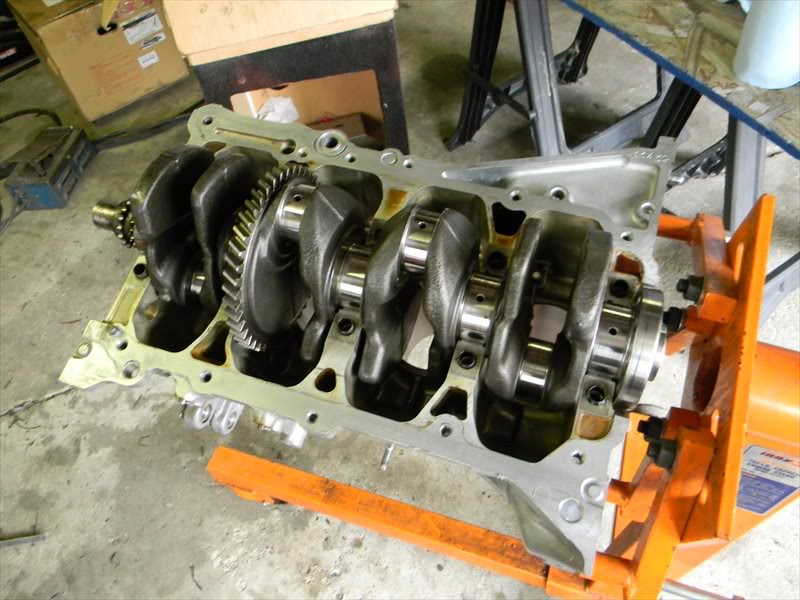
Main caps get installed with the main bearings installed with some ultra slick on them
They are numbered and the arrow points towards the timing chain
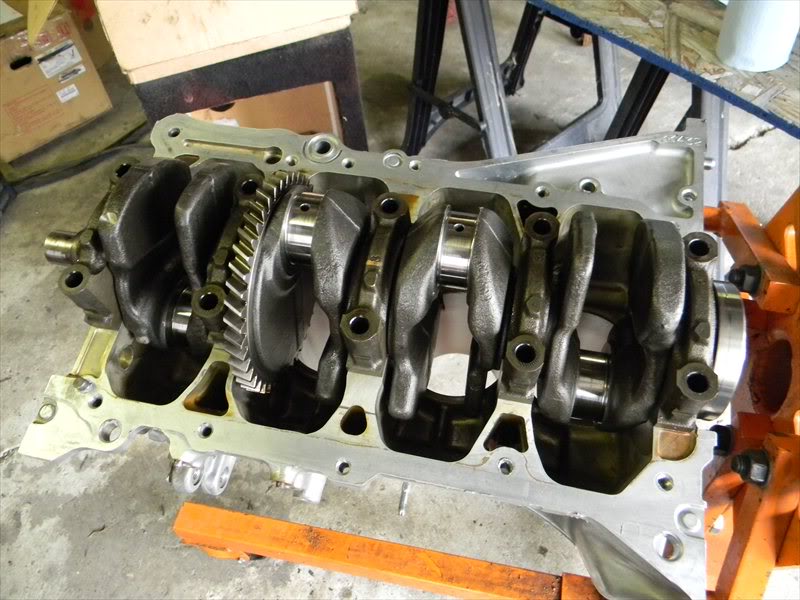
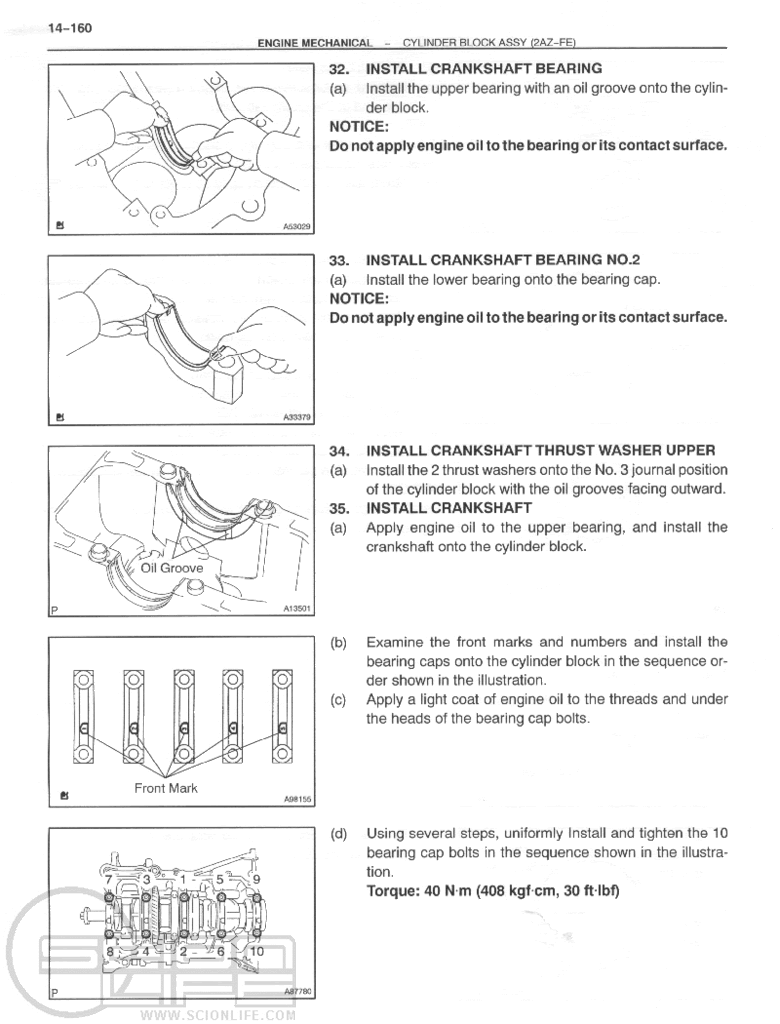
We are ready to torque the main caps down
You want to put the ND oil on the threads and the base of the bolt head
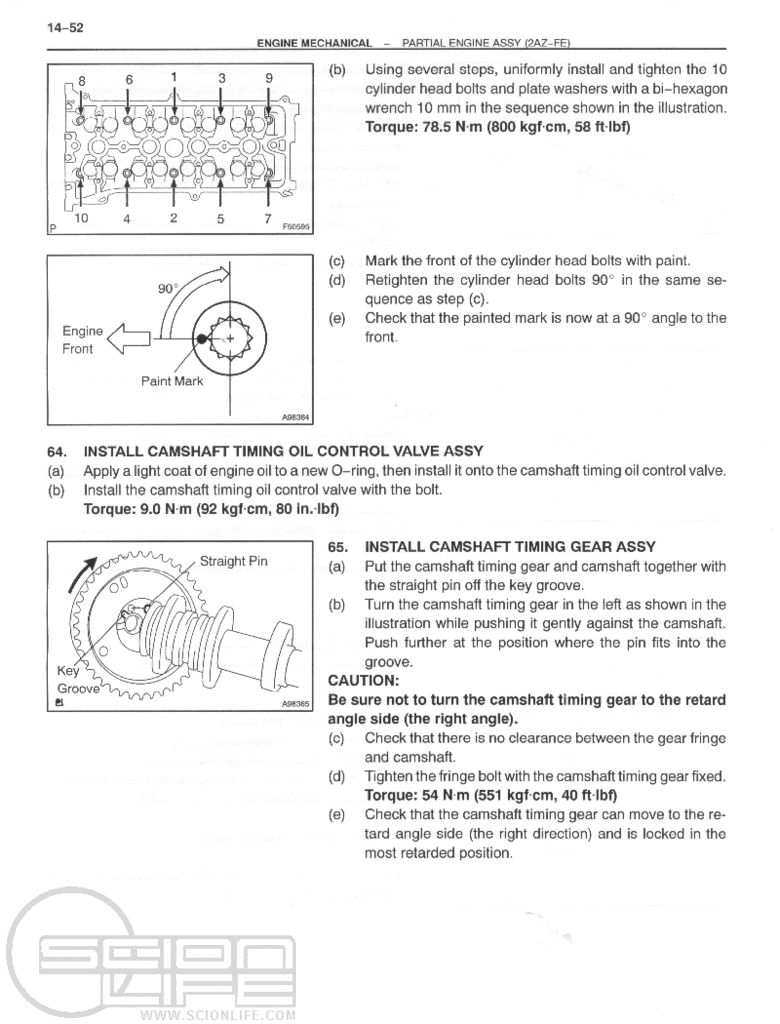
Follow the sequence and torque in multiple steps according to the Toyota diagram
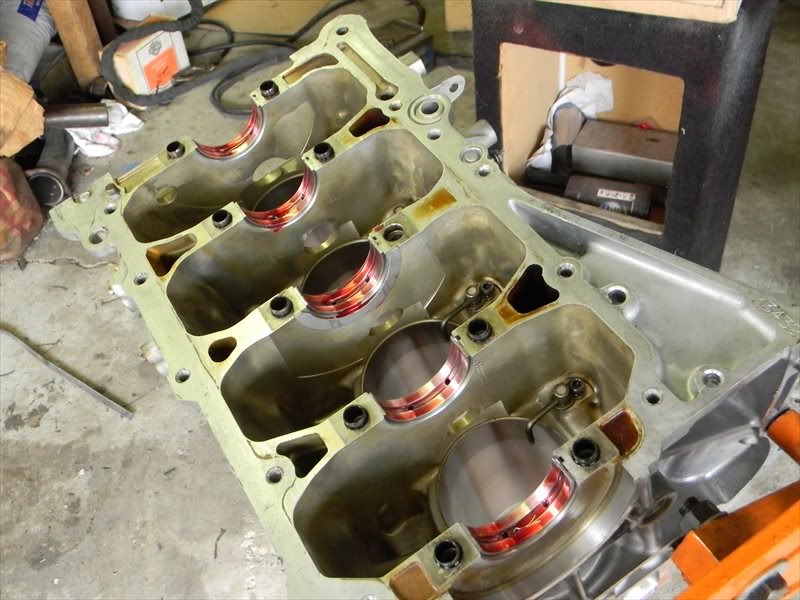
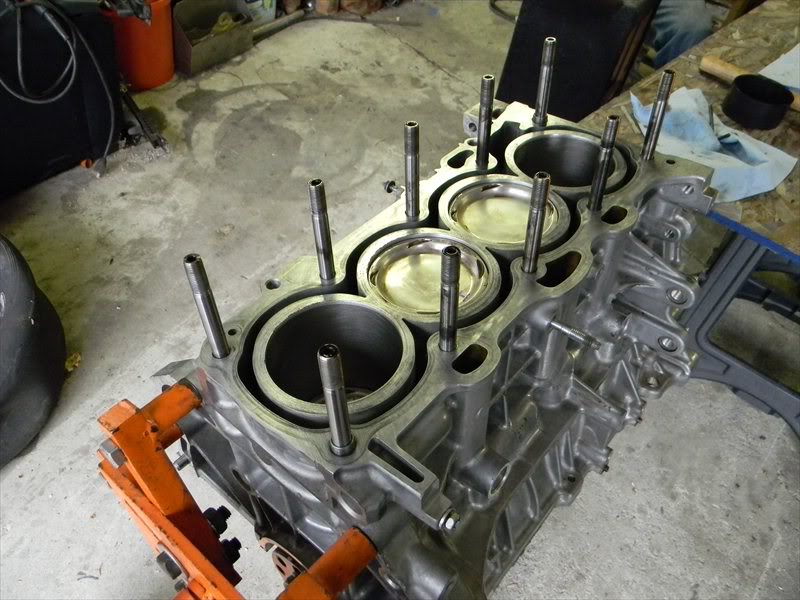
The connecting rods need to be installed onto the pistons and the piston rings are to be installed onto the piston. Follow the diagram provided by your piston manufacturer.
Install 2 pistons at a time. 1&4 then 2&3
Spray down the piston ring compressor (Wiseco 88.5 for me) and piston with WD40.
*I use WD40 and NOT motor oil because your rings will take forever to seat if you use motor oil. With WD40 your engine will be broken in in about 15 minutes of driving.*
Put the piston ring compressor on top of the cylinder and insert the piston and tap it down lightly into the cylinder (wooden handle of a mallet)
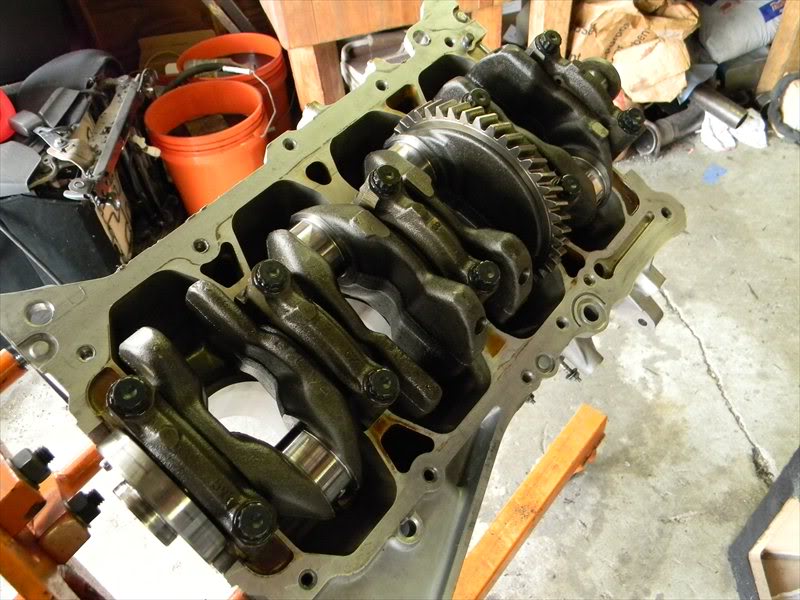
The connecting rods should have the bearings installed with ultra slick on them.
The connecting rod bolts should have ARP Moly Lube on the threads as well as the base of the bolt head
Guide the connecting rod onto the crankshaft and put the cap on and hand tighten the rod bolts.
Install number 1&4 then torque down the rod bolts. Spin the crankshaft and repeat procedure for cylinder 2&3.
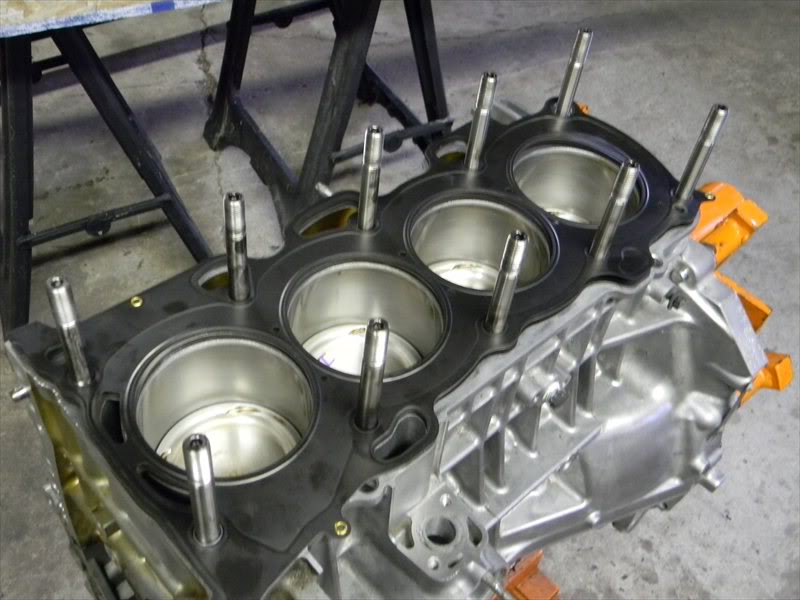
Flip the engine back over and were going to put in the head studs
Put ARP Moly Lube on the threads and install the studs into the block hand tight with the allen wrench. Make sure the threads are clear of any liquids or metal shavings. The Studs should all be fairly even when installed.
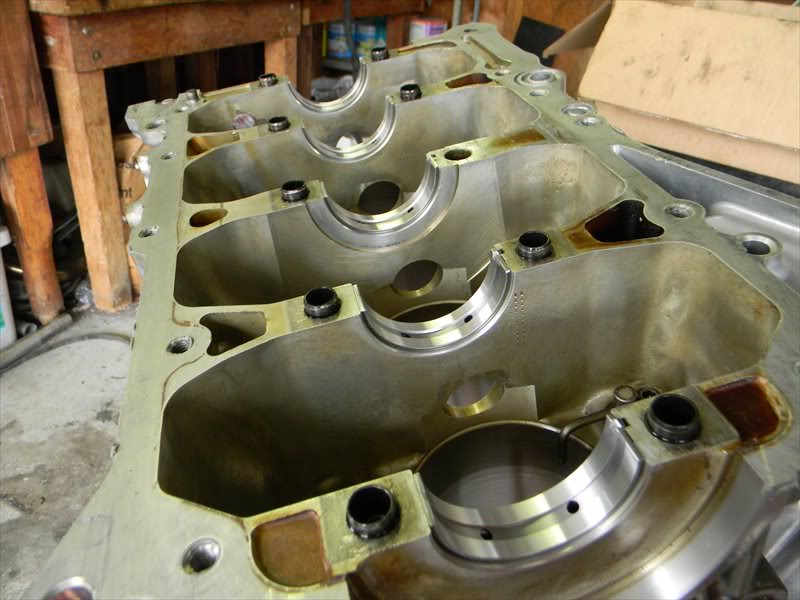
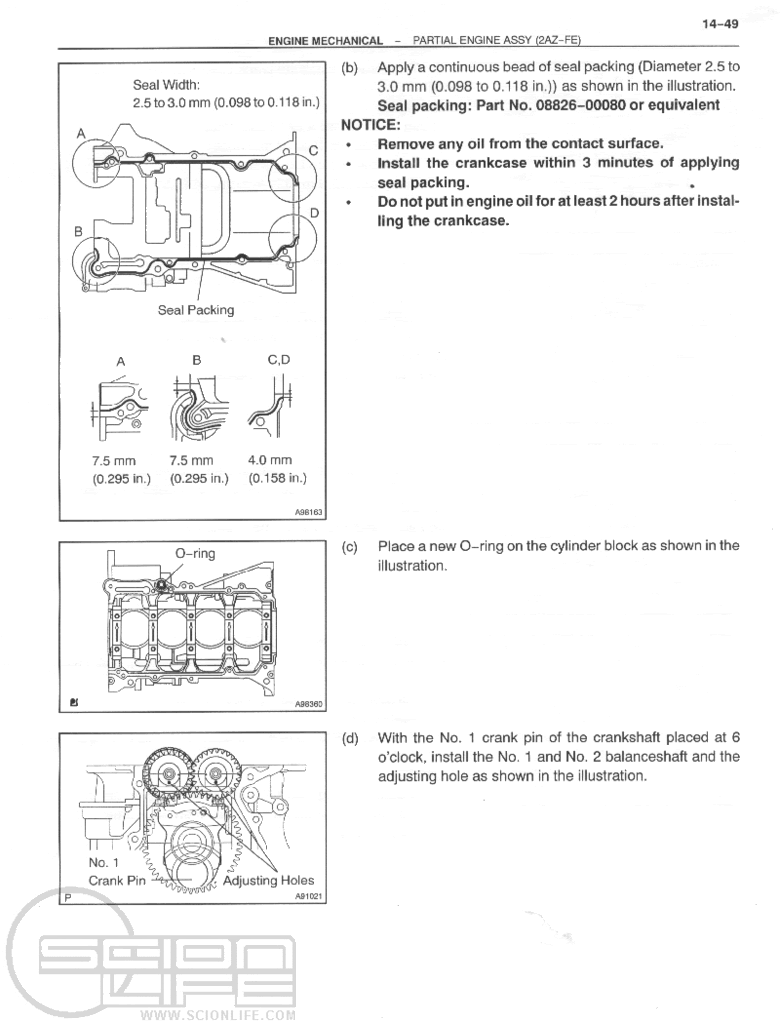
We are ready to put on the crankcase assembly. I do not run balance shafts and I already have the hole plugged so those steps wont be in this tutorial.
Ensuring all gasket surfaces are absolutely clean I dab the Toyota sealant across the gasket surface then use my finger to distribute it around. Give it about 2 minutes to get tacky then install the crankcase onto the block.
I put all the bolts in hand tight with a socket + extension then after a few minutes I start tightening them
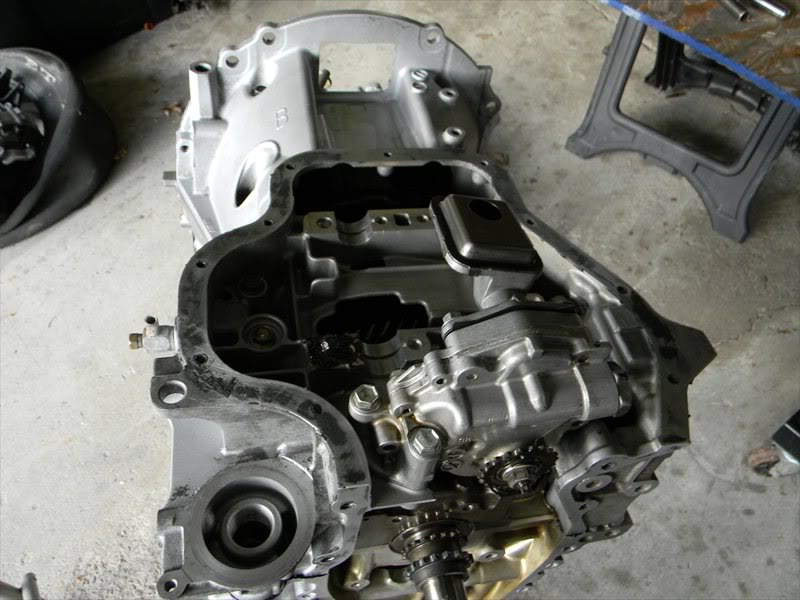
Install the oil filter stud
Now install the oil pump and the 2 new gaskets and torque it down
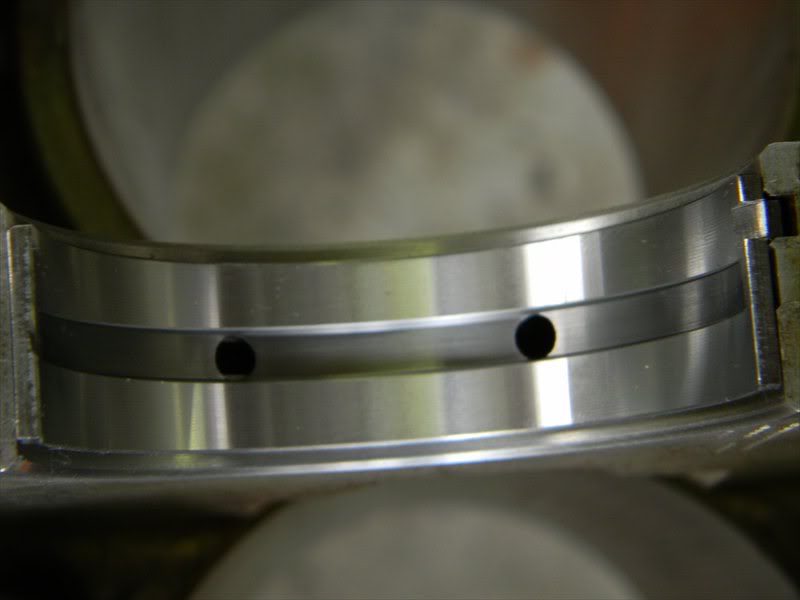
Now lets put on the oil pump chain
There are 2 marks to line up – one on the oil pump one on the crankshaft. They are small dots as pictured
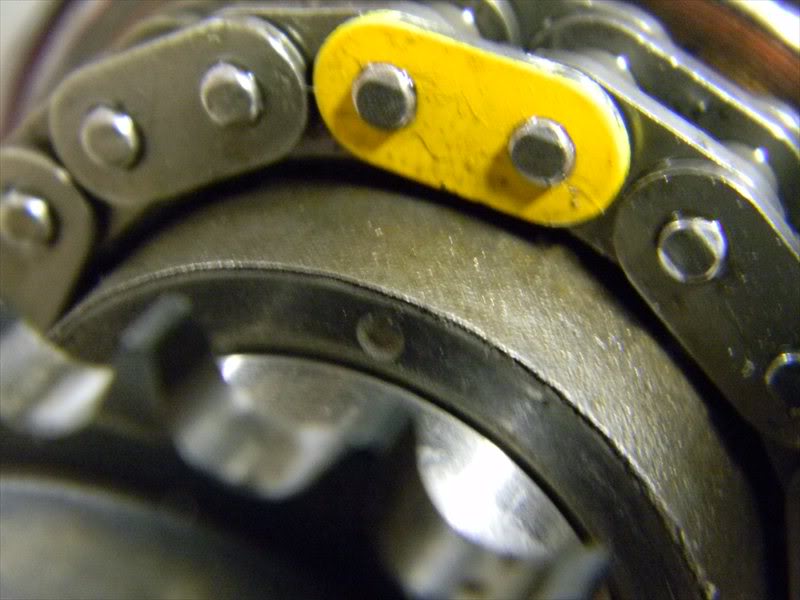
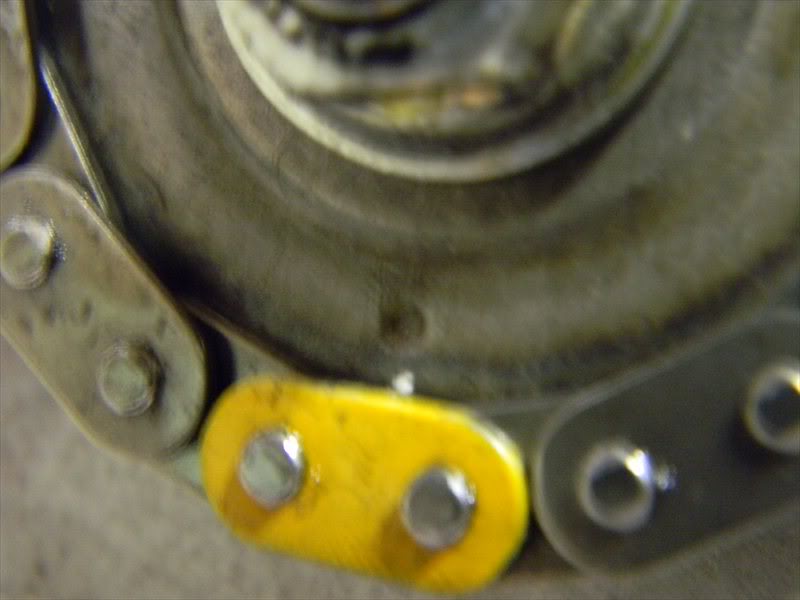
Once the chain is on put the “tensioner” on it with the spring locked in the hole as pictured
That’s it for shortblock assembly – to longblock assembly for timing … but we have to put together the cylinder head first
I am beginning this tutorial assuming your block is honed/machined and piston to wall clearance has already been measured. I am also assuming you have measured for your bearings already. This is just a small tutorial for assembly.
I am also assuming that you have cleaned every part at least 3 times if not more – cleanliness is the most important thing. You want to use a clean paper towel and a small amount of brake cleaner on every single part and wipe it off several times until it cannot possibly get any cleaner. Your hands should be clean as well.
We are starting with the bare shortblock on the engine stand and all of your parts and tools laid out neatly nearby.
We are going to install our main bearings and put some ultra slick on them
Crankshaft gets dropped in place
Main caps get installed with the main bearings installed with some ultra slick on them
They are numbered and the arrow points towards the timing chain
We are ready to torque the main caps down
You want to put the ND oil on the threads and the base of the bolt head
Follow the sequence and torque in multiple steps according to the Toyota diagram
The connecting rods need to be installed onto the pistons and the piston rings are to be installed onto the piston. Follow the diagram provided by your piston manufacturer.
Install 2 pistons at a time. 1&4 then 2&3
Spray down the piston ring compressor (Wiseco 88.5 for me) and piston with WD40.
*I use WD40 and NOT motor oil because your rings will take forever to seat if you use motor oil. With WD40 your engine will be broken in in about 15 minutes of driving.*
Put the piston ring compressor on top of the cylinder and insert the piston and tap it down lightly into the cylinder (wooden handle of a mallet)
The connecting rods should have the bearings installed with ultra slick on them.
The connecting rod bolts should have ARP Moly Lube on the threads as well as the base of the bolt head
Guide the connecting rod onto the crankshaft and put the cap on and hand tighten the rod bolts.
Install number 1&4 then torque down the rod bolts. Spin the crankshaft and repeat procedure for cylinder 2&3.
Flip the engine back over and were going to put in the head studs
Put ARP Moly Lube on the threads and install the studs into the block hand tight with the allen wrench. Make sure the threads are clear of any liquids or metal shavings. The Studs should all be fairly even when installed.
We are ready to put on the crankcase assembly. I do not run balance shafts and I already have the hole plugged so those steps wont be in this tutorial.
Ensuring all gasket surfaces are absolutely clean I dab the Toyota sealant across the gasket surface then use my finger to distribute it around. Give it about 2 minutes to get tacky then install the crankcase onto the block.
I put all the bolts in hand tight with a socket + extension then after a few minutes I start tightening them
Install the oil filter stud
Now install the oil pump and the 2 new gaskets and torque it down
Now lets put on the oil pump chain
There are 2 marks to line up – one on the oil pump one on the crankshaft. They are small dots as pictured
Once the chain is on put the “tensioner” on it with the spring locked in the hole as pictured
That’s it for shortblock assembly – to longblock assembly for timing … but we have to put together the cylinder head first
Last edited by trd07tc; 05-02-2011 at 03:20 AM.
05-02-2011, 02:42 AM
#3
Senior Member
SL Member
Thread Starter
iTrader: (-1)
Join Date: Aug 2009
Location: Milton
Posts: 1,940
Cylinder Head Assembly
Were starting with a bare cylinder head with valve guides. I am using complete stock valvetrain.
*Your valves should have been lapped already to each seat*
Lets install the valve seals
Put a light coat of our ND oil on the inside of the valve seal. I use a magnet to grab them then push them onto the guide. It doesn’t require much force they install easily.

Drop in the valve spring seats
Next you are installing the valve, valve spring, retainer, keepers
Doing 1 cylinder at a time
Install the 4 valves with a light coat of ND oil on the stems and put something under them to keep them from moving down while compressing the spring. I use a huge ball of rags taped up.
You need to have the spring with the reatainer on top with the keepers inside the retainer.
You need a valve spring compressor tool. Put the tool inside the retainer where the keepers are and push them down onto the valve until they lock.
It will take a few tries but you will get it
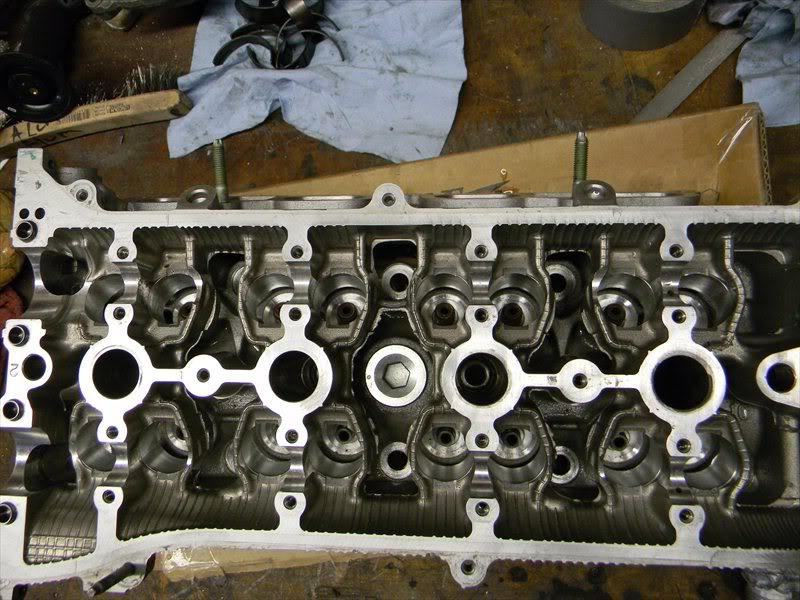
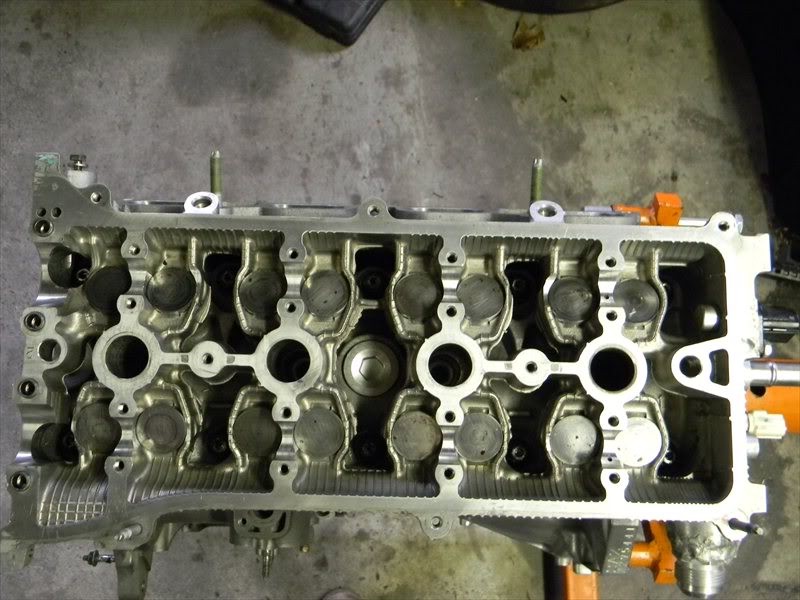
Now install the cam caps. I put my ND oil around it and on top. I install them with a magnet.
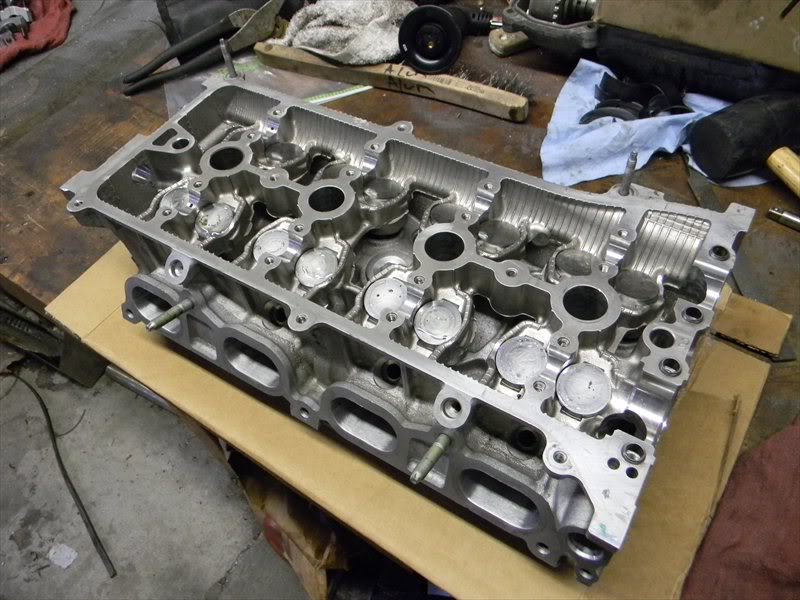
We will put the camshafts and cam caps on once the head is installed onto the block
Were starting with a bare cylinder head with valve guides. I am using complete stock valvetrain.
*Your valves should have been lapped already to each seat*
Lets install the valve seals
Put a light coat of our ND oil on the inside of the valve seal. I use a magnet to grab them then push them onto the guide. It doesn’t require much force they install easily.
Drop in the valve spring seats
Next you are installing the valve, valve spring, retainer, keepers
Doing 1 cylinder at a time
Install the 4 valves with a light coat of ND oil on the stems and put something under them to keep them from moving down while compressing the spring. I use a huge ball of rags taped up.
You need to have the spring with the reatainer on top with the keepers inside the retainer.
You need a valve spring compressor tool. Put the tool inside the retainer where the keepers are and push them down onto the valve until they lock.
It will take a few tries but you will get it
Now install the cam caps. I put my ND oil around it and on top. I install them with a magnet.
We will put the camshafts and cam caps on once the head is installed onto the block
Last edited by trd07tc; 05-02-2011 at 03:08 PM.
05-02-2011, 02:42 AM
#4
Senior Member
SL Member
Thread Starter
iTrader: (-1)
Join Date: Aug 2009
Location: Milton
Posts: 1,940
Longblock Assembly
Now we have a complete shortblock and a complete cylinder head – lets put them together.
Drop on the headgasket. Make sure all of the holes match up.
Drop the cylinder head on
Put ARP moly lube on the threads of the stud, washer base, both sides of the nut.
Torque down the nuts in sequence in several steps.
These are set to 75ft lbs and I follow the Toyota sequence
Picture 281
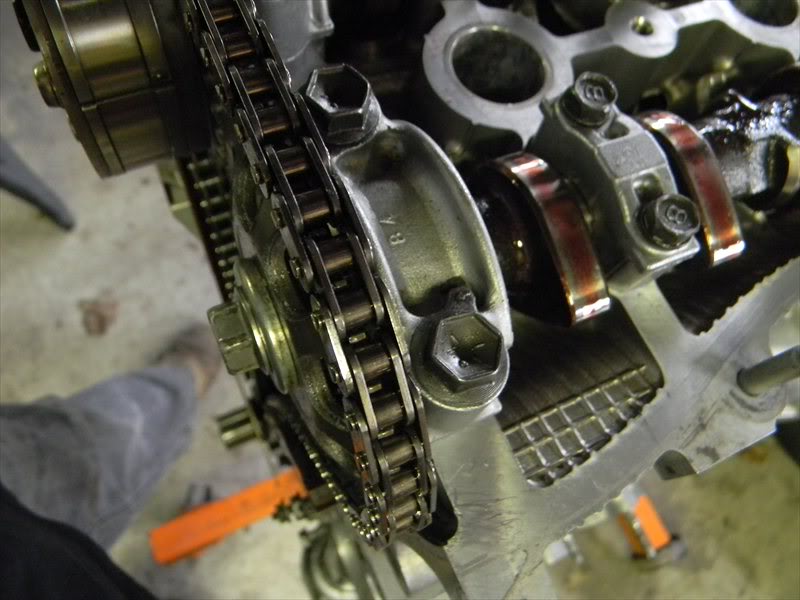
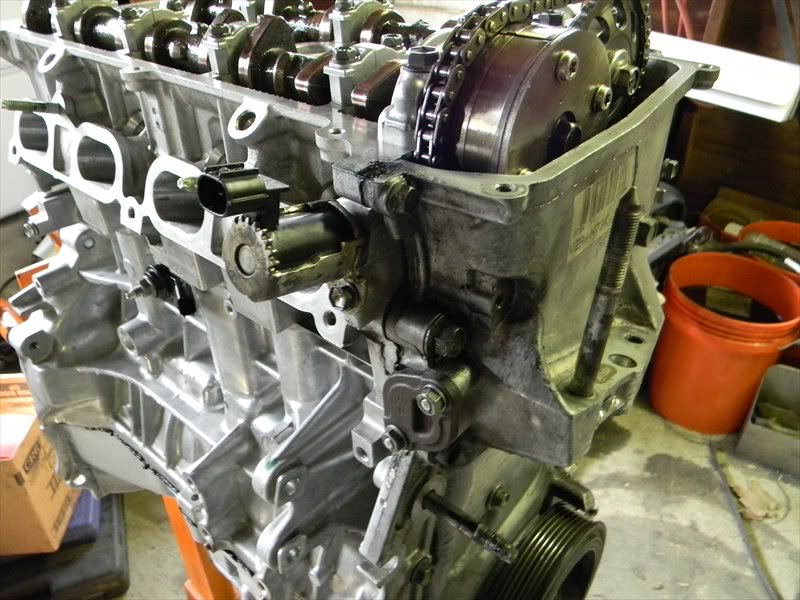
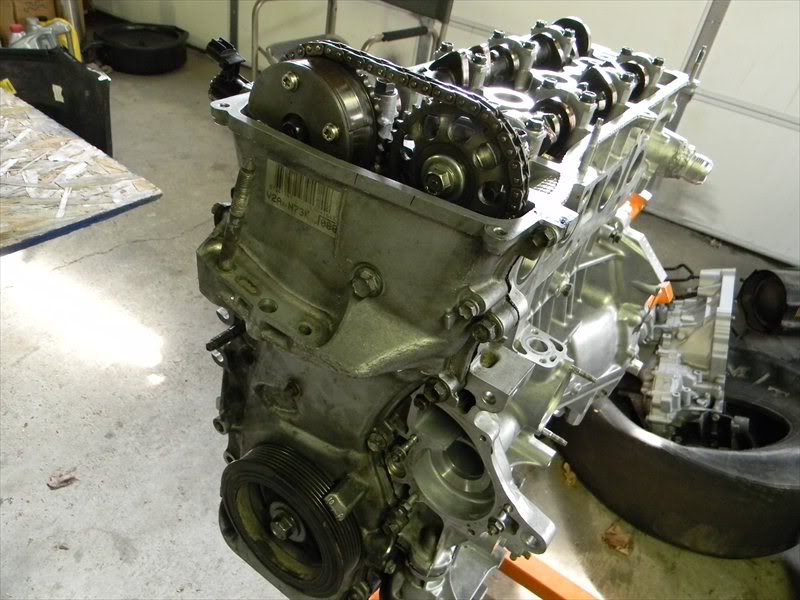
Now we are going to install the camshafts and the cam caps. Don’t forget the intake cam cap #1 has an upper and lower bearing.
I put ultra slick on all of the lobes and journals
All of the cam caps are numbered and point towards the timing chain
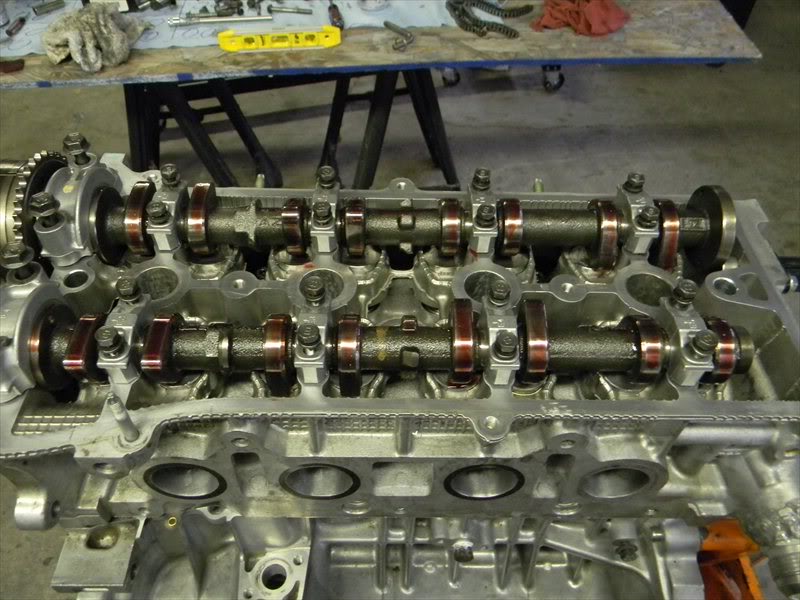
We are going to torque the cam caps down – just follow the provided diagram
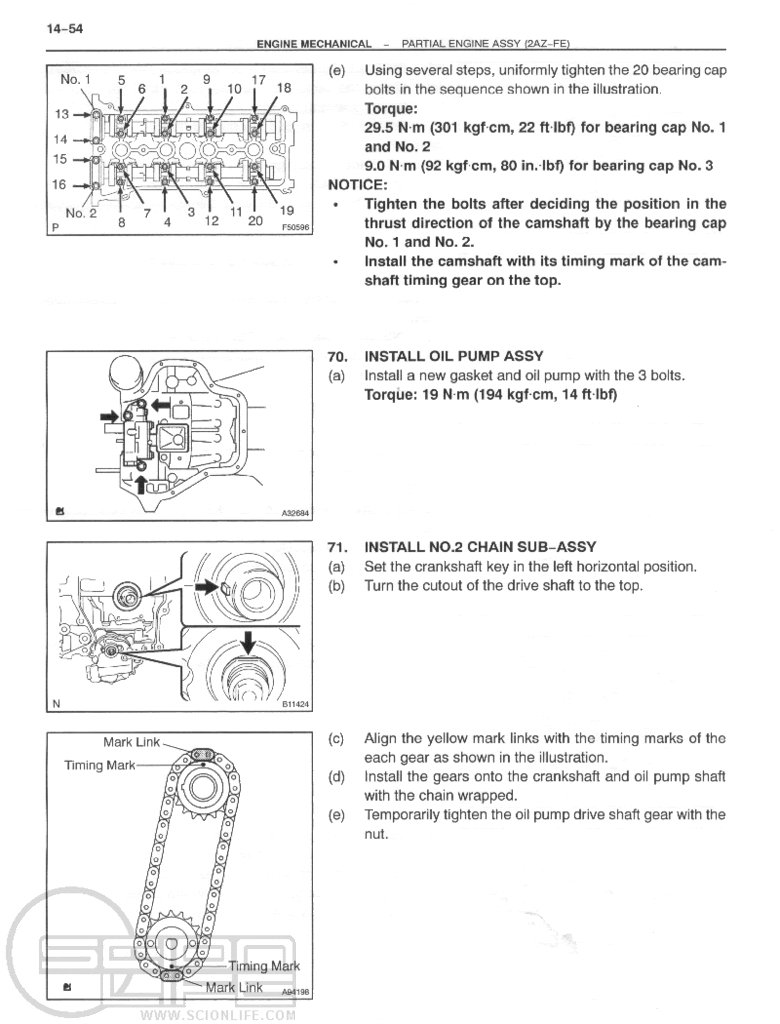
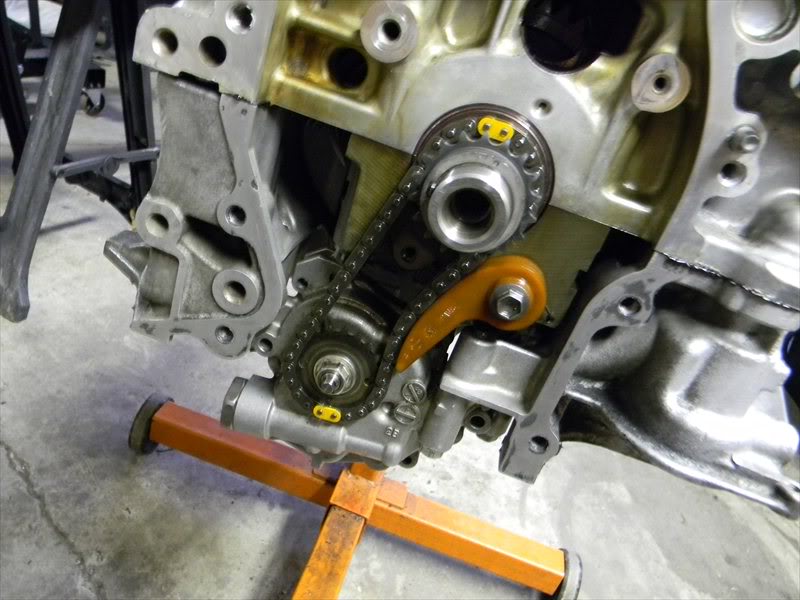
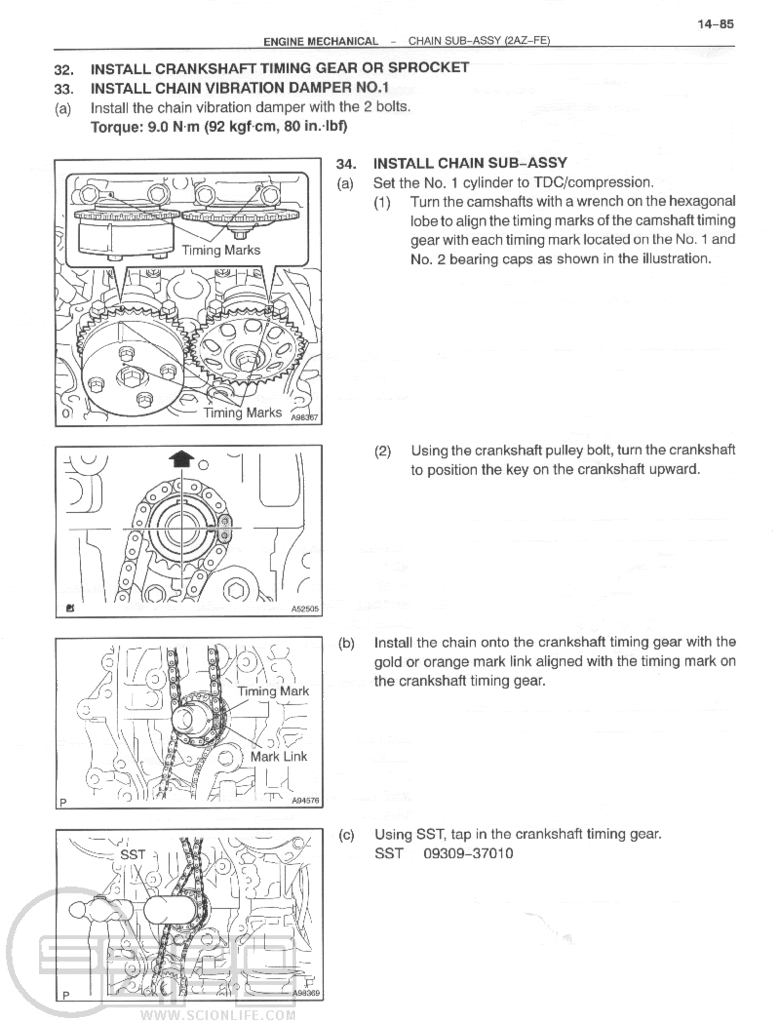
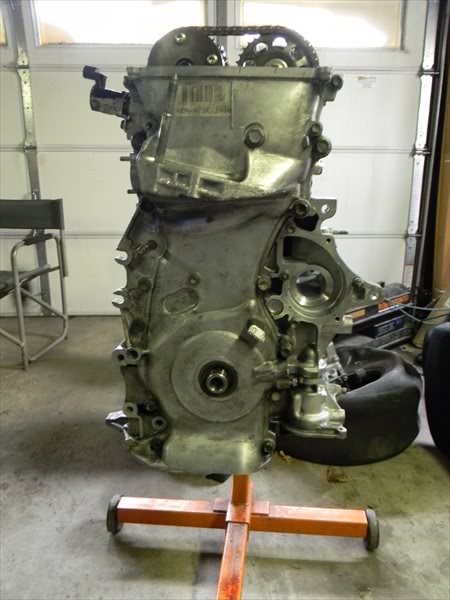
Now lets do the timing. It looks overwhelming but its very simple when taken step by step.
Make sure the crankshaft is at TDC (keyway facing up)
The intake cam gear has a dot and a mark that lines up to an arrow on the #1 cam cap.
The exhaust cam gear has a vertical line that lines up to an arrow on the #1 cam cap.
Use the pictures provided for assistance
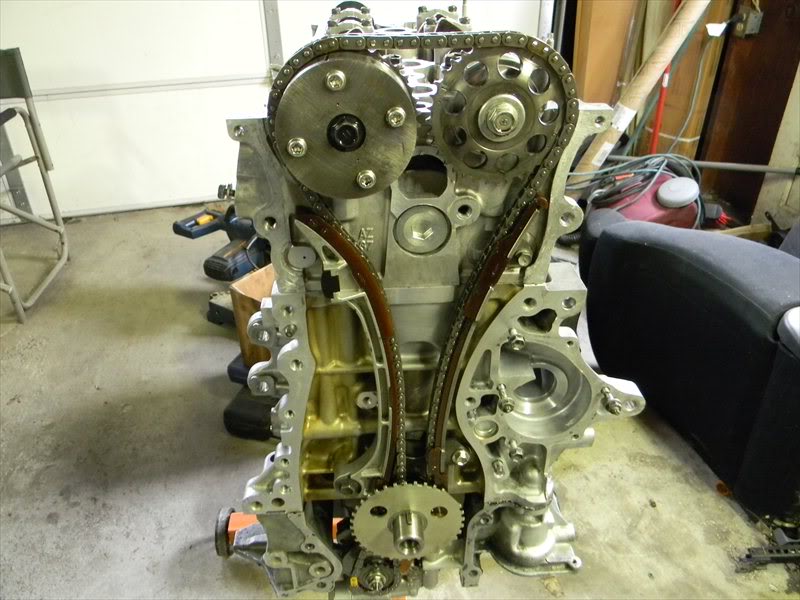
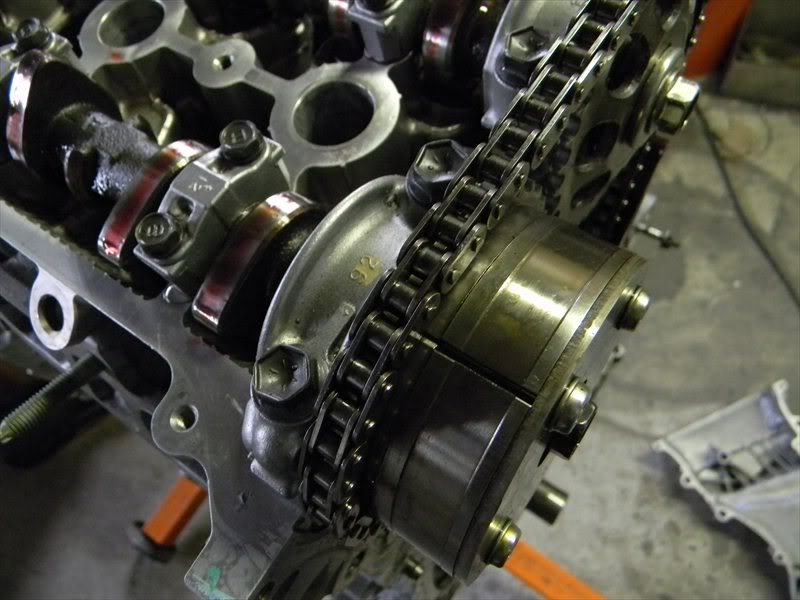
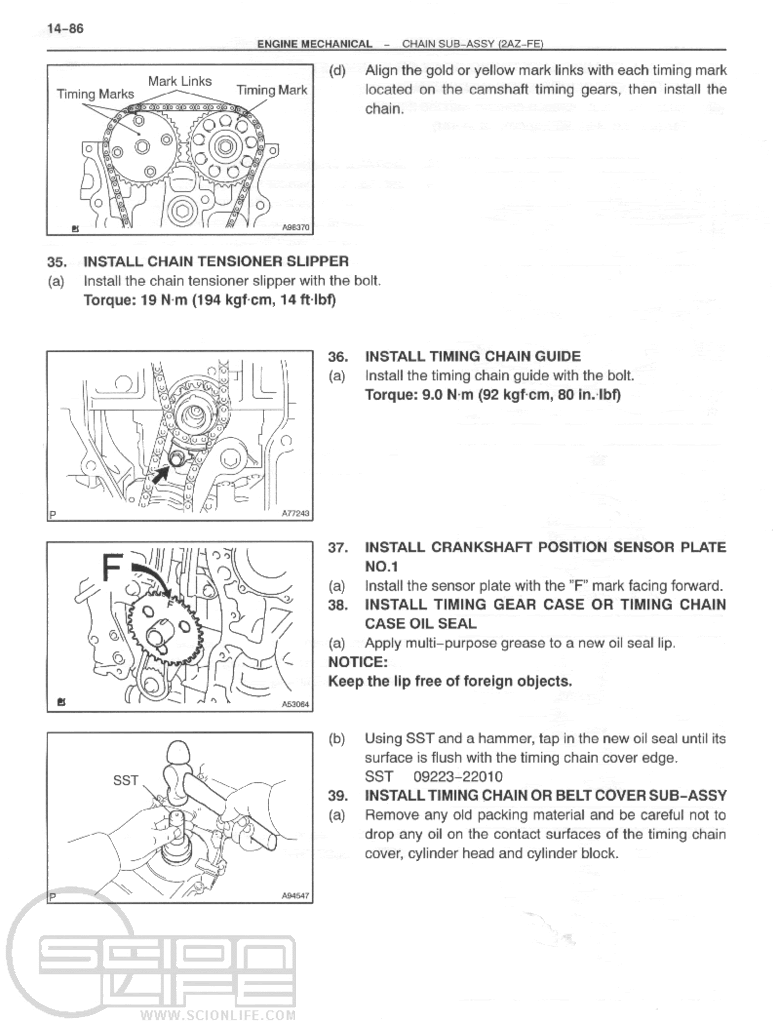
Install the chain guides
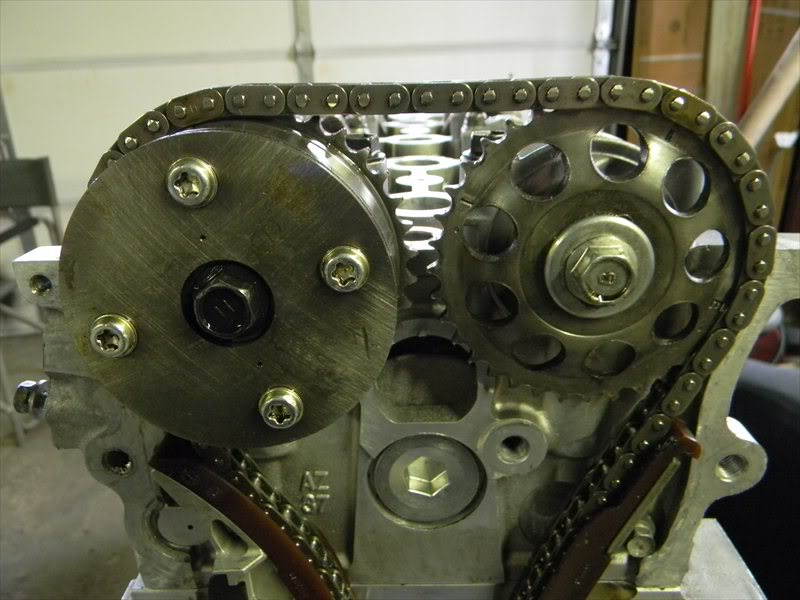
Install the crank sensor plate with the F imprint facing you
We are ready for the timing chain cover. We are going to put on the sealant in a similar fashion as the crankcase.
Now install the crank pulley. Use this to ensure your at TDC (its notched) and double check your timing.
Now install the tensioner all the way in with the hook set. Once its installed use a coat hanger or welding rod to release the hook. Turn the crankshaft counter clockwise slightly then clockwise and you should hear the tensioner click and the chain should now be tensioned.
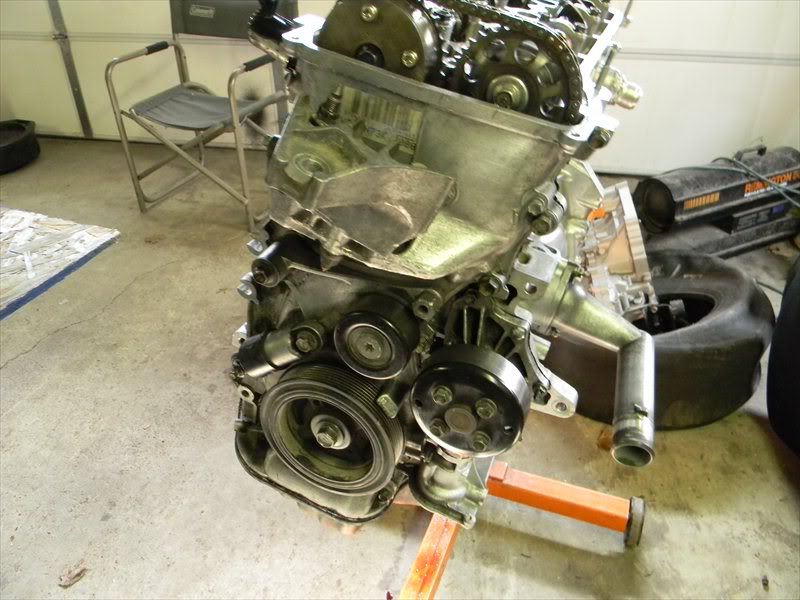
Now lets get the oil pan and install it. It installs with the Toyota sealant just like the crankcase and timing cover. These are very small bolts be careful not to overtighten and snap any of them.
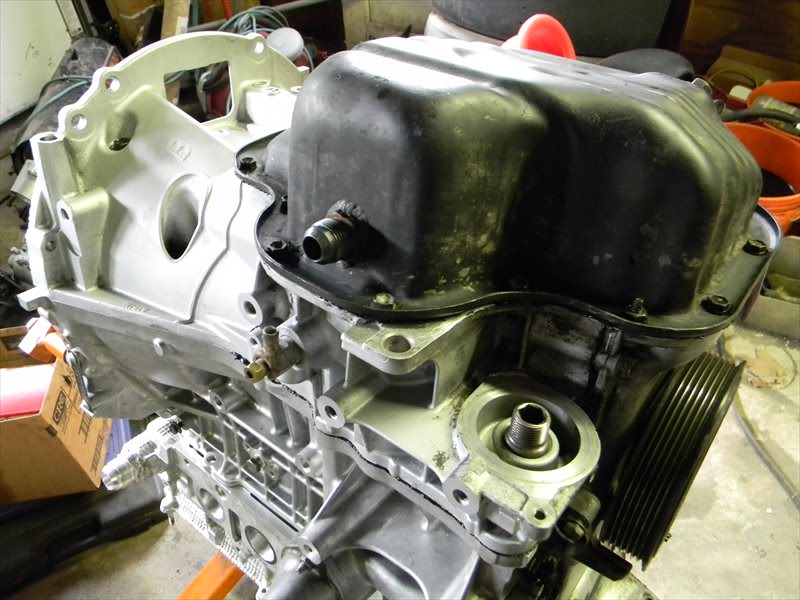
Install the water pump
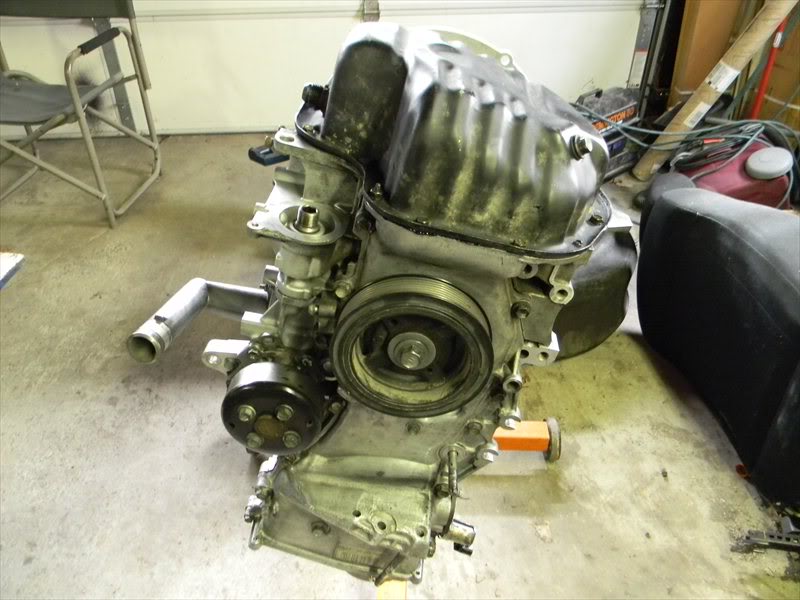
Install tensioner pulley
*I do not run A/C or Power Steering or there pulleys* Those two pulleys and the belt are up to you because my setup is custom no sense in posting it.
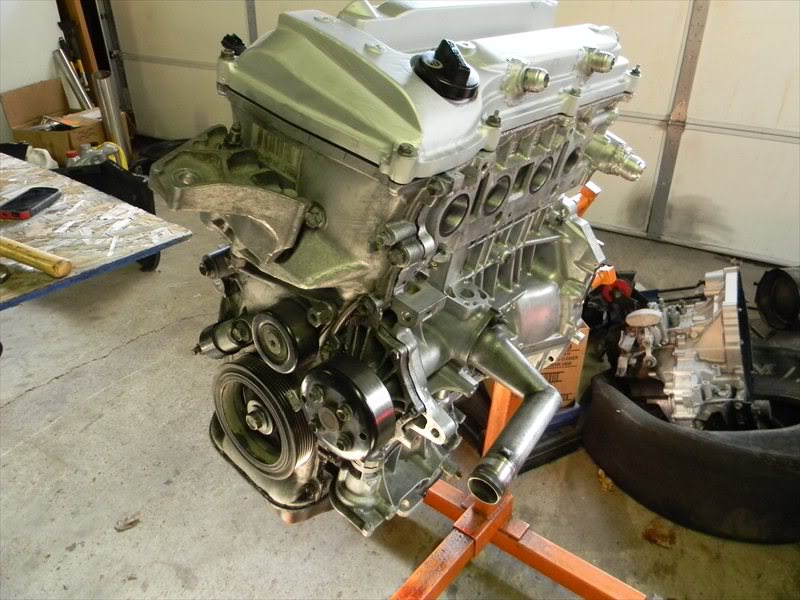
Install the valve cover
There are probably small odds and ends I skipped but common sense should help you here. If you have anything left it most likely goes somewhere.
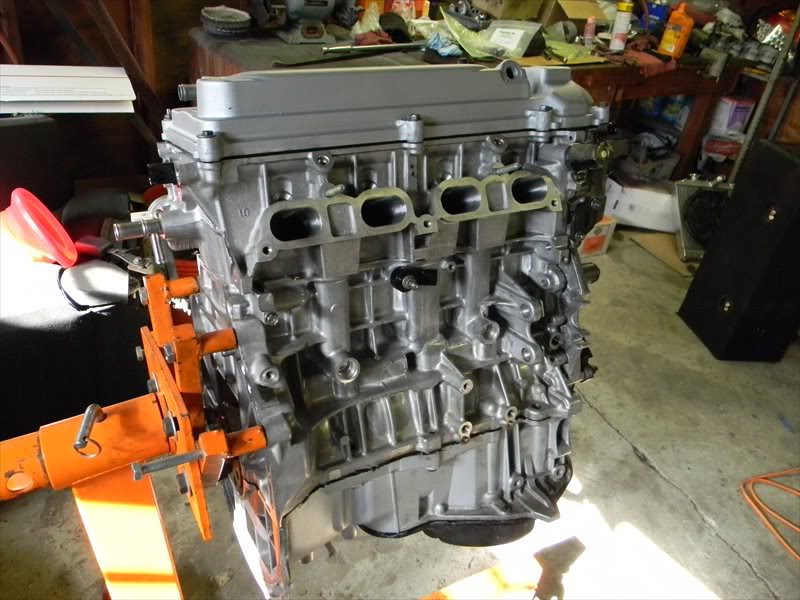
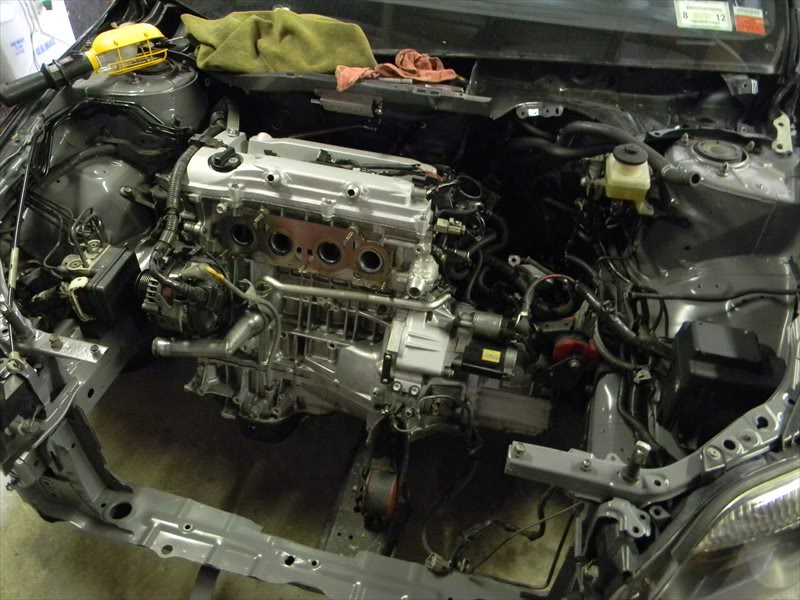
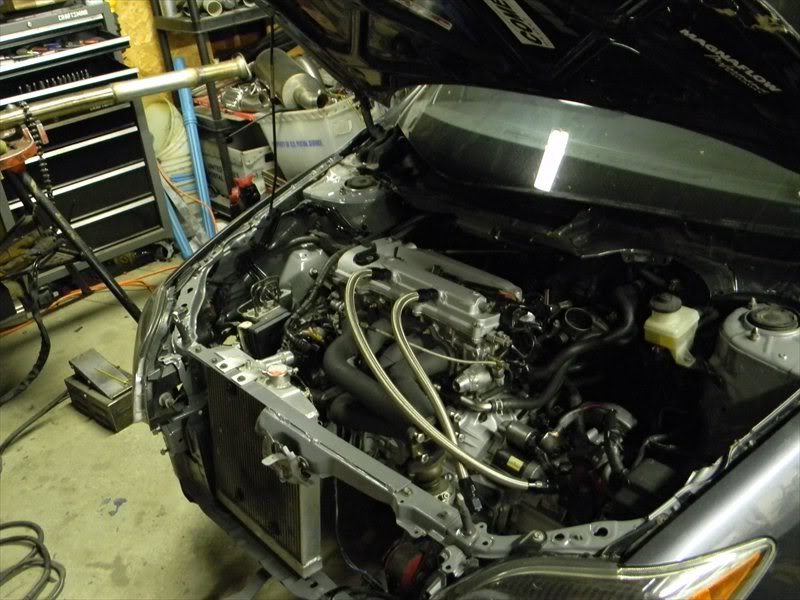
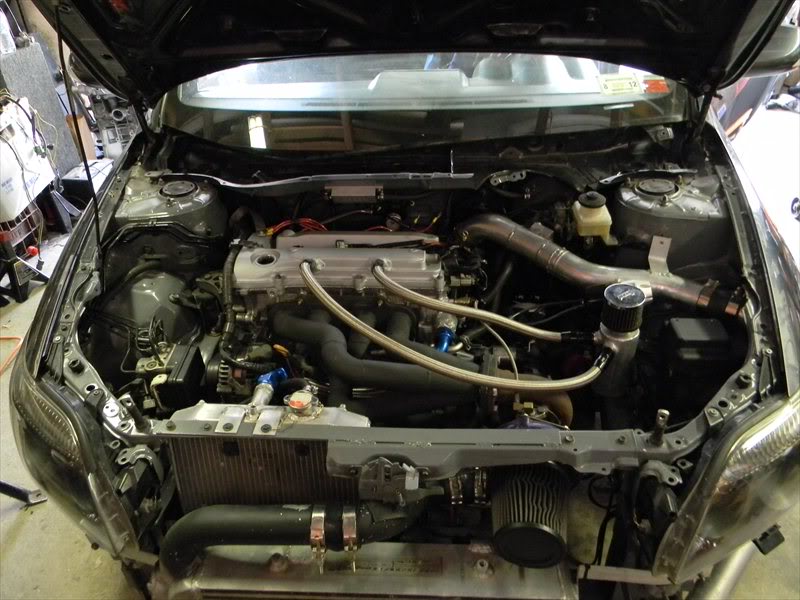
Congratulations – your longblock is assembled. You are now ready to put on the transmission and install into the car.
I will post some pictures from here out maybe they will be helpful to you.
Once the block is off the stand install the rear main seal. I lubricate it slightly and it should sit flush with the block
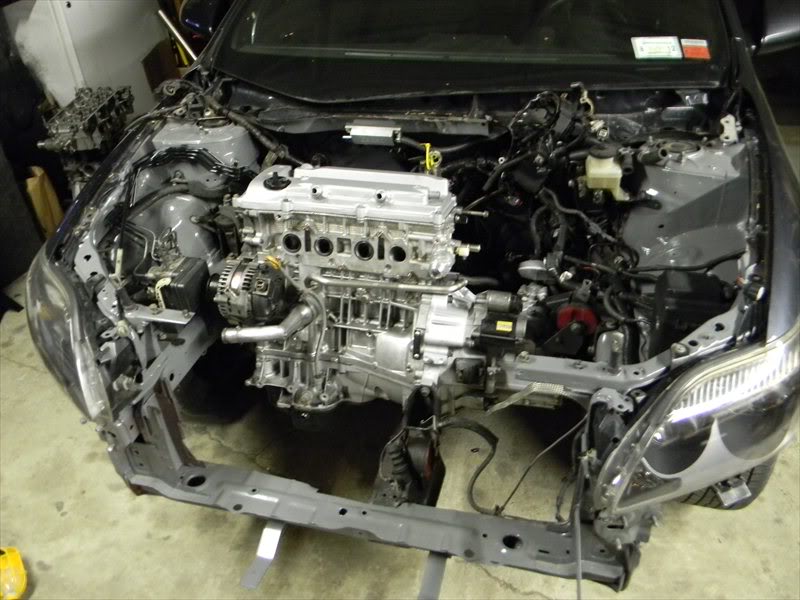
Flywheel/Clutch

Transmission

Dropped in on the engine mounts
Now we have a complete shortblock and a complete cylinder head – lets put them together.
Drop on the headgasket. Make sure all of the holes match up.
Drop the cylinder head on
Put ARP moly lube on the threads of the stud, washer base, both sides of the nut.
Torque down the nuts in sequence in several steps.
These are set to 75ft lbs and I follow the Toyota sequence
Picture 281
Now we are going to install the camshafts and the cam caps. Don’t forget the intake cam cap #1 has an upper and lower bearing.
I put ultra slick on all of the lobes and journals
All of the cam caps are numbered and point towards the timing chain
We are going to torque the cam caps down – just follow the provided diagram
Now lets do the timing. It looks overwhelming but its very simple when taken step by step.
Make sure the crankshaft is at TDC (keyway facing up)
The intake cam gear has a dot and a mark that lines up to an arrow on the #1 cam cap.
The exhaust cam gear has a vertical line that lines up to an arrow on the #1 cam cap.
Use the pictures provided for assistance
Install the chain guides
Install the crank sensor plate with the F imprint facing you
We are ready for the timing chain cover. We are going to put on the sealant in a similar fashion as the crankcase.
Now install the crank pulley. Use this to ensure your at TDC (its notched) and double check your timing.
Now install the tensioner all the way in with the hook set. Once its installed use a coat hanger or welding rod to release the hook. Turn the crankshaft counter clockwise slightly then clockwise and you should hear the tensioner click and the chain should now be tensioned.
Now lets get the oil pan and install it. It installs with the Toyota sealant just like the crankcase and timing cover. These are very small bolts be careful not to overtighten and snap any of them.
Install the water pump
Install tensioner pulley
*I do not run A/C or Power Steering or there pulleys* Those two pulleys and the belt are up to you because my setup is custom no sense in posting it.
Install the valve cover
There are probably small odds and ends I skipped but common sense should help you here. If you have anything left it most likely goes somewhere.
Congratulations – your longblock is assembled. You are now ready to put on the transmission and install into the car.
I will post some pictures from here out maybe they will be helpful to you.
Once the block is off the stand install the rear main seal. I lubricate it slightly and it should sit flush with the block
Flywheel/Clutch
Transmission
Dropped in on the engine mounts
Last edited by trd07tc; 05-02-2011 at 03:10 PM.
05-02-2011, 02:51 AM
#5
Senior Member
SL Member
Thread Starter
iTrader: (-1)
Join Date: Aug 2009
Location: Milton
Posts: 1,940
Initial Startup/Engine Break-in Procedure (my method)
MY Engine break in procedure and initial startup procedure. This is not a thread to dispute engine break in methods. This is what I do and it works so im sharing it.
Make sure all of your fluids are in and there aren’t any leaks at this point and everything is at their proper levels. All of your bolts are tight, etc – Common sense check.
Fill the engine with Non detergent 30 weight oil to its correct level (about 4 qts)
Our engine is in and ready to go. We are going to remove the spark plugs and unplug the ECU.
Crank the engine over for 20 seconds 3 different times. We are building oil pressure here and checking for leaks. You can also verify your timing again if you want.
While cranking keep an eye on the oil pressure light on your dash. Make sure it goes out.
Again – keeping an eye out for leaks (friends are useful here).
Now you can install your spark plugs and plug in the ECU.
Hopefully you have your laptop connected to your ECU and can make Air/Fuel adjustments for startup – this is up to you.
Crank the engine and fire it up. Keep an eye out for leaks again. Give it some throttle here and there while maintaining a proper AFR. Check for leaks/anything odd.
Get it to operating temperature make sure the fan kicks on.
Were going to keep the car on for about 10-15 minutes.
Shut it down – fix any leaks or anything.
Let it cool for several hours.
Drain the non detergent oil and remove the oil filter. Inspect both carefully. There should be metallic flakes. Ensure there are no chunks of well... anything but especially metal.
Put in your convential Valvoline 10w30 and a new Toyota oil filter.
You are going to be using this oil for about 100 miles. For engine break in you want to do a lot of varying throttle up to about 60-70%. You are going to want to do a lot of engine braking – down hills is good.
Drain the valvoline oil and remove the oil filter and inspect both carefully.
Put in your favorite synthetic oil and a new oil filter and enjoy your car
Last edited by trd07tc; 05-02-2011 at 03:15 AM.


 05-02-2011, 03:17 PM
#12
Senior Member
SL Member

Join Date: Jul 2007
Location: West Palm Beach, FL
Posts: 3,773

