
05 Greddy Kit 256hp and 275tq **Added some pics.
 01-03-2008, 08:11 PM
#1
Senior Member

Scionetics
SL Member
Thread Starter

Join Date: Sep 2005
Location: Phoenix, AZ
Posts: 151
Well as some of you know I decided to go turbo on my 05 Scion tC. First off I would like to thank the following for there help on getting this project started (Below is the list of parts or services from each company)
SportCompactOnly.com
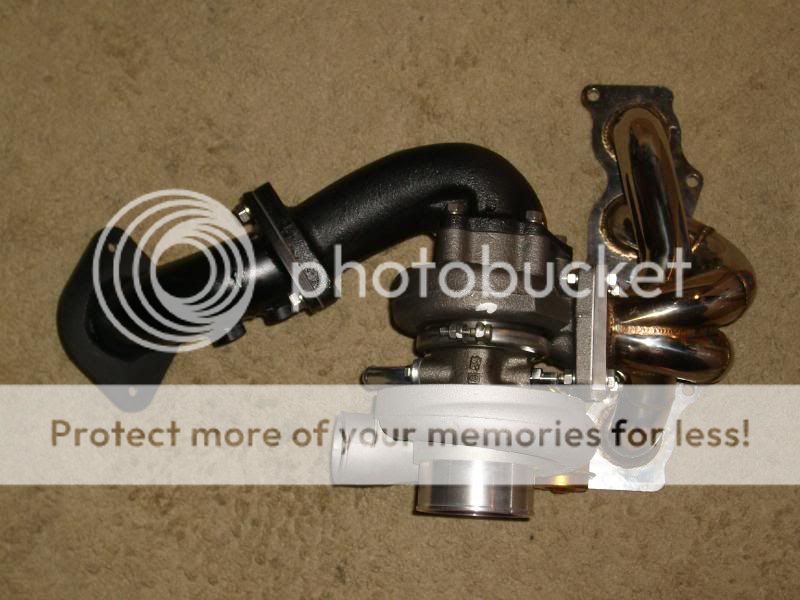
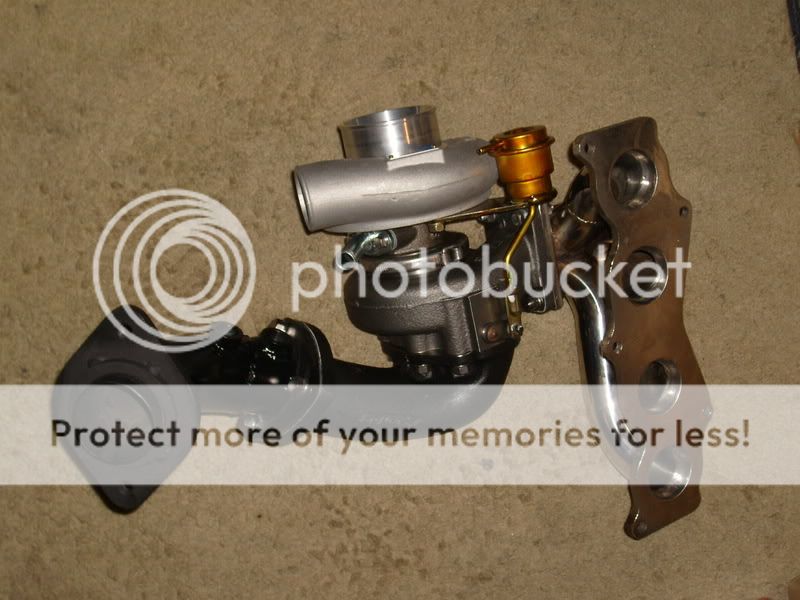
Greddy Turbo Kit
Greddy Fuel Option 2 (EMU)
Greddy BOV Type RS
Greddy BOV Mounting Flange
Greddy Pressure Sensor
Greddy Profec B Spec II Boost Controller
Greddy Turbo Timer
AEM UEGO Wideband AF Gauge type
Auto Meter Boost Gauge
Auto Meter Oil Pressure Gauge
All Fit Oil Sandwich Adaptor
Full-Race.com
Welded Oil Pan fitting for Oil return Line
Welded BOV Flange to I/C Piping
Welded O2 Bung for AEM UEGO sensor to Dump Pipe
Full Race Vacuum Block 5 Port
Dezodwest.com
Plug N Play Greddy Emanage Ultimate Harness
Glow Shift Direct
3 Gauge A-pillar
UMS Tuning
Center Force Dual Friction Clutch
Tuning
Part 1 � 12-18-07
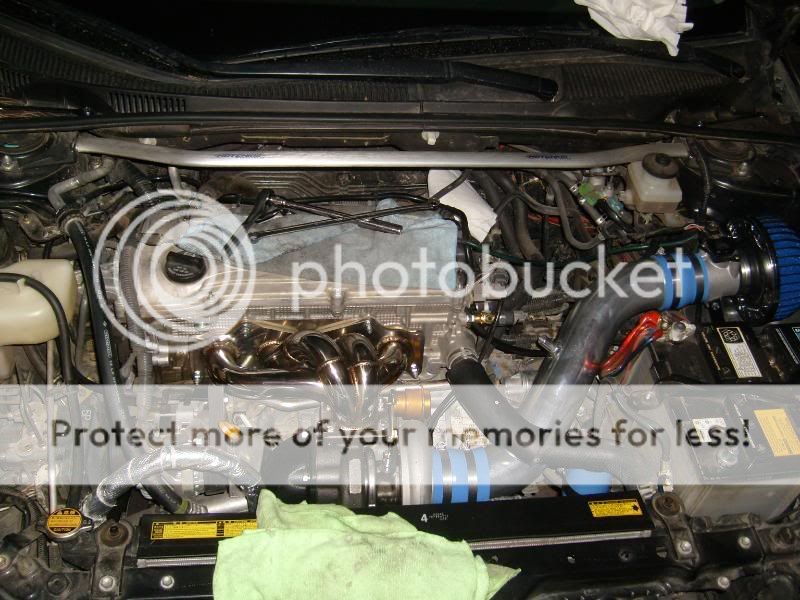
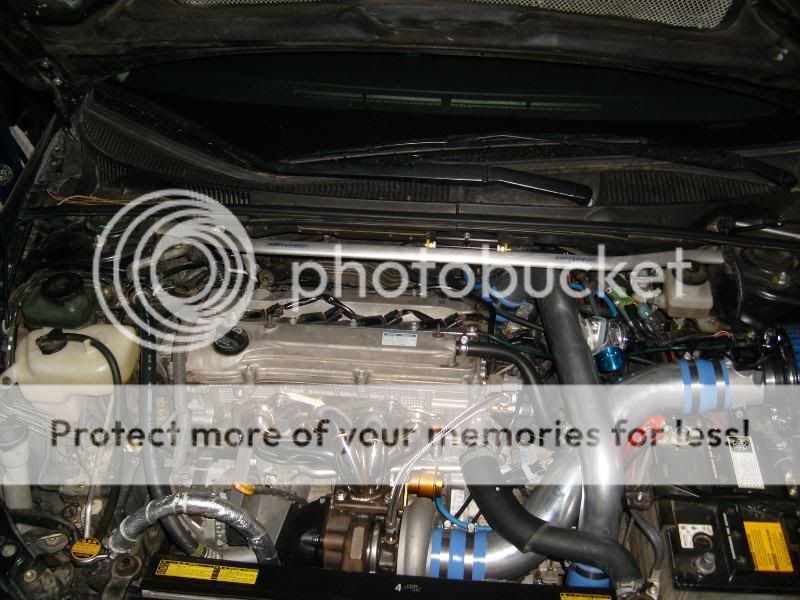
After receiving almost everything I started working on some things around 4pm on Sunday 12-18-07 (had to work on another car prior to mine). Ok mainly this day was break down then mounting certain part for measurements since I will be taking some parts to Full Race for welding. So as of right now the intercooler piping is up, headers and intake have been remove, and rerouted a bunch of lines that was in the way. So Monday 12-19-07 i/c piping, down pipe, and oil pan are going out for welding. Unfortunately I won't have time tomorrow to get to installing more parts but Wednesday should be interesting. Pics Below
One Last Look At Old N/A Setup
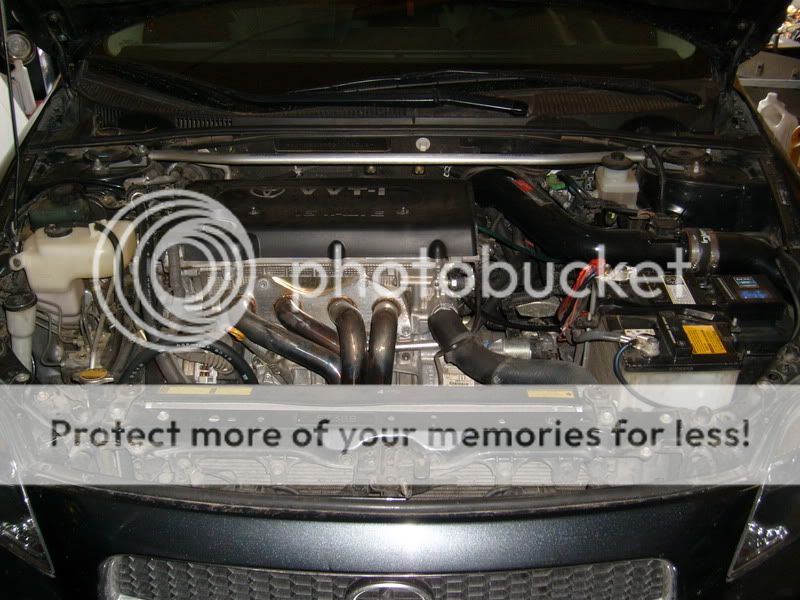
Break Down
Intercooler

Part 2 � 11/24/07
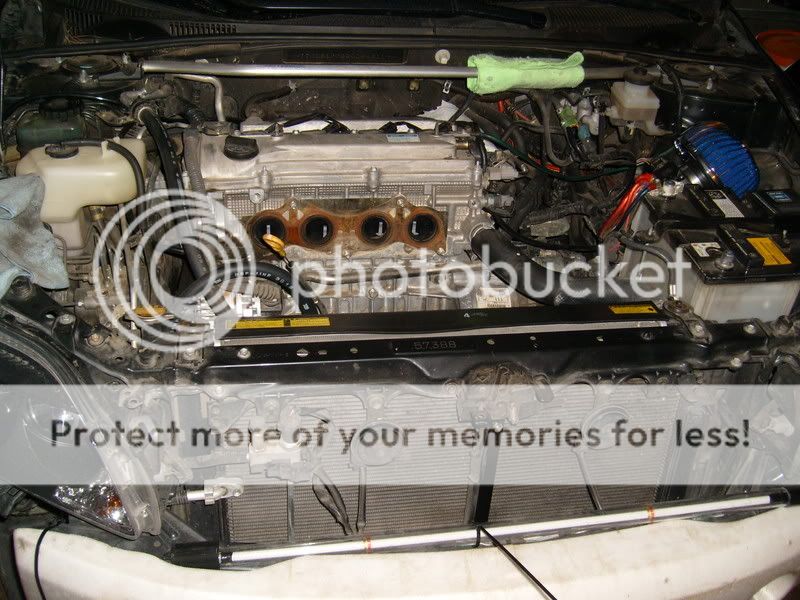
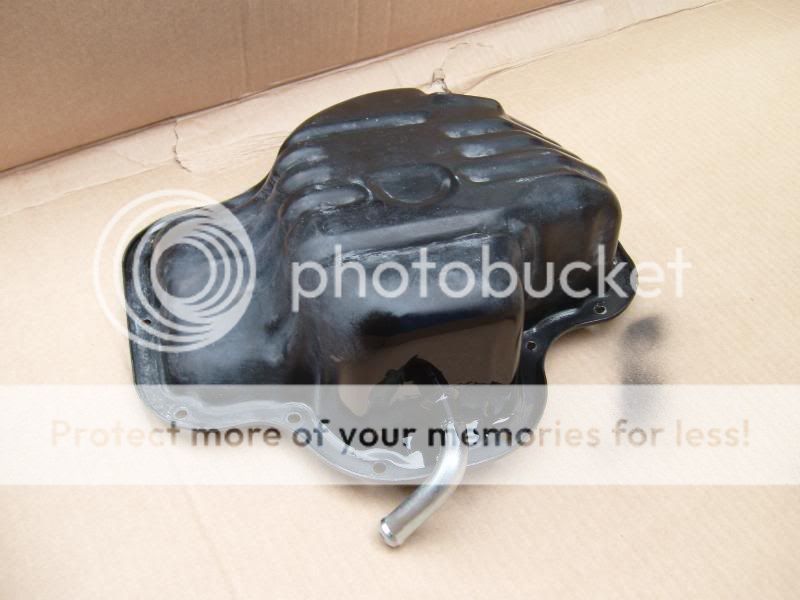
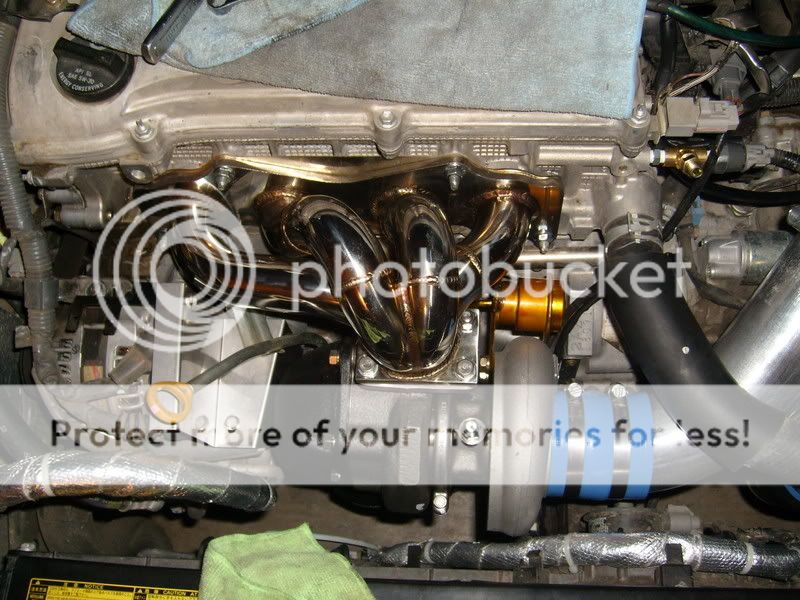
OK so this past Wednesday I got the part back from Full-Race but due to the Holidays I haven�t been able to do much. Today install portion included building the turbo assembly, wrapping a/c lines, further rerouting of line, boost solenoid, heat shield, painting and installing oil pan, and finishing the routing of the I/C piping before I head out for the rest of the weekend.

Part 3 � 11/28/07
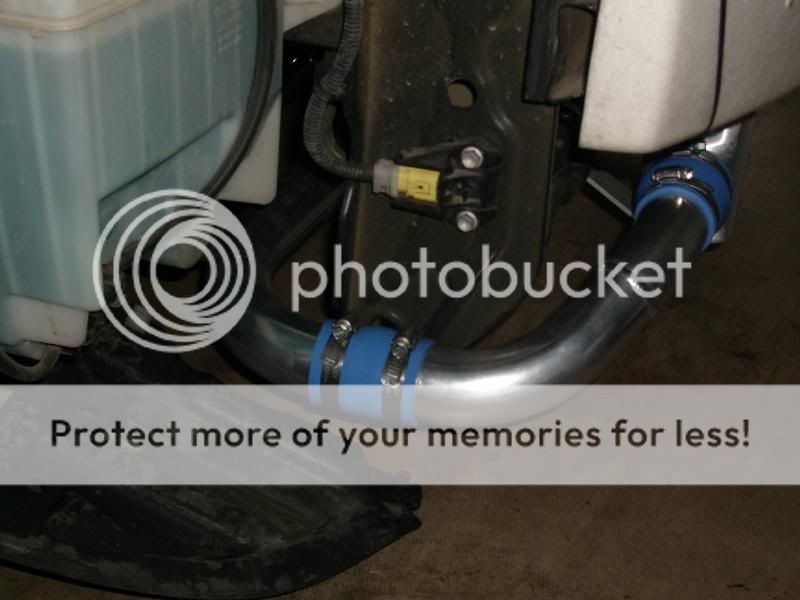
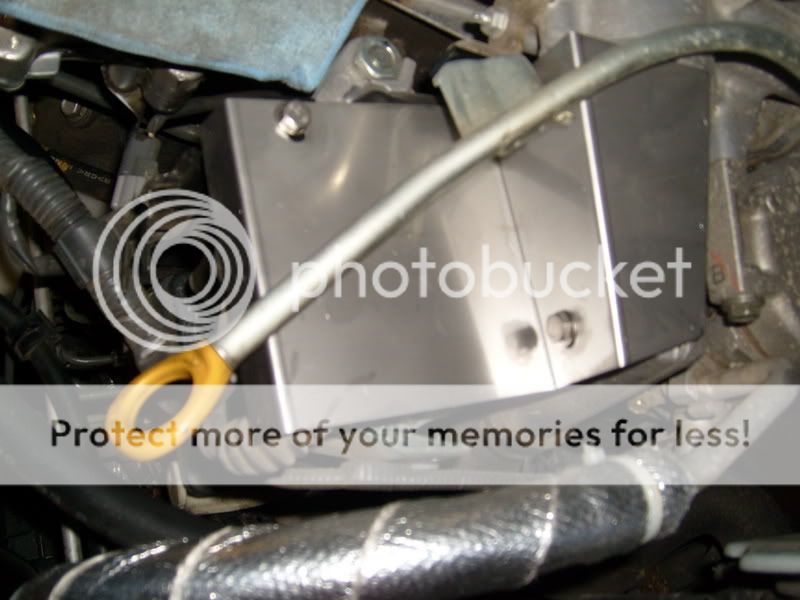
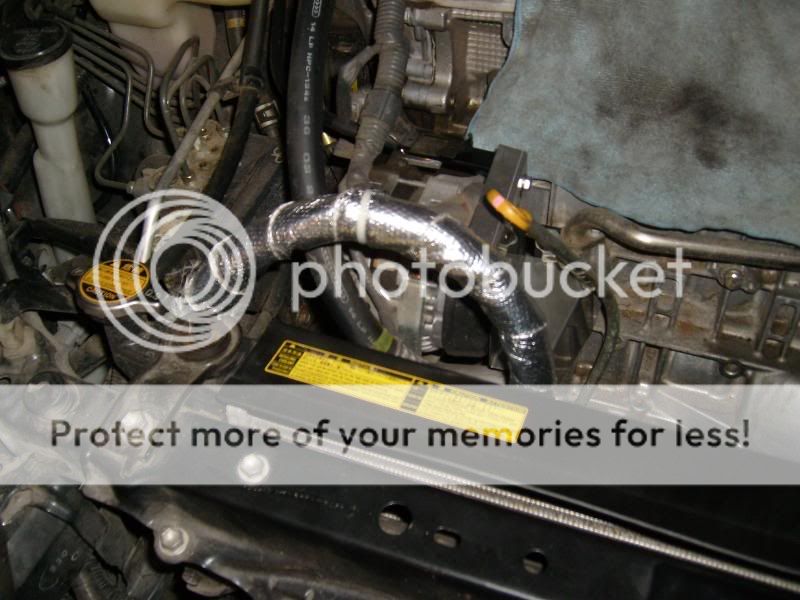
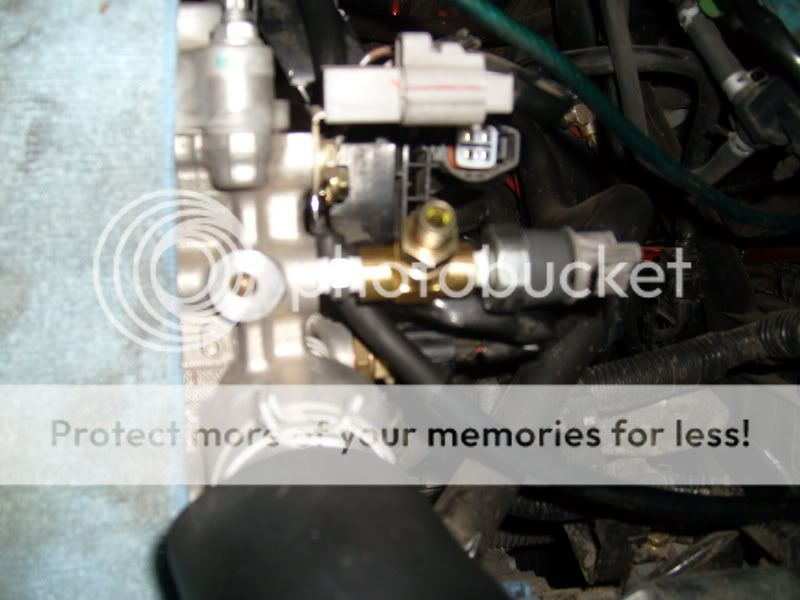
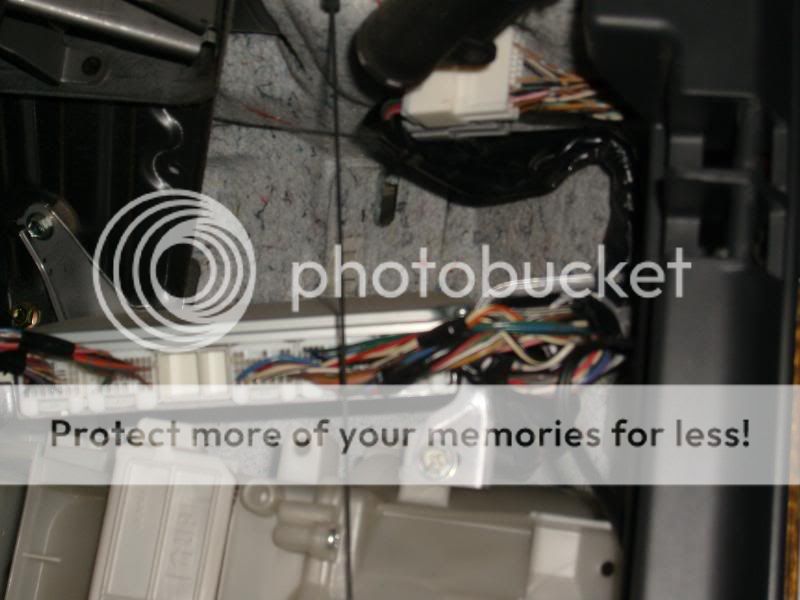
Ok so a couple days have passed and I have been slammed with other things I needed to take care of before getting back to the tC. So now comes the fun part, I took care of the oil fitting for the oil pressure line going to the turbo (Used Hi Temp Silicone like the oil pan). So got to working on routing everything through the firewall which included the nylon line for the boost gauge, vacuum/electrical line for the boost controller, and the electrical line for the AEM UEGO Sensor. This is a bit of a pain but since I already had some wires routed though this wasn�t too bad. After getting all the lines into the car the next part was connecting everything inside the vehicle. For the boost controller and turbo timer I wanted to place these in the cubby below the radio and A/C controls. This required a bit of time since my A/V 2 way switch was already there. So in that instance I rerouted all the A/V wires and switch between the passenger seat and the center console. Also with boost controller hose being somewhat big I had to cut a section out behind the cubby. After doing all that I finally got the Profec B wires and vacuum line connected along with the turbo timer wires connected. From here the turbo time red, blue, and green wires were connect to the ignition switch and the brown wire to the parking brake (Purple wire not connect yet explain later). After that I started on the A-pillar modification to mount the AEM and Boost gauge (Autometer pressure sensor doesn�t fit the All Fit Oil Adaptor, will worry about this later). Drill the holes based off the Glow Shift A-pillar and attached it to the stock pillar. Glow shift A-pillar was a little short but for 25 shipped and got it in two day I�m not going to complain. After doing that I start routing the AEM wire through the car up to the A pillar (if you are doing this there is a small gap near the back end). Next was the boost gauge I route the nylon wire up and notice they didn�t provided the electrical wires. Since I finish an audio/lighting project for someone I still had some parts left. Wire the Boost gauge (back light) to a switch I had laying around since I didn�t want to take the time to connect it to the headlight switch (battery disconnected and didn�t want to attach and take the time to test all the wires). After getting that routed got the AEM UEGO Power wire connect to the yellow wire (Key On) on the ignition switch and ground all the gauges, timer, and boost controller. Last cleaned up all the wiring and since it�s about midnight I�m going to sleep. Probably be another few days before the next update.


Part 4 � 12/3/07
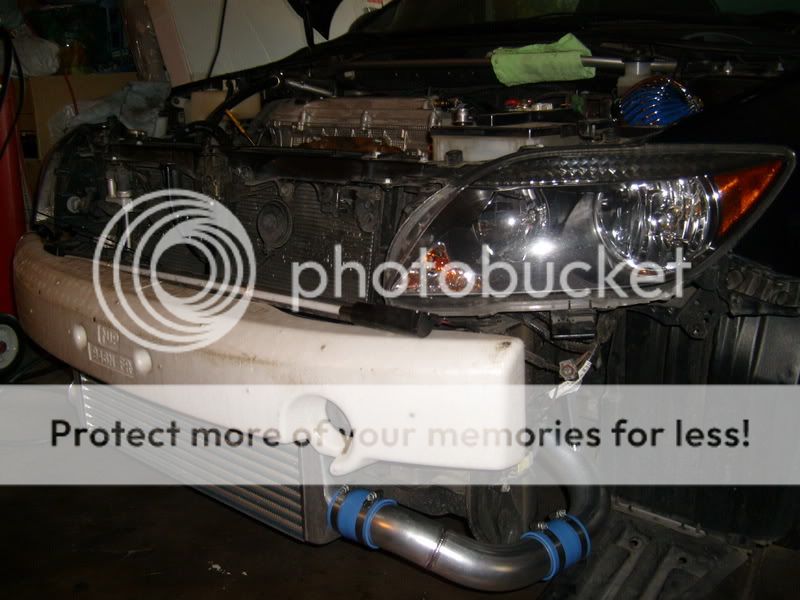
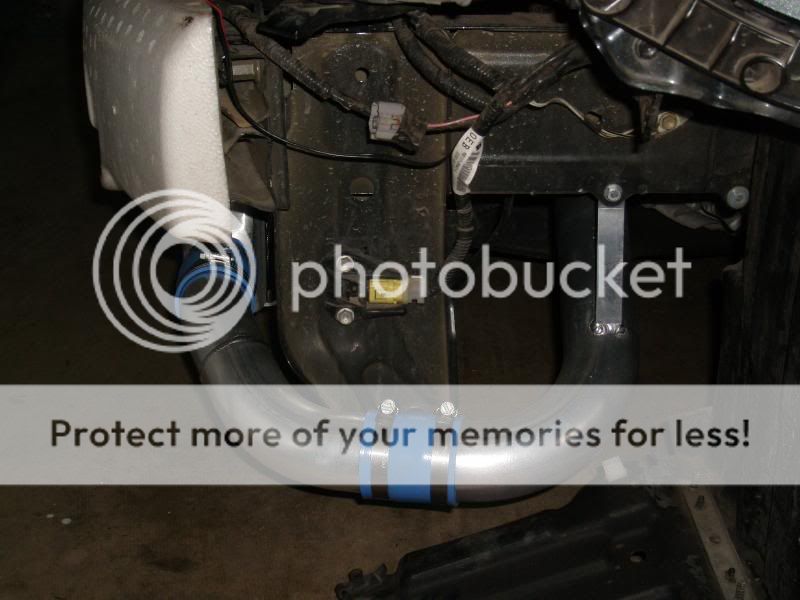
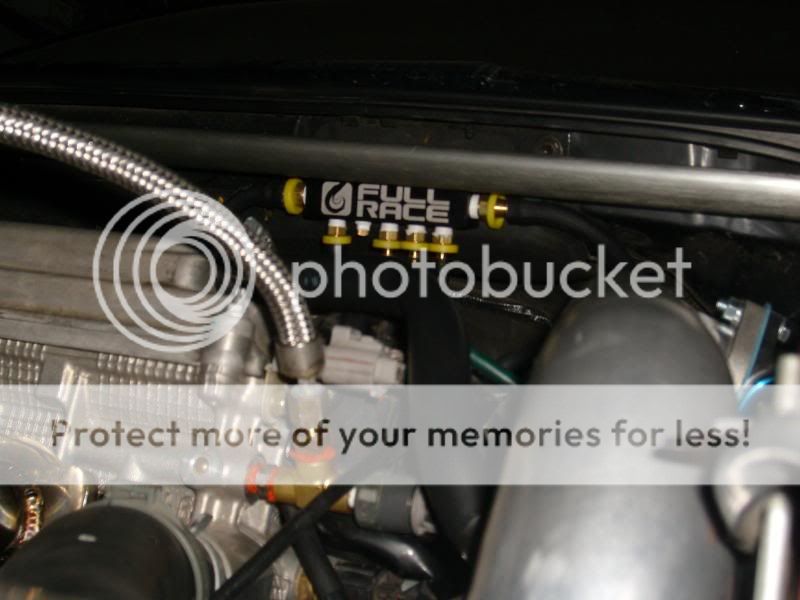
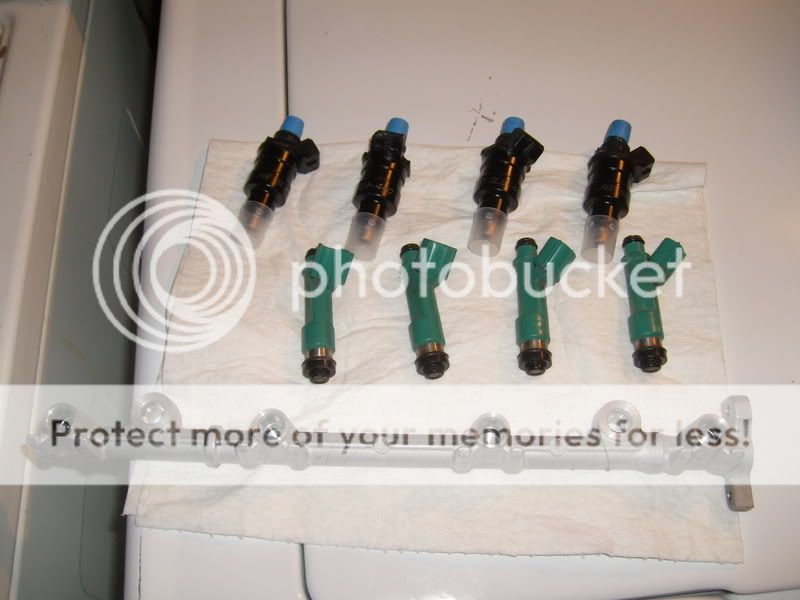
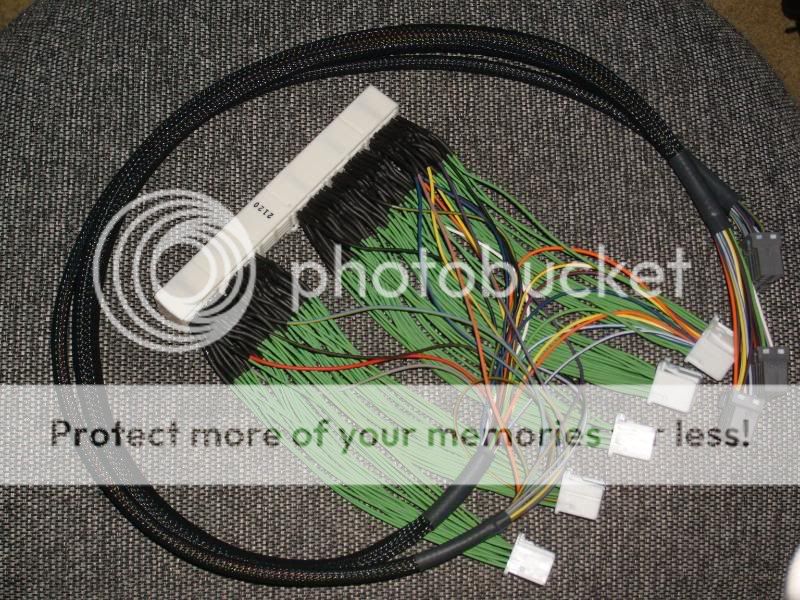
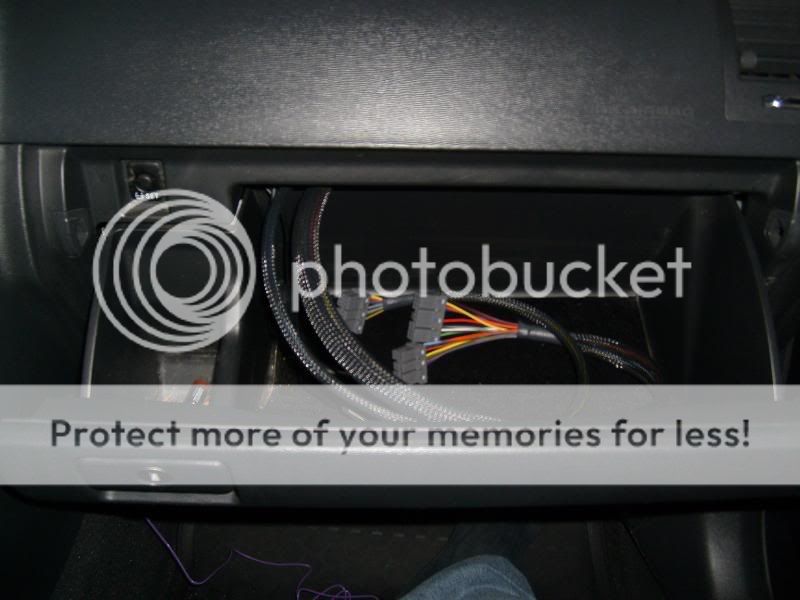
So it�s been a long week as I have been in search of a PNP harness for the EMU. After contacting 3 to 4 different companies I finally remembered Dezod has the harness for the EMU. Email Joe at DezodWest.com and he got me the EMU harness plus 2 day shipping after the harness has been made. So the next task at hand today was the Full Race vacuum block and fuel injectors (install the last I/C pipe w/ BOV Welded on). Getting started I spliced the vacuum block into the brake booster and attached the line for the boost gauge, BOV, boost controller and boost controller solenoid. Next took out the fuel rail and injector and swapped to the 440cc. Note: due to the size of the fuel injectors you do need to grind certain spots for fitment (this took me a while since my compressor is pretty small). After that swapped over the O-ring for the injectors and reinstall the rail plus injectors. Now the only thing left is the harness for the EMU which should be here on Friday, plus cutting the bumper to fit.

Part 5 � 12-9-07
On 12-7-07 I received the harness I ordered from Dezod and connect the harness in. Unfortunately I had to leave town for the weekend but was back on Sunday afternoon. I connected the EMU and did some final touches to the car. When I went to crank the car to get oil pressure nothing happened. So I called a friend who had the EMU software on his laptop and plugged it in. Unfortunately the EMU was blank, but I was able to get the EMU upload with the Greddy base map that Dezod had on there website under the Tech Notes. So I cranked the car for a bit until the oil light turned off plugged everything back in and started the car. About 3 minutes later I noticed a small oil leak from the oil pressure line. Fix that and the car was running. Unfortunately do to my lack of knowledge with the EMU I did not want to drive the car since the base map wasn�t setup by Greddy originally. So I talk to UMS and will be taking it there for tuning.
Part 6 � 12-12-07 (Sorry Forgot My Camera)
Towed my car to UMS today around 3pm and got the car on the Dyno. After getting everything setup Tony did his thing. After getting some quick test runs I was informed that I should purchased a Greddy Boost Pressure sensor to make thing easier on the tuning side. Unfortunately I did not have the money for that at the moment so Tony continued with the tuning. I didn�t pay much attention but I did happen to notice the 240 something torque that the car put out. After a little while Tony came across a problem that I was hoping wouldn�t happen (but I did expect it to happen), the clutch started slipping. After that it was time to call it a day. Got the car back home and will be ordering the last two parts in the next few days and will return to UMS for the Final tune. As for now I am driving the car with no problems yet but not hitting boost due to the clutch. More to come, hopefully soon.
Part 7 � 12/29/07 (No Camera)
Well I got my Center Force Clutch and Greddy pressure sensor in over the past few days and off to Tucson to work on my clutch at my brother�s shop. Started the tear down today around 3pm and got the new clutch in. Note: If you are planning on doing your own clutch and do not have experience I highly recommend you seek help from a professional before doing so. Like most Toyota�s you will need to brace the engine and then drop the sub frame prior to removing the transmission. Anyways it got a little late so I lubed the T.O.B. and reinstalled the transmission and left engine mount. The next day was fairly simple reinstalled the sub-frame, front & rear mount, misc wires, and intake pipes. Since I did all this I change the transmission fluid while I was at it since is been about 30k miles since the last. After that cleaned up and went for a test run. Everything seemed good so back to Phoenix and Final tune with UMS.
Part 8 � 1/3/08
Well took the car to UMS this morning and got it on the dyno. Needless to say there were still some complications. It seems my car runs like it has a vacuum leak but was unable to locate any leak. So Tony continued on with the dyno tuning. After a few runs and switching certain vacuum lines Tony found a problem with the rod connecting to the solenoid for the waste gate. With a few minor adjustments he fixed the problem and started tuning now using the boost controller. Few more runs and minor adjustment we ended up at 256.7 horsepower and 275.5 foot pound of torque at about 9psi. Of course I had to open my mouth and ask about the exhaust leak that they had heard before so Tony took a look and found that there is a leak from my manifold right in between the welding on the back side. So now I have another problem to deal with and will be contacting Greddy to see what they might be able to do. I will post the charts as soon as I scan them in.
SportCompactOnly.com
Greddy Turbo Kit
Greddy Fuel Option 2 (EMU)
Greddy BOV Type RS
Greddy BOV Mounting Flange
Greddy Pressure Sensor
Greddy Profec B Spec II Boost Controller
Greddy Turbo Timer
AEM UEGO Wideband AF Gauge type
Auto Meter Boost Gauge
Auto Meter Oil Pressure Gauge
All Fit Oil Sandwich Adaptor
Full-Race.com
Welded Oil Pan fitting for Oil return Line
Welded BOV Flange to I/C Piping
Welded O2 Bung for AEM UEGO sensor to Dump Pipe
Full Race Vacuum Block 5 Port
Dezodwest.com
Plug N Play Greddy Emanage Ultimate Harness
Glow Shift Direct
3 Gauge A-pillar
UMS Tuning
Center Force Dual Friction Clutch
Tuning
Part 1 � 12-18-07
After receiving almost everything I started working on some things around 4pm on Sunday 12-18-07 (had to work on another car prior to mine). Ok mainly this day was break down then mounting certain part for measurements since I will be taking some parts to Full Race for welding. So as of right now the intercooler piping is up, headers and intake have been remove, and rerouted a bunch of lines that was in the way. So Monday 12-19-07 i/c piping, down pipe, and oil pan are going out for welding. Unfortunately I won't have time tomorrow to get to installing more parts but Wednesday should be interesting. Pics Below
One Last Look At Old N/A Setup
Break Down
Intercooler
Part 2 � 11/24/07
OK so this past Wednesday I got the part back from Full-Race but due to the Holidays I haven�t been able to do much. Today install portion included building the turbo assembly, wrapping a/c lines, further rerouting of line, boost solenoid, heat shield, painting and installing oil pan, and finishing the routing of the I/C piping before I head out for the rest of the weekend.
Part 3 � 11/28/07
Ok so a couple days have passed and I have been slammed with other things I needed to take care of before getting back to the tC. So now comes the fun part, I took care of the oil fitting for the oil pressure line going to the turbo (Used Hi Temp Silicone like the oil pan). So got to working on routing everything through the firewall which included the nylon line for the boost gauge, vacuum/electrical line for the boost controller, and the electrical line for the AEM UEGO Sensor. This is a bit of a pain but since I already had some wires routed though this wasn�t too bad. After getting all the lines into the car the next part was connecting everything inside the vehicle. For the boost controller and turbo timer I wanted to place these in the cubby below the radio and A/C controls. This required a bit of time since my A/V 2 way switch was already there. So in that instance I rerouted all the A/V wires and switch between the passenger seat and the center console. Also with boost controller hose being somewhat big I had to cut a section out behind the cubby. After doing all that I finally got the Profec B wires and vacuum line connected along with the turbo timer wires connected. From here the turbo time red, blue, and green wires were connect to the ignition switch and the brown wire to the parking brake (Purple wire not connect yet explain later). After that I started on the A-pillar modification to mount the AEM and Boost gauge (Autometer pressure sensor doesn�t fit the All Fit Oil Adaptor, will worry about this later). Drill the holes based off the Glow Shift A-pillar and attached it to the stock pillar. Glow shift A-pillar was a little short but for 25 shipped and got it in two day I�m not going to complain. After doing that I start routing the AEM wire through the car up to the A pillar (if you are doing this there is a small gap near the back end). Next was the boost gauge I route the nylon wire up and notice they didn�t provided the electrical wires. Since I finish an audio/lighting project for someone I still had some parts left. Wire the Boost gauge (back light) to a switch I had laying around since I didn�t want to take the time to connect it to the headlight switch (battery disconnected and didn�t want to attach and take the time to test all the wires). After getting that routed got the AEM UEGO Power wire connect to the yellow wire (Key On) on the ignition switch and ground all the gauges, timer, and boost controller. Last cleaned up all the wiring and since it�s about midnight I�m going to sleep. Probably be another few days before the next update.
Part 4 � 12/3/07
So it�s been a long week as I have been in search of a PNP harness for the EMU. After contacting 3 to 4 different companies I finally remembered Dezod has the harness for the EMU. Email Joe at DezodWest.com and he got me the EMU harness plus 2 day shipping after the harness has been made. So the next task at hand today was the Full Race vacuum block and fuel injectors (install the last I/C pipe w/ BOV Welded on). Getting started I spliced the vacuum block into the brake booster and attached the line for the boost gauge, BOV, boost controller and boost controller solenoid. Next took out the fuel rail and injector and swapped to the 440cc. Note: due to the size of the fuel injectors you do need to grind certain spots for fitment (this took me a while since my compressor is pretty small). After that swapped over the O-ring for the injectors and reinstall the rail plus injectors. Now the only thing left is the harness for the EMU which should be here on Friday, plus cutting the bumper to fit.
Part 5 � 12-9-07
On 12-7-07 I received the harness I ordered from Dezod and connect the harness in. Unfortunately I had to leave town for the weekend but was back on Sunday afternoon. I connected the EMU and did some final touches to the car. When I went to crank the car to get oil pressure nothing happened. So I called a friend who had the EMU software on his laptop and plugged it in. Unfortunately the EMU was blank, but I was able to get the EMU upload with the Greddy base map that Dezod had on there website under the Tech Notes. So I cranked the car for a bit until the oil light turned off plugged everything back in and started the car. About 3 minutes later I noticed a small oil leak from the oil pressure line. Fix that and the car was running. Unfortunately do to my lack of knowledge with the EMU I did not want to drive the car since the base map wasn�t setup by Greddy originally. So I talk to UMS and will be taking it there for tuning.
Part 6 � 12-12-07 (Sorry Forgot My Camera)
Towed my car to UMS today around 3pm and got the car on the Dyno. After getting everything setup Tony did his thing. After getting some quick test runs I was informed that I should purchased a Greddy Boost Pressure sensor to make thing easier on the tuning side. Unfortunately I did not have the money for that at the moment so Tony continued with the tuning. I didn�t pay much attention but I did happen to notice the 240 something torque that the car put out. After a little while Tony came across a problem that I was hoping wouldn�t happen (but I did expect it to happen), the clutch started slipping. After that it was time to call it a day. Got the car back home and will be ordering the last two parts in the next few days and will return to UMS for the Final tune. As for now I am driving the car with no problems yet but not hitting boost due to the clutch. More to come, hopefully soon.
Part 7 � 12/29/07 (No Camera)
Well I got my Center Force Clutch and Greddy pressure sensor in over the past few days and off to Tucson to work on my clutch at my brother�s shop. Started the tear down today around 3pm and got the new clutch in. Note: If you are planning on doing your own clutch and do not have experience I highly recommend you seek help from a professional before doing so. Like most Toyota�s you will need to brace the engine and then drop the sub frame prior to removing the transmission. Anyways it got a little late so I lubed the T.O.B. and reinstalled the transmission and left engine mount. The next day was fairly simple reinstalled the sub-frame, front & rear mount, misc wires, and intake pipes. Since I did all this I change the transmission fluid while I was at it since is been about 30k miles since the last. After that cleaned up and went for a test run. Everything seemed good so back to Phoenix and Final tune with UMS.
Part 8 � 1/3/08
Well took the car to UMS this morning and got it on the dyno. Needless to say there were still some complications. It seems my car runs like it has a vacuum leak but was unable to locate any leak. So Tony continued on with the dyno tuning. After a few runs and switching certain vacuum lines Tony found a problem with the rod connecting to the solenoid for the waste gate. With a few minor adjustments he fixed the problem and started tuning now using the boost controller. Few more runs and minor adjustment we ended up at 256.7 horsepower and 275.5 foot pound of torque at about 9psi. Of course I had to open my mouth and ask about the exhaust leak that they had heard before so Tony took a look and found that there is a leak from my manifold right in between the welding on the back side. So now I have another problem to deal with and will be contacting Greddy to see what they might be able to do. I will post the charts as soon as I scan them in.


 01-04-2008, 12:05 AM
#7
Senior Member
SL Member

Join Date: Aug 2004
Location: VEGAS BABY!
Posts: 9,061
Just out of curiosity (you can ignore me if I'm being nosy) but with you being in Pheonix and within driving distance of FullRace, I'm just wondering why you chose the Greddy kit over a Turbo Toyotas kit?
01-04-2008, 12:10 AM
#8


Congrats Ed, cannot wait until she is tuned and little issues fixed. You should definitly be over 256 @ 9 psi. Tq looks good, is the tuner running stock timing or did he pull a little..?
01-04-2008, 03:40 PM
#9
Senior Member
Scionetics
SL Member
Thread Starter
Join Date: Sep 2005
Location: Phoenix, AZ
Posts: 151
Well to answer all the questions
chicotunner07
Total build was a little under 5000 since install was done by me (except tuning and welding)
Vaccum block isn't necessary but makes it easier when you have 4 or 5 line that need a vacuum source so you don't have to cut a line to many times.
Mr Meaty
I really wanted to go with Turbo Toyota's kit but due to price and adding in all the additional things i wouldn't have been able to get everything. (plus Sportcompactonly had some awesome deals) Also i have had a greddy kit in the past and never had a problem with it before so i figured it would be the same with this one.
Garage1217
Ums did try to pull timing but it made little to no difference so it's at stock timing right now since either way it pushed about the same hp. I'm hoping after the manifold gets fixed I should be able to get a little more and i still need to run through and check for a vacuum leak which i couldn't find last night and i even went through and resealed connectors.
so hopefully i'll have this all done by that precision scion show if not i'm just gonna show the car.
01-05-2008, 01:40 AM
#10
Senior Member
Music City Scions
Scikotics
SL Member

Join Date: Jun 2005
Location: TN
Posts: 16,747
Good job man. I only have two inputs. If you ever need to change out your tranny or put in another clutch, you don't have to drop the sub-frame. The second input was that for a little more reliability with the GReddy kit, think about an external WG in the future. Not sure if they have revised their kit since their time to market, but a lot of cars had trouble with the internal WG being stuck and not regulating boost very well.


 01-05-2008, 02:44 PM
#17
Senior Member
Music City Scions
Scikotics
SL Member
Join Date: Jun 2005
Location: TN
Posts: 16,747
Originally Posted by gonzo66
i heard a whisper around SL about turbo toyotas making an EL manifold with an EW option for the greddy Kit 
Are they making a specific one for GReddy though, or are they using the manifold that they said was to replace the ZPI manifold? As the ZPI manifold would also fit the GReddy turbine.
 01-06-2008, 05:25 AM
#20
Senior Member
Scionetics
SL Member
Thread Starter
Join Date: Sep 2005
Location: Phoenix, AZ
Posts: 151
I will try to get a video one of these day but the BOV on mine sound a little weird since the charge pipe is right in front of it. about the internal gate i haven't heard of that many problems unless people were going 12psi or higher so i figure setting it around 8 or 9 i should be ok. Plus at 60k on the motor i figure going any higher and i would end up break a rod, burning out a bearing, or something like that. I do plan on building another motor down the road and doing an external gate with some minor upgrades but for now i'm ok with the internal gate since it was one of the cheapest kits i could get. as for the tranny drop you are right about not having to drop the sub frame i just like to have the extra room and with some help it only added about 30 min to the removal and install time. as far as the leak test i plan on doing that sometime this week after work just been busy lately. overall i like the way everything has been running with the exception of the manifold leak. hope fully i'll have a new manifold in the next fews i'll keep this updated as i get more information