
ScionGT35R 476whp@19psi pics all over
 11-23-2007, 02:46 PM
#301
Senior Member
Team No Limitz
SL Member
Team ScioNRG
Join Date: May 2004
Location: Smithtown Scion (NY)
Posts: 3,789
Originally Posted by soros151
Originally Posted by jwaggz82
^ oh yea - ha. I feel ya with the money situation - I dont know what its like in PR but NJ is surely not the cheapest state to live in ..... Its funny because in my other parts of the USA (minus a few states) the cost of living is cut by around 1/2.

 11-23-2007, 03:10 PM
#303
Senior Member
SL Member
Scion Evolution
Join Date: Oct 2006
Location: Villa Park, Illinois
Posts: 310
how come the 4th pulley cant be replaced, first time seeing it since its pretty much in the back hidden, i have no idea what it is please tell me....(alt, wp, crank, ????) power steering?
 11-23-2007, 06:22 PM
#305
Senior Member
SL Member

Join Date: Jan 2007
Location: Puerto Rico
Posts: 301
Originally Posted by blitztc06
how come the 4th pulley cant be replaced, first time seeing it since its pretty much in the back hidden, i have no idea what it is please tell me....(alt, wp, crank, ????) power steering?
Pito
11-23-2007, 06:50 PM
#306
Senior Member
SL Member
Scion Evolution
Join Date: Oct 2006
Location: Villa Park, Illinois
Posts: 310
i knew someone with a pos fiero and took off power steering "few ponies" from what he said, that car was impossible to move from a stand still, you actually had to be rolling to move the wheel, have NST make you a custom blue one even if its the same size and weight just to look all done on that side of the motor
11-23-2007, 08:03 PM
#307
Senior Member
SL Member
Thread Starter

Join Date: Oct 2006
Location: Puerto Rico
Posts: 541
Originally Posted by soros151
Originally Posted by jwaggz82
^ oh yea - ha. I feel ya with the money situation - I dont know what its like in PR but NJ is surely not the cheapest state to live in ..... Its funny because in my other parts of the USA (minus a few states) the cost of living is cut by around 1/2.
11-23-2007, 08:06 PM
#308
Senior Member
SL Member
Thread Starter
Join Date: Oct 2006
Location: Puerto Rico
Posts: 541
Originally Posted by blitztc06
i knew someone with a pos fiero and took off power steering "few ponies" from what he said, that car was impossible to move from a stand still, you actually had to be rolling to move the wheel, have NST make you a custom blue one even if its the same size and weight just to look all done on that side of the motor
11-24-2007, 01:42 AM
#309
Senior Member
SL Member
Join Date: Jan 2007
Location: Puerto Rico
Posts: 301
Well, I finished installing both in-tank Walbro's today. It took a lot of work to do but I think it will be worth it  ....
....
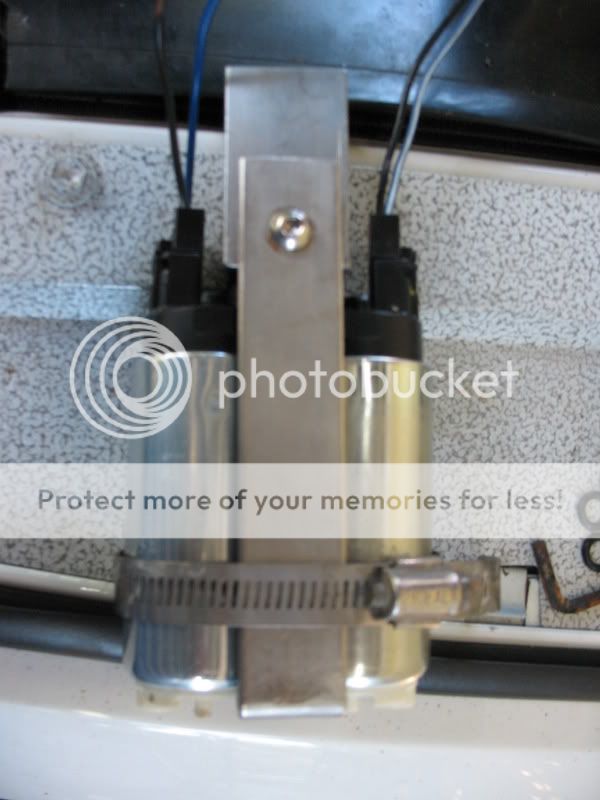
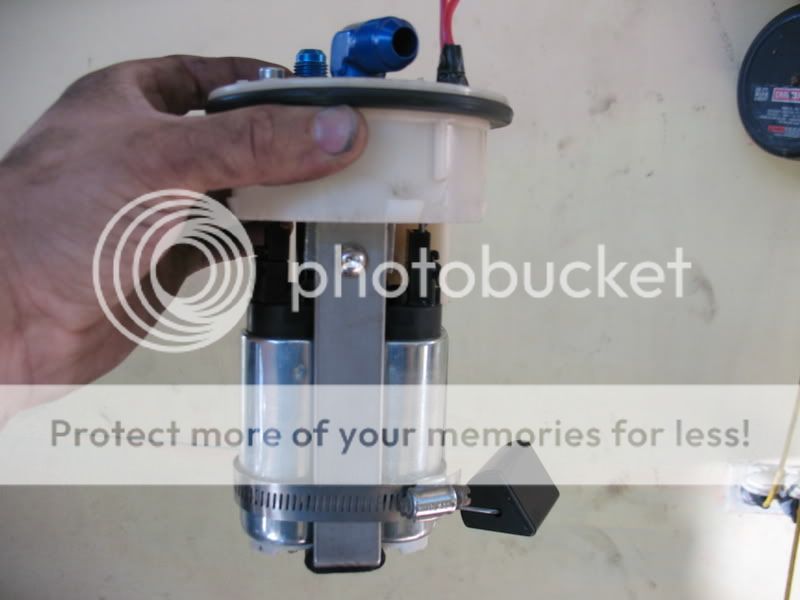
This is the block and pumps along with a custom Stainless Steel bracket that holds the pumps in position .
.
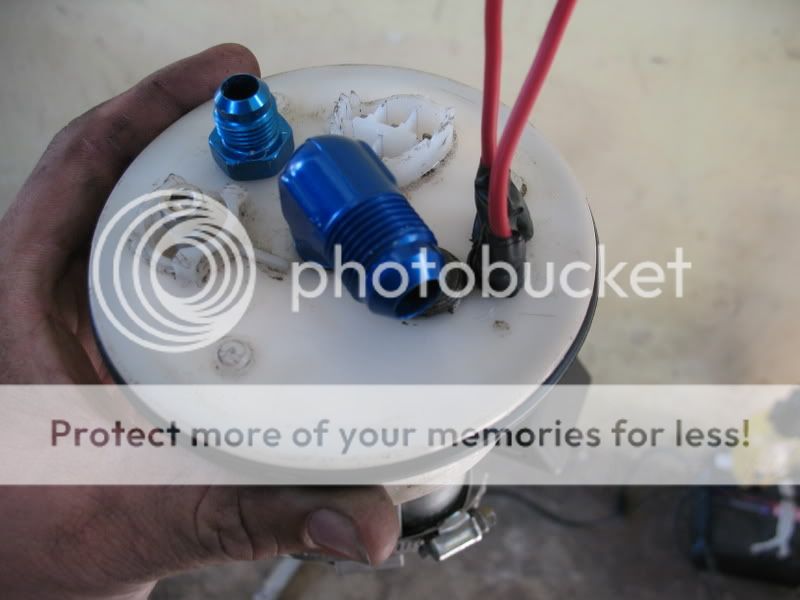
This is the top of the pump assembly before the finishing touches. I fired the pumps in the bench only to see if they where both working and everything was OK. You can see the -8 feed line fitting and the -6 return line fitting. The stock feed port is blocked cause it is no longer in use .
.
In this photos you can see all the setup including the sending unit and the return line that faces opposite of the pumps. Here you can also see the rubber isolator at the very end of the bracket to insulate it from the pumps. I also installed a rubber insulator between the bracket and the block to prevent any vibration and noise in the cabin .
.

Finally I changed the position of the Aeromoitve pressure regulator to the lower part of the driver's side shock tower, installed the new _8 feed line from the tank to the rail and began wiring the pumps to the new 40 amp fuel pump relay ...
...
Tomorrow I will try to finish it off and also install the brand new NOS system sitting in my living room now..... ....
....
I will update tomorrow,
Pito
This is the block and pumps along with a custom Stainless Steel bracket that holds the pumps in position
This is the top of the pump assembly before the finishing touches. I fired the pumps in the bench only to see if they where both working and everything was OK. You can see the -8 feed line fitting and the -6 return line fitting. The stock feed port is blocked cause it is no longer in use
In this photos you can see all the setup including the sending unit and the return line that faces opposite of the pumps. Here you can also see the rubber isolator at the very end of the bracket to insulate it from the pumps. I also installed a rubber insulator between the bracket and the block to prevent any vibration and noise in the cabin
Finally I changed the position of the Aeromoitve pressure regulator to the lower part of the driver's side shock tower, installed the new _8 feed line from the tank to the rail and began wiring the pumps to the new 40 amp fuel pump relay
Tomorrow I will try to finish it off and also install the brand new NOS system sitting in my living room now.....
I will update tomorrow,
Pito
11-24-2007, 04:28 AM
#313
Senior Member
SL Member
Join Date: Jan 2007
Location: Puerto Rico
Posts: 301
Originally Posted by jwaggz82
What size shot are you going to run? 50shot?
Pito
11-24-2007, 01:25 PM
#314
Senior Member
SL Member
Thread Starter
Join Date: Oct 2006
Location: Puerto Rico
Posts: 541
Originally Posted by Mecanica_Pito
Originally Posted by jwaggz82
What size shot are you going to run? 50shot?
Pito
11-24-2007, 05:00 PM
#316
Senior Member
Scikotics
SL Member
iTrader: (2)

Join Date: Sep 2005
Location: HMFIC Jensen Beach, FL
Posts: 3,314
Originally Posted by RSracer
I tried searching the thread w/ no luck...
Did you have to knotch the block for the K1 rods to fit?
Did you have to knotch the block for the K1 rods to fit?

 11-24-2007, 05:35 PM
#318
Senior Member
SL Member

Join Date: Jun 2005
Location: Rock Hill, SC
Posts: 397
Originally Posted by etsnet
Originally Posted by RSracer
I tried searching the thread w/ no luck...
Did you have to knotch the block for the K1 rods to fit?
Did you have to knotch the block for the K1 rods to fit?
11-24-2007, 05:43 PM
#319
Senior Member
SL Member
Thread Starter
Join Date: Oct 2006
Location: Puerto Rico
Posts: 541
Originally Posted by etsnet
Originally Posted by RSracer
I tried searching the thread w/ no luck...
Did you have to knotch the block for the K1 rods to fit?
Did you have to knotch the block for the K1 rods to fit?
11-26-2007, 01:39 AM
#320
Senior Member
SL Member
Join Date: Jan 2007
Location: Puerto Rico
Posts: 301
Originally Posted by etsnet
Originally Posted by RSracer
I tried searching the thread w/ no luck...
Did you have to knotch the block for the K1 rods to fit?
Did you have to knotch the block for the K1 rods to fit?
I took a lot of pictures while assembling the engine and I have plans of making something like a how to and it was going to be explained in that post
Pito