
Just An Old Retired "Build Thread"..
 11-13-2013, 08:09 PM
#361
Honestly, Will, I'm lost and confused now 
What exactly am I aligning? I was under the assumption that I will use the existing projector brackets for the new projector. So that would mean that I just bolt them in and seal the headlights back up. That's where my mind was at...is this not the case?
What exactly am I aligning? I was under the assumption that I will use the existing projector brackets for the new projector. So that would mean that I just bolt them in and seal the headlights back up. That's where my mind was at...is this not the case?
 11-18-2013, 09:59 PM
#362
RX350 Projector Retrofit With Morimoto xbALed Angel Eyes
Before I go any further, I have to take the time to thank DigitalPro (Will) here on Scionlife for planting this seed and and hooking me up with Matt. Will...you're awesome...seriously. Also, Matt from TRS (as well as his entire support team...any time I have a question...their answers awesome and friendly). I challenge you to find another company who's owner/president will take the time to PERSONALLY assist you with everything you need. Matt, thank you, sir.
The Parts:
- Lexus RX350 Non-AFS projector with STI-R clear lens tuned in house by TRS
- Morimoto 3Five long cord D2S ballasts
- Morimoto XB35 5000k D2S bulbs
- 90mm Morimoto xbALed angel eyes in amber
- 90mm rubber housing caps
Tools And Items Needed:
- Dremel with circular sanding attachment
- Screw drivers
- Drill with assorted diameter bits
- Fine gauge floral wire (for mounting halos)
- Canned air
- Rubber butyl blue
- Electrical wire caps/taps
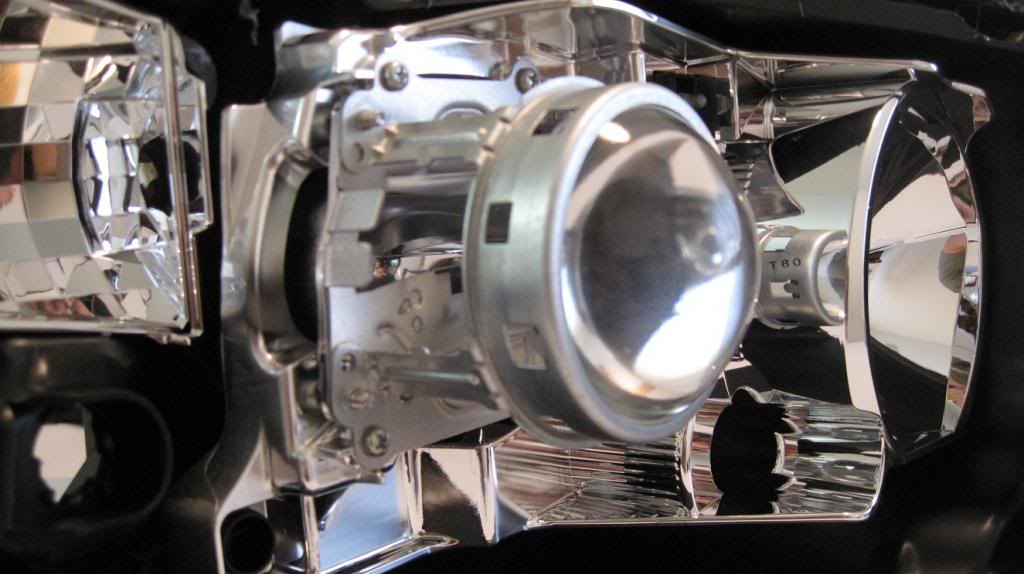
Here's a comparison of the OE projector (right) to the new RX350 bi-xenon projector (left) I'll be installing. The RX350 projector has extra bulk at the bottom of it due to the bi-xenon solenoid. You can see how it sits higher than the OE projector. I'll show how this comes into play later:

You can see that the OE projector (near) and the RX350 projector (far) have virtually identical depths.


Beware, this is very important. If you decide to do this, make sure you get the Non-AFS variant of this projector. It would take someone far braver than me to make the AFS version work with our housing. The AFS version (left) and Non-AFS version (right) don't share any of the same mounting holes!

Below, you'll see the OE projector in it's home:
Now, you'll see what the housing looks like without a projector:

Now you see what happens when we try to just stick the new RX350 projector into the housing with no modification. There is not enough room at the bottom of this housing because the new bi-xenon projector has a solenoid at the bottom used for activating it's high beam. It's in the way and doesn't allow for the projector to bolt in:

So...Dremel time!!! The following three pictures are the before, during, and after Dremelification. You don't have to be super neat with this job because that whole piece is going to be covered by the front shroud anyway. Just be sure not to take too much out and ruin the integrity of the housing.


Yeah...it gets dusty. Nothing canned air can't solve though. You'll use a lot of it, so consider this tip: Continuous use of the canned air will make it cold and it will lose its pressure. Once that happens, take it to the sink and run hot water over it for a minute. The can will immediately be good as new. You can do this whole project with just one can easily.
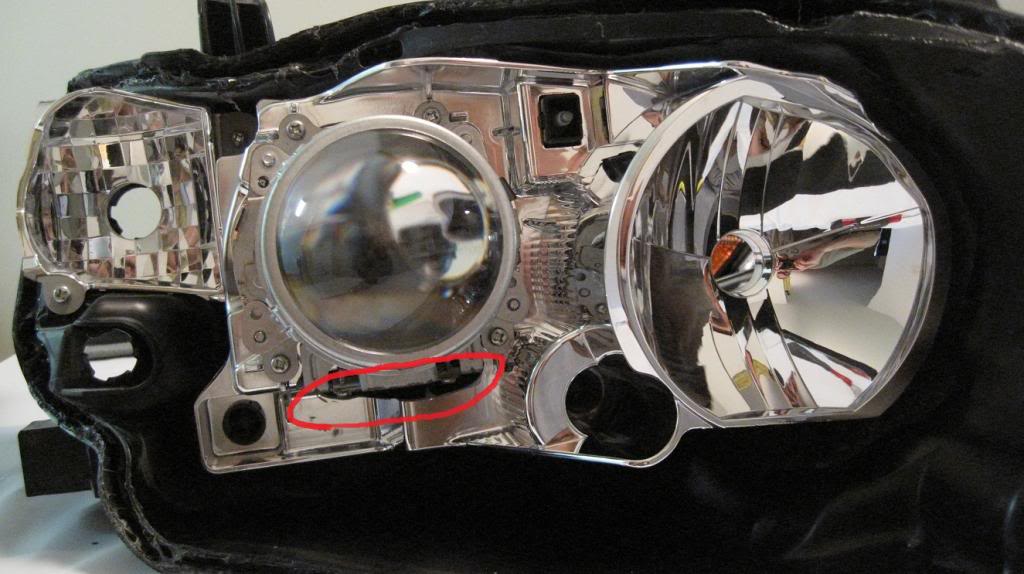
Now, here's the RX350 projector in the housing. Check the circle. Now that that extra housing is out of the way, it bolts right up...like it was meant to be!!
The factory rear rubber seals cannot be used with the new projector...I tried it. It doesn't completely seal the back of the new projector. That's why you need the 90mm rubber housing cap from TRS as well. The photo below shows how light is able to shine through between the projector and the factory rubber seal.

Since the RX350 projectors are bi-xenon, they have an extra connector that connects to our high-beam plug that is used to activate their solenoid for high-beam output. I chose to drill a hole through the rear of the headlight housing to run this through. I then installed the 9005 connector and epoxied around the hole to seal it back.


Now that the projectors are completely installed, time for the halos! I used the technique shown in TRS's video here to install them using floral wire. I recommend it. I installed my crappy Xtec halos using epoxy and it was a pain and kind of a mess. This floral wire method is MUCH less stressful and very effective.
Below, you'll see how I ran the wire from the halo through the shroud. I drilled a hole on the underside of the shroud to get the connector through. It's big, but completely invisible. This photo is shot from the back side of the shroud. Please ignore the black rope on the right...it's from my camera...didn't realize it was there.

Finished product up close. Yes, you can see the floral wire if you are staring at it...but in real life...it is not noticeable. And the power wire for the halo ring itself is completely hidden.

Here are two shots of the new lights on the car:


Here are some night shots of the halos. I'm sorry...it's really tough to get my non-SLR camera to get a good render of these:


Let me assure you...the halos are BRIGHT and MEAN looking in amber. Definitely a head turner and unlike pretty much anything else on the street. It's also cool that you can still see them when the headlights are on. My white ones would just get lost in the output of headlights.
Here is the output of the factory projectors with DDM 55w "4500k" bulbs. You can clearly see the glare above the cutoff caused by the squirrel finders. Also the cutoff is pretty soft.
Shot taken at 25 ft.

Here is the output of the new projectors. Regrettably, I did not check them for rotation prior to sealing them up. As a result, you'll see that the cutoffs of the two headlights do not completely blend. At first glance, it looks like I have my headlights aimed at different heights creating a two step effect. This isn't the case though since you can see each step is exactly the same distance from the line on the wall above them. Also, the cutoff is not completely horizontal.
These shots are all taken at 25 ft.

I did, however, achieve a nice color flicker effect with some nice blues and purples at the cutoff.

The sheer output of these RX350 projectors is phenomenal. This 35w setup destroys my old 55w DDM set. If you have good equipment, 35w is all you need. The beam is crazy wide in comparison to the factory setup as well. Having bi-xenon is awesome now. Having instant full HID brightness for your highs right when you need it is SWEET.
Let's not forget about the clear lenses...these bad boys are cleeeaaarrrrr. Besides their benefit to light output, they just look prettier inside the headlight housing. Check out KILLER's thread. He has the same clear lenses installed on his projectors and he made a direct comparison:
https://www.scionlife.com/forums/sho....php?p=4132571
As for the Morimoto ballasts...they are SOLID. It was so crazy because when I took my old DDM Raptor ballasts out, they accidentally hit against each other as I was holding them by their cords and they literally sounded like cow bells...soooo cheaply made. Of course I didn't do this to my Morimoto's, but they would never do that. Also, the quality of the cords and connectors are top notch...very confidence inspiring. The quality of the relay that was included was the same and makes me feel good that the ballasts are getting the juice they need. I never used a relay on my previous set. The only thing I'm not blown away at is their warm-up time. They are about on par with my DDM set...maybe a hair faster. But at this point, with everything else being said, who gives a damn?
The Morimobo XB35 bulbs are great as well. They are well built and have an accurate, perfect white output when fully warm. 'nough said really.
In conclusion...I'm a total n00b. I have never modified a headlight before, and my only experience with opening headlights was when I installed Xtec halos last year. That's it. This job was painless. As tC2 owners, we are so lucky to have this as an option for those who are serious about their lighting. Again, make sure you get the Non-AFS version of the RX350 bi-xenon projector. The other versions will not be direct drop-in replacements. If you're ordering from TRS...just let them know what your application is. This was a learning experience for all of us and now they'll know exactly what you're talking about if you ask.
Before I go any further, I have to take the time to thank DigitalPro (Will) here on Scionlife for planting this seed and and hooking me up with Matt. Will...you're awesome...seriously. Also, Matt from TRS (as well as his entire support team...any time I have a question...their answers awesome and friendly). I challenge you to find another company who's owner/president will take the time to PERSONALLY assist you with everything you need. Matt, thank you, sir.
The Parts:
- Lexus RX350 Non-AFS projector with STI-R clear lens tuned in house by TRS
- Morimoto 3Five long cord D2S ballasts
- Morimoto XB35 5000k D2S bulbs
- 90mm Morimoto xbALed angel eyes in amber
- 90mm rubber housing caps
Tools And Items Needed:
- Dremel with circular sanding attachment
- Screw drivers
- Drill with assorted diameter bits
- Fine gauge floral wire (for mounting halos)
- Canned air
- Rubber butyl blue
- Electrical wire caps/taps
Here's a comparison of the OE projector (right) to the new RX350 bi-xenon projector (left) I'll be installing. The RX350 projector has extra bulk at the bottom of it due to the bi-xenon solenoid. You can see how it sits higher than the OE projector. I'll show how this comes into play later:

You can see that the OE projector (near) and the RX350 projector (far) have virtually identical depths.


Beware, this is very important. If you decide to do this, make sure you get the Non-AFS variant of this projector. It would take someone far braver than me to make the AFS version work with our housing. The AFS version (left) and Non-AFS version (right) don't share any of the same mounting holes!

Below, you'll see the OE projector in it's home:

Now, you'll see what the housing looks like without a projector:

Now you see what happens when we try to just stick the new RX350 projector into the housing with no modification. There is not enough room at the bottom of this housing because the new bi-xenon projector has a solenoid at the bottom used for activating it's high beam. It's in the way and doesn't allow for the projector to bolt in:

So...Dremel time!!! The following three pictures are the before, during, and after Dremelification. You don't have to be super neat with this job because that whole piece is going to be covered by the front shroud anyway. Just be sure not to take too much out and ruin the integrity of the housing.


Yeah...it gets dusty. Nothing canned air can't solve though. You'll use a lot of it, so consider this tip: Continuous use of the canned air will make it cold and it will lose its pressure. Once that happens, take it to the sink and run hot water over it for a minute. The can will immediately be good as new. You can do this whole project with just one can easily.
Now, here's the RX350 projector in the housing. Check the circle. Now that that extra housing is out of the way, it bolts right up...like it was meant to be!!

The factory rear rubber seals cannot be used with the new projector...I tried it. It doesn't completely seal the back of the new projector. That's why you need the 90mm rubber housing cap from TRS as well. The photo below shows how light is able to shine through between the projector and the factory rubber seal.

Since the RX350 projectors are bi-xenon, they have an extra connector that connects to our high-beam plug that is used to activate their solenoid for high-beam output. I chose to drill a hole through the rear of the headlight housing to run this through. I then installed the 9005 connector and epoxied around the hole to seal it back.


Now that the projectors are completely installed, time for the halos! I used the technique shown in TRS's video here to install them using floral wire. I recommend it. I installed my crappy Xtec halos using epoxy and it was a pain and kind of a mess. This floral wire method is MUCH less stressful and very effective.
Below, you'll see how I ran the wire from the halo through the shroud. I drilled a hole on the underside of the shroud to get the connector through. It's big, but completely invisible. This photo is shot from the back side of the shroud. Please ignore the black rope on the right...it's from my camera...didn't realize it was there.

Finished product up close. Yes, you can see the floral wire if you are staring at it...but in real life...it is not noticeable. And the power wire for the halo ring itself is completely hidden.

Here are two shots of the new lights on the car:


Here are some night shots of the halos. I'm sorry...it's really tough to get my non-SLR camera to get a good render of these:


Let me assure you...the halos are BRIGHT and MEAN looking in amber. Definitely a head turner and unlike pretty much anything else on the street. It's also cool that you can still see them when the headlights are on. My white ones would just get lost in the output of headlights.
Here is the output of the factory projectors with DDM 55w "4500k" bulbs. You can clearly see the glare above the cutoff caused by the squirrel finders. Also the cutoff is pretty soft.
Shot taken at 25 ft.

Here is the output of the new projectors. Regrettably, I did not check them for rotation prior to sealing them up. As a result, you'll see that the cutoffs of the two headlights do not completely blend. At first glance, it looks like I have my headlights aimed at different heights creating a two step effect. This isn't the case though since you can see each step is exactly the same distance from the line on the wall above them. Also, the cutoff is not completely horizontal.
These shots are all taken at 25 ft.

I did, however, achieve a nice color flicker effect with some nice blues and purples at the cutoff.

The sheer output of these RX350 projectors is phenomenal. This 35w setup destroys my old 55w DDM set. If you have good equipment, 35w is all you need. The beam is crazy wide in comparison to the factory setup as well. Having bi-xenon is awesome now. Having instant full HID brightness for your highs right when you need it is SWEET.
Let's not forget about the clear lenses...these bad boys are cleeeaaarrrrr. Besides their benefit to light output, they just look prettier inside the headlight housing. Check out KILLER's thread. He has the same clear lenses installed on his projectors and he made a direct comparison:
https://www.scionlife.com/forums/sho....php?p=4132571
As for the Morimoto ballasts...they are SOLID. It was so crazy because when I took my old DDM Raptor ballasts out, they accidentally hit against each other as I was holding them by their cords and they literally sounded like cow bells...soooo cheaply made. Of course I didn't do this to my Morimoto's, but they would never do that. Also, the quality of the cords and connectors are top notch...very confidence inspiring. The quality of the relay that was included was the same and makes me feel good that the ballasts are getting the juice they need. I never used a relay on my previous set. The only thing I'm not blown away at is their warm-up time. They are about on par with my DDM set...maybe a hair faster. But at this point, with everything else being said, who gives a damn?
The Morimobo XB35 bulbs are great as well. They are well built and have an accurate, perfect white output when fully warm. 'nough said really.
In conclusion...I'm a total n00b. I have never modified a headlight before, and my only experience with opening headlights was when I installed Xtec halos last year. That's it. This job was painless. As tC2 owners, we are so lucky to have this as an option for those who are serious about their lighting. Again, make sure you get the Non-AFS version of the RX350 bi-xenon projector. The other versions will not be direct drop-in replacements. If you're ordering from TRS...just let them know what your application is. This was a learning experience for all of us and now they'll know exactly what you're talking about if you ask.


 . Are you referring to the TRD exhaust or the Tsudo?
11-19-2013, 12:23 PM
. Are you referring to the TRD exhaust or the Tsudo?
11-19-2013, 12:23 PM
#369

Retrofit looks great!! Nice work and thanks for the praises!!! Glad to help out! Toni Khauv from Meng Motorsports will personally answer you PMs regarding product questions, he's been another great contact!! The RX350 Bi-X is a perfect TC2 upgrade, Amber COB halos look bad azz!
Last edited by DigitalPro; 11-19-2013 at 12:39 PM.
11-19-2013, 03:23 PM
#371
Senior Member
SL Member

Join Date: Mar 2013
Posts: 516
Dude you did a FANTASTIC JOB! Props.
The amber halos really make the car stand out and the projectors look insane.
Question
1.What did you use to reseal the headlights?
2. Did you have to aim the projectors once they were inside the headlights? I noticed the chrome bracket usually gets a bit out of place and you have to readjust it using the turning gear behind the headlight.
3. what happened to the old high beam reflector?
11-19-2013, 04:49 PM
#373
Retrofit looks great!! Nice work and thanks for the praises!!! Glad to help out! Toni Khauv from Meng Motorsports will personally answer you PMs regarding product questions, he's been another great contact!! The RX350 Bi-X is a perfect TC2 upgrade, Amber COB halos look bad azz!
11-19-2013, 05:01 PM
#374
Dude you did a FANTASTIC JOB! Props.
The amber halos really make the car stand out and the projectors look insane.
Question
1.What did you use to reseal the headlights?
2. Did you have to aim the projectors once they were inside the headlights? I noticed the chrome bracket usually gets a bit out of place and you have to readjust it using the turning gear behind the headlight.
3. what happened to the old high beam reflector?
The amber halos really make the car stand out and the projectors look insane.
Question
1.What did you use to reseal the headlights?
2. Did you have to aim the projectors once they were inside the headlights? I noticed the chrome bracket usually gets a bit out of place and you have to readjust it using the turning gear behind the headlight.
3. what happened to the old high beam reflector?
1. I used TRS rubber butyl sealant. Good stuff. One pack of that stuff will last you many retrofits!
2. DEFINITELY needed to re aim them using the gear in the back. One was facing basically at the ground and the other was as high as a high beam! I think mainly it was because of the way TRS tuned them. One of them had washers just on the bottom posts of the lens holder making the lens point slightly up in relation to the bowl itself. The other was opposite. They lined up nicely using the adjustment posts though.
3. Right now I just have the high beam bulbs in there to keep them sealed. They are not connected to anything though. I want to do a high beam blinker but I need to figure out how to do the wiring.
11-19-2013, 05:19 PM
#376
Check how the tail lights are sealed, they're not like the headlights with Butyl sealant. Plastic might be heat bonded together, time to dremel them but you need to make sure the cutting isn't visible when put back together.
11-19-2013, 05:29 PM
#377
Senior Member
SL Member
Join Date: Mar 2013
Posts: 516
then ill just stick to my LED bulbs with the hyper flash mode. lol
11-19-2013, 05:36 PM
#378
Check the compatibility for TC2, V-LEDS has a replacement blinker relay made for LEDs.
http://www.vleds.com/catalog/product.../category/886/
Check these LEDs out for your tails, remember RED LEDs behind RED lenses, for $10 a pair these are the brightest I've found on the net, sure there from China but they're just as bright as the halogens (White) 7443/7440
http://www.ddmtuning.com/Products/7440-7443-23x5630
 11-19-2013, 05:41 PM
#379
Senior Member
SL Member
Join Date: Mar 2013
Posts: 516
those all look pretty tough but superbrightledsDOTcom has some pretty good quality ones.
here is the link
http://www.superbrightleds.com/morei...sher/925/2276/
I have them on my car and they illuminate quite well during daylight and the flasher mode is a plus for all the distracted Miami drivers who are always on the dam phone.
here is the link
http://www.superbrightleds.com/morei...sher/925/2276/
I have them on my car and they illuminate quite well during daylight and the flasher mode is a plus for all the distracted Miami drivers who are always on the dam phone.
