
Header Back Exhaust Install Write-Up
 04-03-2006, 12:40 AM
#1
Senior Member
SL Member
Thread Starter

Join Date: Dec 2005
Location: Lost in Tranquility
Posts: 3,270
First I want to thank Stylis (Gabe @ Precision Muffler) for the excellent exhaust he crafted for me and his superior customer service, A+A+A+ job.
DISCLAIMER:
Sorry Darren, hope you don't mind me using this disclaimer.
Scionlife.com and I do not take any responsibility in what you do to your car. This FAQ could be filled with incorrect information. You could be voiding your warranty if your exhaust is not installed by a certified mechanic, dealership, or muffler shop. It is quite possible that you can totally mess up your car by using this as a guide to install your exhaust. This can result in serious bodily injury, death, dismemberment, sexually transmitted diseases and so forth to you and anybody else in case of an accident resulting from failure to take safety precautions and/or following the instructions in this write-up
PRE-PRE-INSTALLATION
A pre-pre-installation recommendation that was offered to me by Stylis: As soon as you know you will be doing this installation (2 weeks prior in my case), spray your factory rubber hangers, O2 sensors and bolts with WD-40 several times. This will ensure a little bit easier removal of these parts from the car.
TOOLS REQUIRED
Floor jack; 4 jack stands; ratchet; 12mm, 14mm, 16mm sockets; 10" ratchet extension;16mm wrench; 7/8 wrench or O2 socket and WD-40.
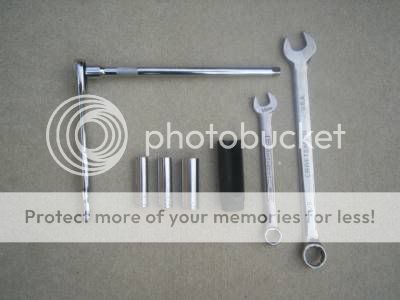
Optional items: gloves and hanger spreaders, or a pair of long needle-nose pliers to use as hanger spreaders

PEOPLE REQUIRED
Only one person is required (the install won't do itself), but if you have two or more people, they can hand you the required tools so you don't have to keep crawling out from under the car. Supplying beer is not recommended, because the other people may start a party and forget you are under the car.
PRE-INSTALLATION
I am not going to inform you of how to jack your vehicle up. If you do not know where or how to jack up your vehicle (or where the best place for jack stands are), then this installation is not recommended for you to do. I jacked my car up about 45 min to an hour before installation to let the factory exhaust cool completely off. About 30 mins into the cooling process, I sprayed the rubber hangers and bolts again with WD-40. Also while waiting for the exhaust to cool down, I assembled my new exhaust.
ASSEMBLY OF NEW EXHAUST
My header back exhaust came in 4 sections: down pipe to cat, resonator to straight pipe, curved axle pipe and muffler with tip (yours may be different depending on who makes it for you).
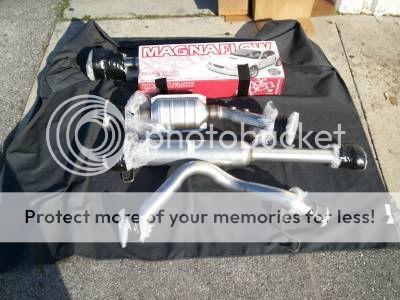
All pieces with the exception of the muffler section have flanges and are bolted together with 16mm bolts with nuts and gaskets in between the two flanges.
I fully assembled the downpipe through the resonator and assembled the axle piece to the muffler so there were two full sections. The muffler slips over the axle pipe and is clamped on with a U clamp.
REMOVAL OF FACTORY EXHAUST
In this section start from the rear of the car, just like you are changing to an axle back exhaust.
STEP 1.Unbolt and remove the 14mm clamp that holds the axle pipe to the muffler.

2. Remove the muffler from the two rubber hangers.
I found that with a big pair of needle-nose pliers you could spread the rubber hangers enough so you could pull the metal muffler hanger out.
3. Remove 12mm bolt from the factory metal bar near the middle of the car.
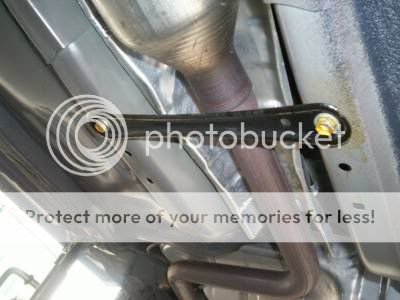
4. After removing the first bolt, loosen the second 12mm bolt on the other side of metal bar. CAUTION: the second bolt will loosen and swing the metal bar so be careful of it.
The metal bar being to one side of the car will allow the exhaust to come down and out freely in a later step.
HERE IS THE MOST CRUCIAL STEP OF THEM ALL (the one that could cost you $200 or more).
5. Remove the passenger side O2 sensor that is after the cat. I originally was going to wrench it off, but I bought an O2 socket so it would be easier. Well all the wonderful O2 socket did was start to strip it. Before to much damage was done, I used the 7/8 wrench on it and the O2 came out. I also did not spray the O2 sensors with WD-40 on the day of installation for fear of getting WD-40 in the O2.
While removing the passenger side O2, I noticed the drivers side O2 had a plug on its wires that was about 9 inches or so from the sensor, in the engine bay. I'm am not sure if the 2003-2005 xB's have this plug, because I have never worked on anything but an '06. If you do not have this plug then remove drivers side O2 sensor.
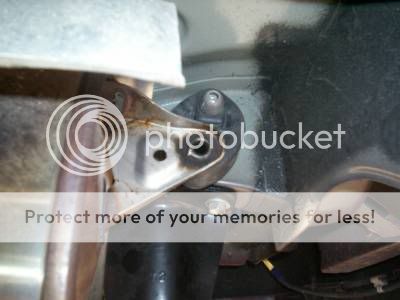
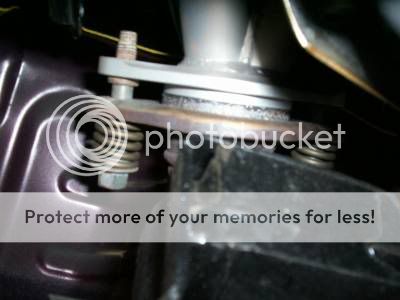
6. With the 10" socket extension and 14mm socket remove the two 14mm spring bolts securing the exhaust to the header. Be careful of the O2 sensor if it has not been previously removed.
7. Remove the exhaust from the rubber hangers in the middle of the car. These are the last two things holding the exhaust to the car, so be careful not to drop the exhaust on your face.
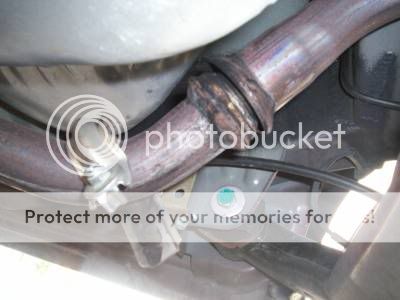
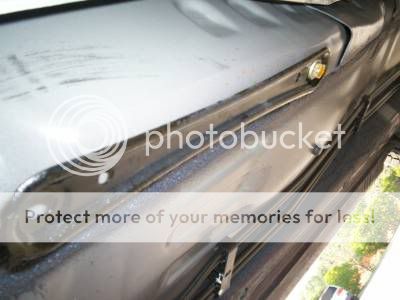
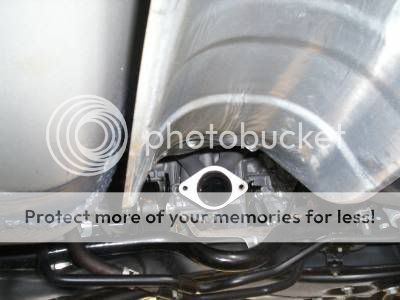
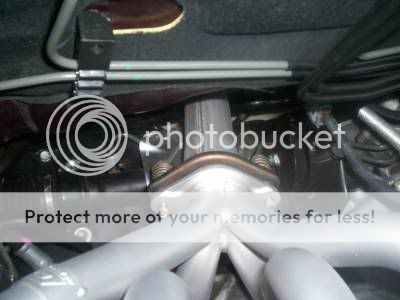
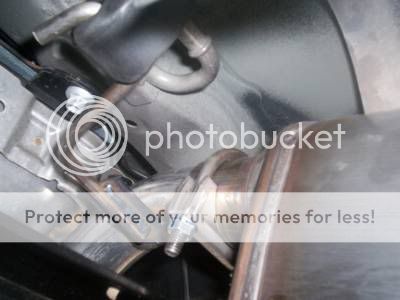
8. Remove exhaust from the underside of the car. I found that the easiest way to get the exhaust out was to push the exhaust towards the back of the car over the rear axel and slowly let the down pipe to the ground in the front. Then push the down pipe toward the front of the car to remove the end of exhaust over and down from the rear axle. Here is what underside of the car will look like after exhaust is removed.
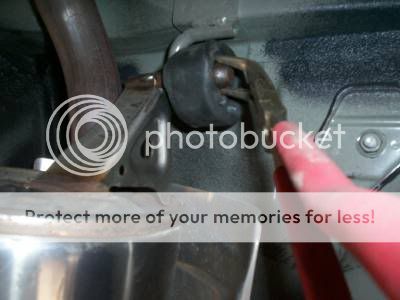
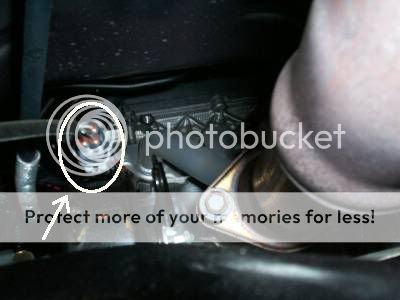
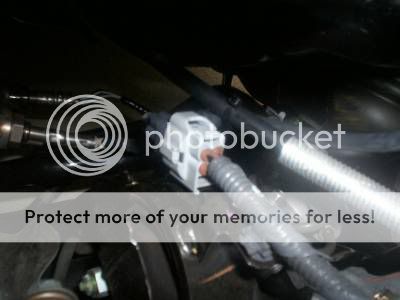
9. Remove the 2nd O2 sensor from the exhaust. With the exhaust fully out, you can now get a good grip and some muscle on the 7/8's wrench to remove the O2. This makes it much easier than laying on your back trying to undo the sensor. Pictured below is the plug for the o2 sensor that was unplugged.

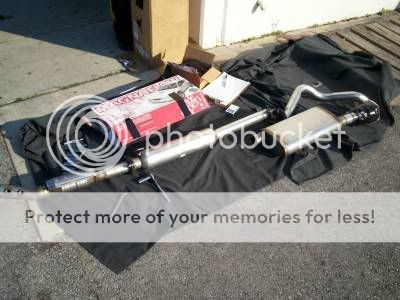
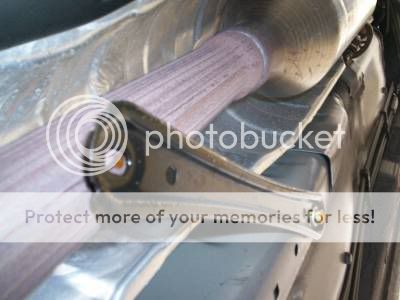
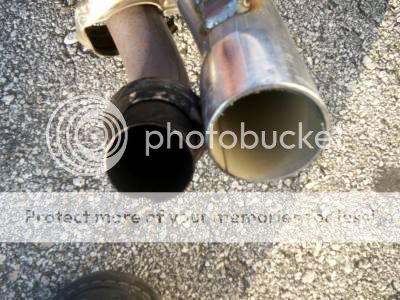
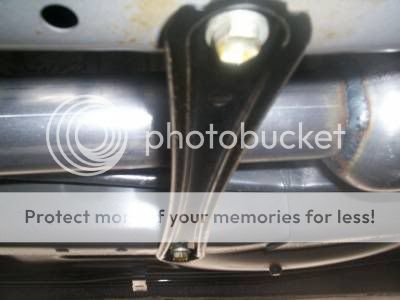
Here is the factory exhaust next to the new exhaust.
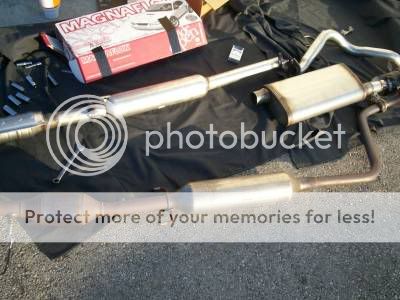
Factory pipe diameter 1.5 inches, new exhaust 2.25 inches in diameter.
INSTALLATION OF NEW EXHAUST
In this section, start with cat section of exhaust and work your way towards the back of the car.
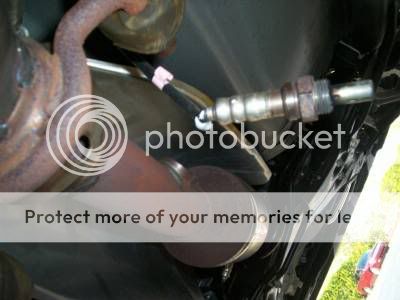
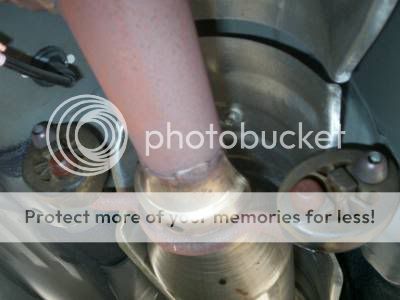
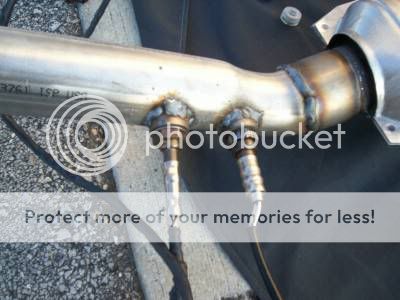
STEP 1. Screw the drivers side O2 sensor into the new exhaust between the downpipe and cat. Specs used for tightening the O2: the "till it felt good and tight"method.(also pictured is my A/F guage sender o2 sensor)
2. Insert the downpipe of new exhast back into the underside of engine compartment towards the header.

3. Hang the cat exhaust section onto the middle rubber hangers.This will sturdy and hold the exhaust to the car so you can move on to the next step.

4. Line downpipe and header up, insert and tighten the two 14mm spring bolts until completely tight. I reused my stock doughnut gasket for this install because it was in great condition. You may choose to get a new one if yours is not in the best shape or it could cause an exhaust leak.
5. Reinstall the passenger side O2 sensor.

6. Reconnect driver side O2 sensor to the plug in the engine bay.
7. Rebolt and tighten the two 12mm bolts that hold the metal bar in the middle of the car. This will help hold the end of the exhaust up if it is sagging it all.
8. Remove the factory rubber hangers from where the factory axle back exhaust section was. These hangers come off the factory mounts easier than the exhaust did off the rubber hangers themselves. Just pull on them a little bit and they will pop off. I removed the factory rubber hangers so I could put them on the new muffler for easy hanging in the next step.
9. Insert axle back part of exhaust, from the rear of the car over the rear axle. Hang the exhaust with rubber hangers, already on, to the factory mounts.


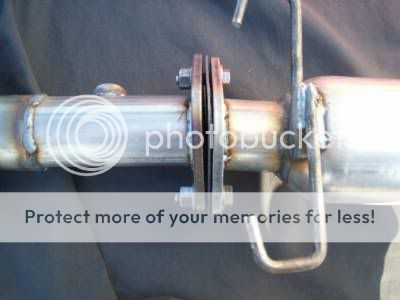
10. Connect the two sections of exhaust together. Tighten the two 16mm nuts and bolts and make sure the gasket in between the two is straight.


11. From the outside rear of the car, make sure the exhaust tip is straight, if it is not straight then make it straight.


Clamp the U-bolt down where the muffler and the axle pipe meet. Make sure that after it is clamped, you recheck that the tip is straight.
12. Recheck all bolts and O2 sensors in the install to make sure they are tightened to spec.
13. Pull ECU fuse to reset it.
14. Start car and check for exhaust leaks at bolted sections and header. You may need some one to rev the car to feel slight leaks. If you have leaks shut car off and fix leak and start step 14 over again.
15. Lower car off jackstands and take it for a ride.
Now before anybody picks this write-up apart or starts flaming me in any kind of way, I must tell you that I install car stereos for a living. I am not a mechanic. So some of my directions or methods may not be right, but they did work for me. I started the install at about 4:30 pm with the sun going down and was done with the complete mod by 7:30 pm just as it was getting dark. I also did this install outside of my shop by myself in low light and lacked an extra pair of hands, so there is not a great picture or even a picture at all for every step. And some of the pictures were taken the next day of the finished exhaust. So I hope you enjoyed this write-up and that it will help somebody in the future that decides to do this mod themselves. Oh, and the new deep sound this exhaust makes is awesome! Feels great on the butt dyno too.
DISCLAIMER:
Sorry Darren, hope you don't mind me using this disclaimer.
Scionlife.com and I do not take any responsibility in what you do to your car. This FAQ could be filled with incorrect information. You could be voiding your warranty if your exhaust is not installed by a certified mechanic, dealership, or muffler shop. It is quite possible that you can totally mess up your car by using this as a guide to install your exhaust. This can result in serious bodily injury, death, dismemberment, sexually transmitted diseases and so forth to you and anybody else in case of an accident resulting from failure to take safety precautions and/or following the instructions in this write-up
PRE-PRE-INSTALLATION
A pre-pre-installation recommendation that was offered to me by Stylis: As soon as you know you will be doing this installation (2 weeks prior in my case), spray your factory rubber hangers, O2 sensors and bolts with WD-40 several times. This will ensure a little bit easier removal of these parts from the car.
TOOLS REQUIRED
Floor jack; 4 jack stands; ratchet; 12mm, 14mm, 16mm sockets; 10" ratchet extension;16mm wrench; 7/8 wrench or O2 socket and WD-40.
Optional items: gloves and hanger spreaders, or a pair of long needle-nose pliers to use as hanger spreaders
PEOPLE REQUIRED
Only one person is required (the install won't do itself), but if you have two or more people, they can hand you the required tools so you don't have to keep crawling out from under the car. Supplying beer is not recommended, because the other people may start a party and forget you are under the car.
PRE-INSTALLATION
I am not going to inform you of how to jack your vehicle up. If you do not know where or how to jack up your vehicle (or where the best place for jack stands are), then this installation is not recommended for you to do. I jacked my car up about 45 min to an hour before installation to let the factory exhaust cool completely off. About 30 mins into the cooling process, I sprayed the rubber hangers and bolts again with WD-40. Also while waiting for the exhaust to cool down, I assembled my new exhaust.
ASSEMBLY OF NEW EXHAUST
My header back exhaust came in 4 sections: down pipe to cat, resonator to straight pipe, curved axle pipe and muffler with tip (yours may be different depending on who makes it for you).
All pieces with the exception of the muffler section have flanges and are bolted together with 16mm bolts with nuts and gaskets in between the two flanges.
I fully assembled the downpipe through the resonator and assembled the axle piece to the muffler so there were two full sections. The muffler slips over the axle pipe and is clamped on with a U clamp.
REMOVAL OF FACTORY EXHAUST
In this section start from the rear of the car, just like you are changing to an axle back exhaust.
STEP 1.Unbolt and remove the 14mm clamp that holds the axle pipe to the muffler.
2. Remove the muffler from the two rubber hangers.
I found that with a big pair of needle-nose pliers you could spread the rubber hangers enough so you could pull the metal muffler hanger out.
3. Remove 12mm bolt from the factory metal bar near the middle of the car.
4. After removing the first bolt, loosen the second 12mm bolt on the other side of metal bar. CAUTION: the second bolt will loosen and swing the metal bar so be careful of it.
The metal bar being to one side of the car will allow the exhaust to come down and out freely in a later step.
HERE IS THE MOST CRUCIAL STEP OF THEM ALL (the one that could cost you $200 or more).
5. Remove the passenger side O2 sensor that is after the cat. I originally was going to wrench it off, but I bought an O2 socket so it would be easier. Well all the wonderful O2 socket did was start to strip it. Before to much damage was done, I used the 7/8 wrench on it and the O2 came out. I also did not spray the O2 sensors with WD-40 on the day of installation for fear of getting WD-40 in the O2.
While removing the passenger side O2, I noticed the drivers side O2 had a plug on its wires that was about 9 inches or so from the sensor, in the engine bay. I'm am not sure if the 2003-2005 xB's have this plug, because I have never worked on anything but an '06. If you do not have this plug then remove drivers side O2 sensor.
6. With the 10" socket extension and 14mm socket remove the two 14mm spring bolts securing the exhaust to the header. Be careful of the O2 sensor if it has not been previously removed.
7. Remove the exhaust from the rubber hangers in the middle of the car. These are the last two things holding the exhaust to the car, so be careful not to drop the exhaust on your face.
8. Remove exhaust from the underside of the car. I found that the easiest way to get the exhaust out was to push the exhaust towards the back of the car over the rear axel and slowly let the down pipe to the ground in the front. Then push the down pipe toward the front of the car to remove the end of exhaust over and down from the rear axle. Here is what underside of the car will look like after exhaust is removed.
9. Remove the 2nd O2 sensor from the exhaust. With the exhaust fully out, you can now get a good grip and some muscle on the 7/8's wrench to remove the O2. This makes it much easier than laying on your back trying to undo the sensor. Pictured below is the plug for the o2 sensor that was unplugged.
Here is the factory exhaust next to the new exhaust.
Factory pipe diameter 1.5 inches, new exhaust 2.25 inches in diameter.
INSTALLATION OF NEW EXHAUST
In this section, start with cat section of exhaust and work your way towards the back of the car.
STEP 1. Screw the drivers side O2 sensor into the new exhaust between the downpipe and cat. Specs used for tightening the O2: the "till it felt good and tight"method.(also pictured is my A/F guage sender o2 sensor)
2. Insert the downpipe of new exhast back into the underside of engine compartment towards the header.
3. Hang the cat exhaust section onto the middle rubber hangers.This will sturdy and hold the exhaust to the car so you can move on to the next step.
4. Line downpipe and header up, insert and tighten the two 14mm spring bolts until completely tight. I reused my stock doughnut gasket for this install because it was in great condition. You may choose to get a new one if yours is not in the best shape or it could cause an exhaust leak.
5. Reinstall the passenger side O2 sensor.
6. Reconnect driver side O2 sensor to the plug in the engine bay.
7. Rebolt and tighten the two 12mm bolts that hold the metal bar in the middle of the car. This will help hold the end of the exhaust up if it is sagging it all.
8. Remove the factory rubber hangers from where the factory axle back exhaust section was. These hangers come off the factory mounts easier than the exhaust did off the rubber hangers themselves. Just pull on them a little bit and they will pop off. I removed the factory rubber hangers so I could put them on the new muffler for easy hanging in the next step.
9. Insert axle back part of exhaust, from the rear of the car over the rear axle. Hang the exhaust with rubber hangers, already on, to the factory mounts.
10. Connect the two sections of exhaust together. Tighten the two 16mm nuts and bolts and make sure the gasket in between the two is straight.
11. From the outside rear of the car, make sure the exhaust tip is straight, if it is not straight then make it straight.
Clamp the U-bolt down where the muffler and the axle pipe meet. Make sure that after it is clamped, you recheck that the tip is straight.
12. Recheck all bolts and O2 sensors in the install to make sure they are tightened to spec.
13. Pull ECU fuse to reset it.
14. Start car and check for exhaust leaks at bolted sections and header. You may need some one to rev the car to feel slight leaks. If you have leaks shut car off and fix leak and start step 14 over again.
15. Lower car off jackstands and take it for a ride.
Now before anybody picks this write-up apart or starts flaming me in any kind of way, I must tell you that I install car stereos for a living. I am not a mechanic. So some of my directions or methods may not be right, but they did work for me. I started the install at about 4:30 pm with the sun going down and was done with the complete mod by 7:30 pm just as it was getting dark. I also did this install outside of my shop by myself in low light and lacked an extra pair of hands, so there is not a great picture or even a picture at all for every step. And some of the pictures were taken the next day of the finished exhaust. So I hope you enjoyed this write-up and that it will help somebody in the future that decides to do this mod themselves. Oh, and the new deep sound this exhaust makes is awesome! Feels great on the butt dyno too.

 04-03-2006, 05:41 PM
#4
Senior Member
SL Member
Thread Starter
Join Date: Dec 2005
Location: Lost in Tranquility
Posts: 3,270
Hey thanks guys for the compliments, it did help that i had somone who was good at building the exhaust and has an xB to get the fitment right. But i will try and get a soundclip of it if anybody out there knows the best way to do it( like what website to host it and what type of file it should be) please pm me with the info, thanks.
04-04-2006, 03:53 PM
#6
Senior Member
SL Member
Thread Starter
Join Date: Dec 2005
Location: Lost in Tranquility
Posts: 3,270
Dang this thread isn't in the Tech section yet or a sticky, what the heck, J/K. Gabe the file format for the sound clip is a QCP file,since its off my cell phone. I dont know if you can do anything with this, let me know, if not ill get a digital video camera at work and do it.

 04-05-2006, 03:08 AM
#10
Senior Member
SL Member
Thread Starter
Join Date: Dec 2005
Location: Lost in Tranquility
Posts: 3,270
Here is 2 out of 3 video's i shot of the exhaust sound, just reving it didnt do justice for the exhaust. So i did two drive byes, so you can hear the real sound of it. I 'm able to get the 2 drive byes on the host site but not the reving one, i'll keep working on it. So enjoy, and Gabe i am also having problems emailing them to you, will work on that one also.
http://media.putfile.com/Exhaust-346
http://media.putfile.com/exhaust4
http://media.putfile.com/Exhaust-346
http://media.putfile.com/exhaust4
04-05-2006, 05:21 PM
#11
Senior Member
SL Member
Thread Starter
Join Date: Dec 2005
Location: Lost in Tranquility
Posts: 3,270
 04-05-2006, 08:44 PM
#14
Senior Member
SL Member
Thread Starter
Join Date: Dec 2005
Location: Lost in Tranquility
Posts: 3,270
Originally Posted by ProshopXB
Originally Posted by RTon20s
A little piece of advice...
Choose your wording carefully.
Nice write-up though.
Choose your wording carefully.
Nice write-up though.
What words or wording???
Just so everyone knows, i made a crack on my self a few post ago.(thanks RTon20s for finding it). So yes i am addicted to SL and yes i finally got it up, with the help of some viagra and a pic of the Greddy SC, LoL.


