
Free Form Spherical Sub Cabinets

 11-01-2008, 05:20 AM
#22
Member
Thread Starter

Join Date: Oct 2005
Posts: 31
HondAudio,
They are 12" drivers. I have been using a single sub for the last 3 years, with my MDF speaker ball. It sounded good with just one driver, but I felt I was missing something. I had an extra sub, collecting dust, so I decided to make a pair of cabinets out of 'glass. The sole purpose of making seperate enclosures, was so I could take just one sub out if needed. Force loading them into the rear hatch gives me a "bass up front" effect. Pointing them in any direction other than the hatch does not give me that effect. I am not in it for the "boom", but more for the sound quality.
I figured out the volume of my enclosures, using the appropriate formulas. My cabinets are approx. 1 cu. ft.. The piece of MDF that you see in the bottom of the enclosure is 'glassed into the enclosure. There is a stud that runs thru the bottom of the cabinet. The stud runs thru the floor panels, and is secured with a wing nut.
hotwheelsrs1,
I use Nutrik part#'s NL2MP(panel mount), and NL2FC(cable mount). You insert the cable mount(male), into the panel mount(female), and turn. There is a spring loaded collar on the cable mount that functions as a lock. To disconnect the two, you have to pull back the spring loaded collar, turn, and pull. There is no better connector, so far as I am concerned, especially at $6.25 total for both connectors. It looks clean, and is easier to manage than binding post's.
11-01-2008, 07:40 AM
#24
Senior Member
SL Member

Join Date: May 2006
Posts: 661
Originally Posted by Oompwa
HondAudio,
hotwheelsrs1,
I use Nutrik part#'s NL2MP(panel mount), and NL2FC(cable mount). You insert the cable mount(male), into the panel mount(female), and turn. There is a spring loaded collar on the cable mount that functions as a lock. To disconnect the two, you have to pull back the spring loaded collar, turn, and pull. There is no better connector, so far as I am concerned, especially at $6.25 total for both connectors. It looks clean, and is easier to manage than binding post's.
how do u wire to the connectors themselves?
im thinkin bout getting some i just wanna make sure i understand how to set it up...
11-01-2008, 07:42 AM
#25
Member
Thread Starter
Join Date: Oct 2005
Posts: 31
Yes, they are WalMart *****($2.59 I think). I took my tape measure, and picked out two ***** that met my criteria.
Please keep in mind that this was not just a slapped together assembly. It was drawn out on AutoCAD first. The pieces of MDF were planned out, all the way down to the radiuses which the ***** rest on. As you can see, the ball is cradled in the frame accordingly(within reason as the ***** are not perfectly round to begin with) prior to wrapping. All of this helped in the estimation of volume.
The spacers that you see were used for symmetry. After wrapping the assemblies with the jersey knit, one was slightly smaller than the other. Probably due to me tugging on it too much while wrapping. I used the spacers to manipulate the ball, and position it so that they both came out the same size/shape. Here is a pic where you can see the mismatch, prior to me installing the spacers.
[img] [/img]
Please keep in mind that this was not just a slapped together assembly. It was drawn out on AutoCAD first. The pieces of MDF were planned out, all the way down to the radiuses which the ***** rest on. As you can see, the ball is cradled in the frame accordingly(within reason as the ***** are not perfectly round to begin with) prior to wrapping. All of this helped in the estimation of volume.
The spacers that you see were used for symmetry. After wrapping the assemblies with the jersey knit, one was slightly smaller than the other. Probably due to me tugging on it too much while wrapping. I used the spacers to manipulate the ball, and position it so that they both came out the same size/shape. Here is a pic where you can see the mismatch, prior to me installing the spacers.
[img]
[/img]
11-01-2008, 08:04 AM
#26
Member
Thread Starter
Join Date: Oct 2005
Posts: 31
so one set of those connectors controls the negative and positive line?
how do u wire to the connectors themselves?
im thinkin bout getting some i just wanna make sure i understand how to set it up...
how do u wire to the connectors themselves?
im thinkin bout getting some i just wanna make sure i understand how to set it up...
So far as the wiring is concerned;
First, you unscrew the end cap from the male connector. You feed the wire through this end cap, and through a neat little retainer. The pos and neg wires are attached to the connector with brass screw down clamps(no soldering). Now, you screw the end cap back onto the body of the connector. As you are screwing the cap on, the retainer is clamping down on the wire. That's it. It's meant to be used with pro-audio cables(5/16" or so diameter), so larger gauge speaker wire is best, for the clamp to retain the wire properly.
The panel mount connector uses spade connectors.
11-05-2008, 11:50 PM
#31
Senior Member
SL Member

Join Date: Jul 2006
Location: Scottsdale, AZ
Posts: 598
Where do you have the amps? Under the front seats? In the cubby on the right side? Have you given any thought to coupling the right enclosure to a hole in the cover and then utilizing the space in the cubby underneath?
11-06-2008, 06:37 AM
#32
Member
Thread Starter
Join Date: Oct 2005
Posts: 31
I utilize that cubby hole, and won't compromise what little hidden storage I have. My sub cabinets have to be easily removable. Some of my other hobbies take up a lot of space also, so I am always taking them in and out. If were to try anything else, the sub setup would have to be more stealthy, possibly fiberglassed into the rear side panels.
My amp is under my front pass. seat. I made a platform that is cradled by the seat brackets. My amp is pretty much hidden, and still has plenty of ventilation. Basically, my whole system is stealth, except for my subs.
[img]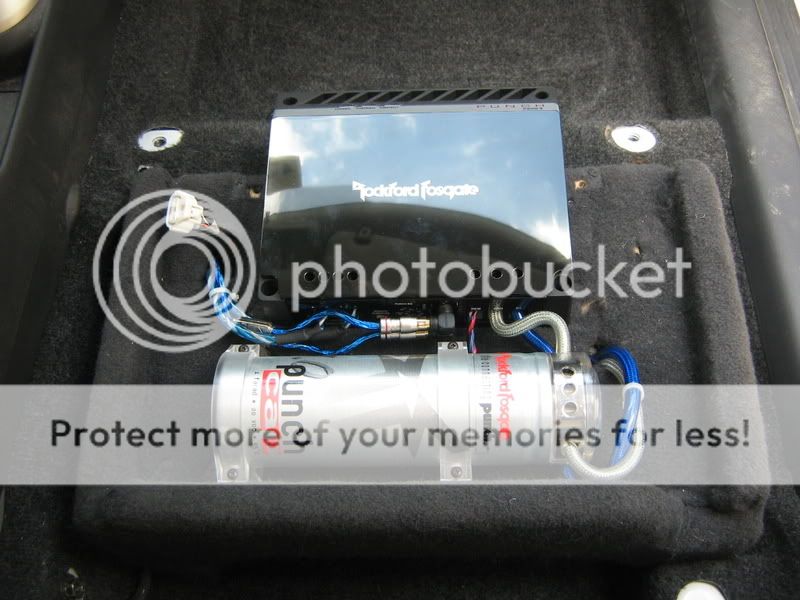
[/img]
My amp is under my front pass. seat. I made a platform that is cradled by the seat brackets. My amp is pretty much hidden, and still has plenty of ventilation. Basically, my whole system is stealth, except for my subs.
[img]
[/img]

 12-06-2008, 06:07 AM
#38
Senior Member
SL Member

Join Date: Feb 2007
Location: Back in the "grove"
Posts: 2,472
so how many of the nieghbors came over and asked wth are you doin?
and how many people gave you funny looks in the wal-mart measuring their *****?
and again awsome awsome work.
12-07-2008, 12:34 AM
#40
Member
Thread Starter
Join Date: Oct 2005
Posts: 31
Darn it! For some reason I don't always get e-mail notification of new post's.
I think they were too freaked out to ask what I was making. Once I started applying body filler, I made sure to carry them both in and out of the garage at the same time, holding them against my chest with my arms wrapped around them. It looked like two giant *****. I am sure it was not the weirdest thing they have seen me doing though.
We are talking about Wal-Mart now. I was the one giving the funny looks towards my fellow shoppers. I feel out of place at Wal-Tart.
Thank you for the compliment.
Yep.
so how many of the nieghbors came over and asked wth are you doin?
and how many people gave you funny looks in the wal-mart measuring their *****?
Thank you for the compliment.
A 16" diameter ball has a volume that's just a hair shy of 1.25 cubic feet.