
Energy Suspension End Link Bushings installed!!!!


 03-18-2008, 10:43 PM
#282
Junior Member

Join Date: Mar 2007
Location: in front of my monitor
Posts: 11
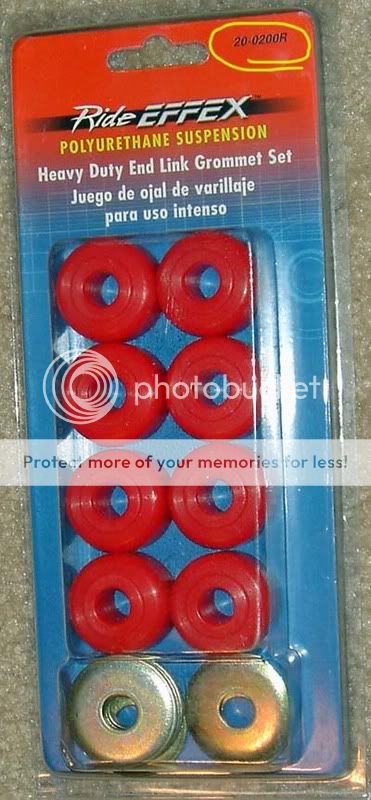
I found another local source for the End Link Grommet Set. You can also get them at PepBoys. They are made by SUPERIOR AUTOMOTIVE. Their product line is Ride EFFEX P/N:20-0200R and they cost $9.99.
This kit is IDENTICAL in every way to the Energy Suspension part number 9.8105R but it cost a few dollars less. The kit includes the identical 8 Red Polyurethane Grommet's and the 8 metal washers just like the Energy kit does.
Superior Automovite web site: www.sup-auto.com
Polyurethane Sway Bar End Link Kit
Energy Suspension
Part Number: 9.8105R
ID: 0.375"
Nipple OD: 0.6875"
OD: 1.125"
Overall Length: 0.75"
Includes: 8 Grommets & 8 Heavy Gauge Washers
Retail Price: $11.99
=====
Superior Automovite - Ride EFFEX
Part Number: 20-0200R
ID: 0.375"
Nipple OD: 0.6875"
OD: 1.125"
Overall Length: 0.75"
Includes: 8 Grommets & 8 Heavy Gauge Washers
Retail Price: $9.99
=====
The bolts required are:
Grade 8, 5/16 diameter, 4" long,
The lock nut required are:
Grade 8, 5/16, Self Locking.
03-27-2008, 12:15 AM
#283
Senior Member
SL Member

Join Date: May 2005
Location: L.A.,CA
Posts: 701
Hey enduser, great info! I dropped by Pep Boys and they had one pack left. Thanks for putting all that info in your post!
Pretty easy to install. Jacked both sides up, took the old bolts and bushings out, put the new ones in, and ready to go! I don't really feel handling improvements, but it does feel much tighter going over bumps.
Pretty easy to install. Jacked both sides up, took the old bolts and bushings out, put the new ones in, and ready to go! I don't really feel handling improvements, but it does feel much tighter going over bumps.
 04-12-2008, 11:36 PM
#287
Senior Member
SL Member

Join Date: Sep 2004
Location: No. Virginia
Posts: 427
I just finished this mod. It helps to have both sides jacked up if you don't use ramps. I had to adjust my jacks a bit as I went along to get the bolts to drop in.
Here's a tip... put the second bushing, 2 washers and the third bushing on the control arm first before feeding your bolt and first bushing through.
Here's a tip... put the second bushing, 2 washers and the third bushing on the control arm first before feeding your bolt and first bushing through.
04-17-2008, 10:36 PM
#288
Senior Member
SL Member
Join Date: Feb 2007
Posts: 643
Finished this mod today, and I must say its well worth the few bux for the parts. I can't believe those stock bushings were just shot with not even 19,000miles on them.
Definitly unbolt both stock units when uninstalling so you can move the swaybar around to take the old junk out. Also put the front end on jackstands and use the jack (or 2 if you have them like I did) to jack up and down each control arm. This is very important to getting the old stuff out and the new stuff in.
Definitly unbolt both stock units when uninstalling so you can move the swaybar around to take the old junk out. Also put the front end on jackstands and use the jack (or 2 if you have them like I did) to jack up and down each control arm. This is very important to getting the old stuff out and the new stuff in.
04-20-2008, 03:19 AM
#289
Member

Join Date: Oct 2005
Posts: 31
I did this mod today. Before starting this mod, I measured the distance between the bottom of the sway bar and the top of the a-arm, and noted that it was 1.75".
If you just stack up the washers and bushings as shown in previous threads, the distance between them will end up at just 1.5", even before tightening the assembly. In order to keep the correct geometry, I machined a pair of spacers .25" long and a pair .375" long, to put between the inner washers.
Upon re-assembly I realized that it was gonna be hard enough just getting the .25 thick spacers in there, so thats what I went with, and discarded the .375" spacers. The 4" bolt was just barely long enough for me to get the nut started. Afer tightening to the correct torque, I remeasured between the bar and the a-arm, and have a distance of 1.625". This I feel, is close enough. If I would not have used a spacer at all, the disatnce would have only been 1.375".
This may seem **** and overkill, but I see no reason to shorten the length of the link, if I can make it the right length to begin with. Also the bushings will seat better if they are squared up, or perpendicular, with the holes in the bar and a-arm(which is how it was designed to be). Now in the past, when I have lowered my vehicles, I shortened the length of the link relative to the amount of drop. The bar end may not be parallel with the a-arm in a lowered application, but this is one of the compromises that come with lowering. Maintaining the sway bar ends geometry or height, relative to the center sway bar mounting points takes priority in this application.
This is actually the main reason I used spacers between the inner washers;Maintaining the sway bar ends geometry or height, relative to the center sway bar mounting points takes priority in this application.
07-14-2008, 11:25 PM
#290
Banned
SL Member

Join Date: Dec 2003
Location: Motel 6
Posts: 2,202
Just installed these on mine and the GFs xBs. First time on mine was a learning expierence. The GFs was much easier. Some pointers i would like to make.
Jack the front end of the car up and secure it on stands.
12MM for both top and bottom of the OEM bolt
remove the top nut first.
Using visegrips on the center of the bolt remove the bottom nut.
Do this on both sides, and the OEM bolts, washers and rubbers will just fall out.
When installing, insert the center bushings with 2 metal washers in the center.
From the top, drop in the new 4" bolt with a bushing and metal washer.
Do both sides, then install the bottom bushing, washer, and locking nut from the bottom and tighten.
My bolts were only threaded on the bottom inch or so, so i tightened them all the way up to that point. I also did not find the Grade 8 nut, so i went with the basic.
I also bled my front end brakes while i was under there. The fluid came out yellow ( DOT 3 ) but with the fluid were tiny bits of stuff. Stuff black and rust colored. I had the GF pump the brakes until no more stuff was released from the front calipers. This sutff came out of both sets of calipers, hers and mine.
Oh, i bought the bushings from PepBoys as well. Part # 20-0020R
 07-16-2008, 12:43 PM
#292
Banned
SL Member
Join Date: Dec 2003
Location: Motel 6
Posts: 2,202
So after making a day trip to Coney Island yesterday ( the famous 4th of July Nathans Hot Dog Eating Contest 2 blocks down ) i did notice that the front end was smoother. I already have the front srtut brace ( RS1 ) and the Progress rear sway & Progress spring so i wasnt expecting much. I did notice that going over potholes and sewer grates, the transistion was considerably smoother.

 08-29-2008, 04:45 PM
#296
Junior Member

Join Date: Jul 2008
Posts: 28
Originally Posted by Oompwa
I did this mod today. Before starting this mod, I measured the distance between the bottom of the sway bar and the top of the a-arm, and noted that it was 1.75".
If you just stack up the washers and bushings as shown in previous threads, the distance between them will end up at just 1.5", even before tightening the assembly. In order to keep the correct geometry, I machined a pair of spacers .25" long and a pair .375" long, to put between the inner washers.
Upon re-assembly I realized that it was gonna be hard enough just getting the .25 thick spacers in there, so thats what I went with, and discarded the .375" spacers. The 4" bolt was just barely long enough for me to get the nut started. Afer tightening to the correct torque, I remeasured between the bar and the a-arm, and have a distance of 1.625". This I feel, is close enough. If I would not have used a spacer at all, the disatnce would have only been 1.375".
This may seem **** and overkill, but I see no reason to shorten the length of the link, if I can make it the right length to begin with. Also the bushings will seat better if they are squared up, or perpendicular, with the holes in the bar and a-arm(which is how it was designed to be). Now in the past, when I have lowered my vehicles, I shortened the length of the link relative to the amount of drop. The bar end may not be parallel with the a-arm in a lowered application, but this is one of the compromises that come with lowering. Maintaining the sway bar ends geometry or height, relative to the center sway bar mounting points takes priority in this application.
This is actually the main reason I used spacers between the inner washers;Maintaining the sway bar ends geometry or height, relative to the center sway bar mounting points takes priority in this application.
If you just stack up the washers and bushings as shown in previous threads, the distance between them will end up at just 1.5", even before tightening the assembly. In order to keep the correct geometry, I machined a pair of spacers .25" long and a pair .375" long, to put between the inner washers.
Upon re-assembly I realized that it was gonna be hard enough just getting the .25 thick spacers in there, so thats what I went with, and discarded the .375" spacers. The 4" bolt was just barely long enough for me to get the nut started. Afer tightening to the correct torque, I remeasured between the bar and the a-arm, and have a distance of 1.625". This I feel, is close enough. If I would not have used a spacer at all, the disatnce would have only been 1.375".
This may seem **** and overkill, but I see no reason to shorten the length of the link, if I can make it the right length to begin with. Also the bushings will seat better if they are squared up, or perpendicular, with the holes in the bar and a-arm(which is how it was designed to be). Now in the past, when I have lowered my vehicles, I shortened the length of the link relative to the amount of drop. The bar end may not be parallel with the a-arm in a lowered application, but this is one of the compromises that come with lowering. Maintaining the sway bar ends geometry or height, relative to the center sway bar mounting points takes priority in this application.
This is actually the main reason I used spacers between the inner washers;Maintaining the sway bar ends geometry or height, relative to the center sway bar mounting points takes priority in this application.
Any idea if I can just reduce/cut the size of the bolt and the spacer on the ES kit a little bit, looking for a middle ground?:
http://www.energysuspensionparts.com...5130&cat=10770
Or is the threaded part of the bolt too short?
09-03-2008, 03:47 AM
#297
Senior Member
SL Member

Join Date: Apr 2007
Location: Richmond, VA
Posts: 2,084
Guess whats missing???

Hints:
Its grade 8
its made out of rubber like material
red and silver in color
can be purchased at lowes and auto zone
connects sway bar to control arm
Yup, it broke and vanished. I felt a slight wobble on the interstate like it was really windy out. Then clunk noises when going over bumps sideways. I checked and it was gone.
I replaced it with the kit that comes with the bolts, lets see hot that one holds up.
 09-03-2008, 04:10 AM
#299
Senior Member
SL Member
Join Date: Apr 2007
Location: Richmond, VA
Posts: 2,084
Yupper, got em from lowes. I did this back in March.
I was horsing around the other day we got all this rain, better check yourself before you wreck yourself.
I basically was drifting to end all drifting and when it snapped I lost my drifting ability and when the car strighten out I quit that.
I was horsing around the other day we got all this rain, better check yourself before you wreck yourself.
I basically was drifting to end all drifting and when it snapped I lost my drifting ability and when the car strighten out I quit that.
Originally Posted by dexter_5000
did you use a nylon lock nut?
09-28-2008, 05:26 PM
#300
Junior Member
Join Date: Jul 2008
Posts: 28
Got my bushings bolts and nuts with the good info enduser62 posted up there
Now... question, jacking up the car, is that just for clearence or do I need the wheels to be "hanging" ?
I ask because I can also use ramps which would be easier. So... ramps or jacks?
Now... question, jacking up the car, is that just for clearence or do I need the wheels to be "hanging" ?
I ask because I can also use ramps which would be easier. So... ramps or jacks?