Boxer Rebellion's Summer Overhaul (intake/exhaust/pulley...)
 08-23-2005, 05:31 PM
#1
Senior Member
SL Member
Thread Starter

Join Date: Jan 2005
Location: Birthplace of Speedo, USA
Posts: 2,556
Hello all... got some mods planned over the next month or two and thought I'd document them all in one thread. Most are outside the car, hence the Drag Coefficient placement. I'll be taking lots of pix and keep everyone updated on the progress. Here's the current list...
1. Grille- the 4caroption carbon fiber one. Just installed. I've had alot of questions about fitment, so I'll show what needed to be done in detail, the good and the bad.
2. Wheels/Tires/Lugs/OTG shims- Very excited about these. Wheels arrived today and hopefully can get everything sorted and mounted next week...
3. Taillights- You may have seen my current DIY tails... I like em but have some ideas for improvements, so I'll be starting from scratch with stockers.
4. Gauge Cluster- Did some pretty unique mods to it you may find interesting.
5. Misc. Mods- Have a few other things planned if I have time (School starting and record FL heat might be a factor...)
Well that's all for now... should have the first installment tomorrow.


 08-24-2005, 06:49 PM
#6
Senior Member
SL Member
Thread Starter
Join Date: Jan 2005
Location: Birthplace of Speedo, USA
Posts: 2,556
Aight kids, first up is the grille. I haven't seen anyone write about the carbon bB grille in any detail so here's my experience with it. Overall I'm satisfied although I might be painting it TCM in the future, haven't decided...
Here it is-

It comes with a mesh insert which is actually nicely done, and a black w/chrome bB badge that I decided not to use-

The regular bB badge fits AND allows you to slide a zip tie behind it... which brings me to what's not to like about this grille. It does NOT fit out of the box.
First off the front bows out a bit from the line of the hood/bumper... this is fixed by the use the the aforementioned ziptie. It goes around the central brace under the hood latch (or thru the hole that's in the center i=of it) and around where the bB badge goes, like this-

from the front-

The standard bB badge has just enough space for the tabs to slide in, over and under where the ziptie cuts across. The black bB one has no tabs, its an adhesive emblem that requires a flat surface and won't work.

But the biggest hurdle is the fitment of the sides of the grille. The underside of the top edge of the grille is not flat like the stock grille is, but angled and uneven (a byproduct of it being CF perhaps...) So you have to widdle down the soft plastic attachment tabs on the headlights that the grille fastens to... I did this with an Exacto knife and it took at least half an hour to get the two sides to match up with the grille and make it fairly level... The plastic is very soft on the headlight housing and not too hard to trim, I'm sure you may have better tools for the job than I do
Check the angle of the upper side edge of the grille... you have to make the tab match that angle.

The hole on the sides is just big enough to slip a zip tie through... it might be able to be drilled out to use the OEM fasteners but I didn't want to risk it, as it's very close to the edge...
Here's what the alignment looks like after all that crap, pretty decent-

The other issue is the carbon fiber weave is a bit uneven, which is what makes it look authentic I guess In direct sunlight it can look less than perfect. I'm toying with the idea of painting the top part of it TCM and leaving the lower part carbon, not sure....

Here's a shot with the hood up (you can't really see the engine bay at all thru the mesh when the hood's closed)-

So that's the grille. Next up is the guage cluster thingie.
Here's a preview-

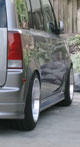
Also wheel preview-


Here it is-
It comes with a mesh insert which is actually nicely done, and a black w/chrome bB badge that I decided not to use-
The regular bB badge fits AND allows you to slide a zip tie behind it... which brings me to what's not to like about this grille. It does NOT fit out of the box.
First off the front bows out a bit from the line of the hood/bumper... this is fixed by the use the the aforementioned ziptie. It goes around the central brace under the hood latch (or thru the hole that's in the center i=of it) and around where the bB badge goes, like this-
from the front-
The standard bB badge has just enough space for the tabs to slide in, over and under where the ziptie cuts across. The black bB one has no tabs, its an adhesive emblem that requires a flat surface and won't work.
But the biggest hurdle is the fitment of the sides of the grille. The underside of the top edge of the grille is not flat like the stock grille is, but angled and uneven (a byproduct of it being CF perhaps...) So you have to widdle down the soft plastic attachment tabs on the headlights that the grille fastens to... I did this with an Exacto knife and it took at least half an hour to get the two sides to match up with the grille and make it fairly level... The plastic is very soft on the headlight housing and not too hard to trim, I'm sure you may have better tools for the job than I do
Check the angle of the upper side edge of the grille... you have to make the tab match that angle.
The hole on the sides is just big enough to slip a zip tie through... it might be able to be drilled out to use the OEM fasteners but I didn't want to risk it, as it's very close to the edge...
Here's what the alignment looks like after all that crap, pretty decent-
The other issue is the carbon fiber weave is a bit uneven, which is what makes it look authentic I guess
In direct sunlight it can look less than perfect. I'm toying with the idea of painting the top part of it TCM and leaving the lower part carbon, not sure....Here's a shot with the hood up (you can't really see the engine bay at all thru the mesh when the hood's closed)-
So that's the grille. Next up is the guage cluster thingie.
Here's a preview-
Also wheel preview-


 08-25-2005, 12:53 PM
#12
Senior Member
SL Member

Join Date: Nov 2004
Posts: 213
Hey Boxer, I've admired your mods as I have a TCM right down the road from you. So now I can paint my grill like yours was. I think it looks good but might look better body colored. Are those wheels the same as ViolentB? only silver of course. Hopefully now that my car is modified I can get to a show this fall to see all these cars in person.
08-25-2005, 04:32 PM
#13
Senior Member
SL Member
Thread Starter
Join Date: Jan 2005
Location: Birthplace of Speedo, USA
Posts: 2,556
Originally Posted by DisneybB
Hey Boxer, I've admired your mods as I have a TCM right down the road from you. So now I can paint my grill like yours was. I think it looks good but might look better body colored. Are those wheels the same as ViolentB? only silver of course. Hopefully now that my car is modified I can get to a show this fall to see all these cars in person.
I might be getting rid of my old grille, if so I'll let you know.
Yep those are the same wheels as ViolentB's but 17x7.5" and silver. Found new old stock ones online from some warehouse somewhere and couldn't pass em up, they're some of my fave wheel designs ever.
...yeah you should come to our Scion Dynasty Daytona meets sometime, be glad to have you.
08-25-2005, 05:13 PM
#14
Senior Member
SL Member
Thread Starter
Join Date: Jan 2005
Location: Birthplace of Speedo, USA
Posts: 2,556
OK, installment #2: GAUGE CLUSTER THINGIE.
Like the grille this is a mod I've already completed, but I'll tell ya how it's done. It's purely cosmetic but it makes the whole dash are look 200% better IMO.
I like the aftermarket chrome bezel you can get for the speedo but thought it was a bit heavy and garish looking... I wanted something that looked like a swatch watch protruding from the dash, very stylized but clean. AND I wanted a little red stripe around it (don't ask me why)... took me a bit to figure out the best way to do it.
First remove the bezel/cluster/thingie. There's a tech article that shows you how, basically remove the one screw above the idiot light panel and yank toward you carefully.
I masked off the front smooth section around the speedo and painted that Testors Metallic Silver, very light coats, inside and out.
I then masked the silver part and painted the rest Krylon Metallic Black, really more of a anthracite color.
Then I wanted a little red strip to seperate these areas. After some trial and error I came up with this- Take three red zip ties 8", the kind with the teeth only on one side, smooth on the other. Slice the ends off as straight and cleanly as possible... I found sharp scissors worked best. I then VERY carefully abraded the end edges lightly with sandpaper to give it a little tooth, and crazy glued the ends together (glue applied with a needle to make the amounts very small...) The trick is to make the ends line up seamlessly. If I would screw up I would just cut it off right before a joint and try again... it takes 3 zips, 2 don't quite make it (if the made ONE zip long enough that was smooth on one side it would have been ideal, but i don't believe they exist...)
The glue fuses the plastic and it should be almost as strong as if it was one piece.
I cut the length to be exactly enough to wrap from one end to another... I tried having it go past the edges and under the bezel but it didn't work very well.
To affix it I started on one end with a dot of crazy glue on the bottom edge and worked around, a little bit more dots every inch or so, carefull to keep them hidden by the strip itself, and scraping off a little paint where the glue was so plastic could stick to plastic. Work slowly and carefully till you get to the other side, and put a little extra glue there, just try not go get any glue on the silver part in front of the red strip as it will be very obvious
Here's a bit of detail removed from the car-
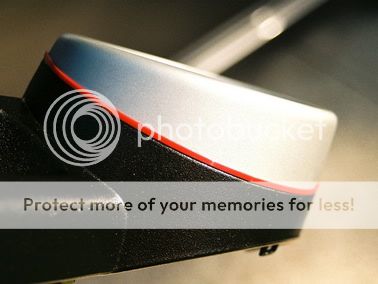
Let it set for a bit and snap it back in, should look something like this-

The testors is a pretty close match to the other silver dash trim pieces and integrates nicely...

I like the way it looks from outside the car too, much more prominent...

One thing interesting about the inside of the bezel is that in certain lighting conditions the gauge face is bottom lit by reflected light, which makes a cool "glow" at times...
BTW the Badtz Maru head is a small part of a custom speedo I had made, but it had tribal flames and all kinds of craziness that made it hard to read the numerals at a glance... so I just cut out the head from it and stuck it on the OEM face. At least light shines thru it so the eyes glow at night...
Well there ya have it, more fun with paint, zip ties and crazy glue.
Next up, wheels/tires/lugs/shims. Not really as crafty, but more interesting I imagine...
Like the grille this is a mod I've already completed, but I'll tell ya how it's done. It's purely cosmetic but it makes the whole dash are look 200% better IMO.
I like the aftermarket chrome bezel you can get for the speedo but thought it was a bit heavy and garish looking... I wanted something that looked like a swatch watch protruding from the dash, very stylized but clean. AND I wanted a little red stripe around it (don't ask me why)... took me a bit to figure out the best way to do it.
First remove the bezel/cluster/thingie. There's a tech article that shows you how, basically remove the one screw above the idiot light panel and yank toward you carefully.
I masked off the front smooth section around the speedo and painted that Testors Metallic Silver, very light coats, inside and out.
I then masked the silver part and painted the rest Krylon Metallic Black, really more of a anthracite color.
Then I wanted a little red strip to seperate these areas. After some trial and error I came up with this- Take three red zip ties 8", the kind with the teeth only on one side, smooth on the other. Slice the ends off as straight and cleanly as possible... I found sharp scissors worked best. I then VERY carefully abraded the end edges lightly with sandpaper to give it a little tooth, and crazy glued the ends together (glue applied with a needle to make the amounts very small...) The trick is to make the ends line up seamlessly. If I would screw up I would just cut it off right before a joint and try again... it takes 3 zips, 2 don't quite make it (if the made ONE zip long enough that was smooth on one side it would have been ideal, but i don't believe they exist...)
The glue fuses the plastic and it should be almost as strong as if it was one piece.
I cut the length to be exactly enough to wrap from one end to another... I tried having it go past the edges and under the bezel but it didn't work very well.
To affix it I started on one end with a dot of crazy glue on the bottom edge and worked around, a little bit more dots every inch or so, carefull to keep them hidden by the strip itself, and scraping off a little paint where the glue was so plastic could stick to plastic. Work slowly and carefully till you get to the other side, and put a little extra glue there, just try not go get any glue on the silver part in front of the red strip as it will be very obvious
Here's a bit of detail removed from the car-
Let it set for a bit and snap it back in, should look something like this-
The testors is a pretty close match to the other silver dash trim pieces and integrates nicely...
I like the way it looks from outside the car too, much more prominent...
One thing interesting about the inside of the bezel is that in certain lighting conditions the gauge face is bottom lit by reflected light, which makes a cool "glow" at times...
BTW the Badtz Maru head is a small part of a custom speedo I had made, but it had tribal flames and all kinds of craziness that made it hard to read the numerals at a glance... so I just cut out the head from it and stuck it on the OEM face. At least light shines thru it so the eyes glow at night...
Well there ya have it, more fun with paint, zip ties and crazy glue.
Next up, wheels/tires/lugs/shims. Not really as crafty, but more interesting I imagine...