Blacked out my lights.
 01-29-2008, 05:37 AM
#21
Senior Member
SL Member
Thread Starter
Join Date: Jun 2007
Location: Portland, OR
Posts: 262
Originally Posted by SSVworks
THANKS! i did mine this weekend and they look great. My only advice would be a lower temp for a longer time (like the other thread said). some of the plastic on the housing deformed slightly and i had to grind a spot and re-round a hole to get it back on the car. minor stuff for the result. Good write up.
-Trevor
-Trevor
 01-29-2008, 05:39 AM
#22
Senior Member
SL Member
Thread Starter
Join Date: Jun 2007
Location: Portland, OR
Posts: 262
Originally Posted by RoboX
really any paint will do. DO NOT touch the chrome with your fingers! AT ALL. itll cause you to do much more work! DO NOT sand the housing down! it does not need to be roughed up. i would use a semi gloss or flat black. LIGHT layers of paint. wait 10 mins between coats. let the paint dry 100% before reinstalling the housing. otherwise itll leave a rainbow like glare on your lens. after putting the headlight back together. reseal it with black silicone. and you should be good. heres the basic steps to take
1- remove front bumper
2- unplug headlight bulbs
3- remove headlights
4- there will be 3-4 philip screw on the back side of your headlights remove those
5- preheat oven at 250
6- place ONE head light in the oven for 7 mins
7- take the head light out of oven
8- there are a few tabs along the sides where the len meets the back part pop those off
9- start peeling them apart (flat head screw diver will help out
10- with glove pull the middle housing out and place on a piece of cardboard
11-spray light coats of spray paint on the lens
*at a fairly fast motion spray left to right, right the len until you have a light coat on. (just enough where you see it black but the chrome still come trough it a little apply that same ammount of paint after 10 mins. keep doin that until all chrome is gone. make sure you get all the little corners
12- after paint is dry place the housing back into its home
13- put the lens back on and press the back piece and lens together
14- place that until back into the oven for a bout 4 mins
15- pull out the until and press harder until the tabs resnap back together
*dont worry if the all dont
16- as its cooling reinstall the philip screws that you took out and youll notice itll that then lens will pull closer in.
*if needed manually resnap the tabs back on
17- let then until cool down
18- apply black silicone all around the edge to prevent fogging
*it just an extra step you can take not 100% needed
19- do the same thing with the other head light
20- put everything back together then BAM! mean look under $20 and not much time
01-30-2008, 03:46 AM
#23
Junior Member

Join Date: Dec 2007
Posts: 11
dang... you painted the whole inner turn signal bulb area. i masked off that 'pocket' where the inner bulb sits, i thought you did too. oh well... i tried tinting the orange reflector but i was worried it didn't let enough reflection through so i untinted it before i put it back together. It looks Sick anyway! suspension is on the way, I'll post pics by Friday!
01-30-2008, 04:50 AM
#24
Senior Member
SL Member
Thread Starter
Join Date: Jun 2007
Location: Portland, OR
Posts: 262
some of my friends on other cars went to an auto store and bought some other color reflectors (clear, blue) cut them out to shape and replaced them with the ambers. i like the amber so i left it. love to see some pics post them up when you can
03-02-2008, 03:39 AM
#27

Originally Posted by RoboX
the reflectors? no it can only be yellow amber or clear in the front you might ba able to get away with blue
03-02-2008, 03:58 AM
#28
Junior Member

Join Date: Nov 2007
Location: San Bruno, CA
Posts: 16
no I actually meant the housing.. goin with a green theme.. i contacted rock blocker and they said a green over lay would be illegal but im wondering if it would be legal if i did the house since the green would not filter the light itself...
03-02-2008, 12:46 PM
#29
Senior Member
Revolt Imports
DeepSouth Scions
SL Member
iTrader: (1)

Join Date: Apr 2004
Location: Gonzales
Posts: 1,014
Any color inside would be ok as long as the light isn't affected.
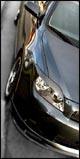
I did my headlights last night in black. First I gotta say I was pretty scared being this was the first time I've ever tried this, but it was really easy and they look a million times better in my opinion.
I did my headlights last night in black. First I gotta say I was pretty scared being this was the first time I've ever tried this, but it was really easy and they look a million times better in my opinion.

 03-03-2008, 01:19 PM
#32

Originally Posted by DJ_FroZone
can somebody up a pic on a BSP? btw how much did this cost u guys?
looks bad-___ guys. im still trying to get the guts up to bake my first gen lights to clear the reflector. im a wimp