Custom Intake Using Spectre Parts From AutoZone
#1
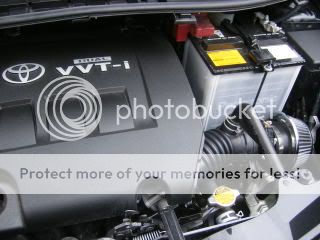
Spectre intake for 3" intake system for $20
Spectre 3" to 3" or 3" to 2.5" coupler with 2 metal clamps $8
Total: $28 (not including zip ties)
Bought the filter, thinking we had a 3" intake system. I believe now that a filter for a 3.5" intake system would have fit much better.
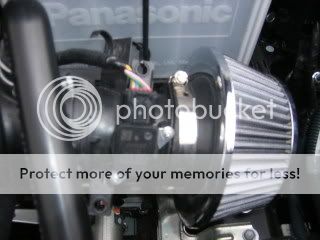
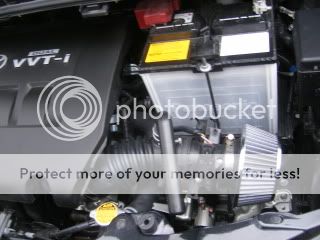
I used a hair dryer to heat up the coupler, and then stretched it over the MAF, then clamped it down.
The other end of the coupler, attached to the filter,I squeezed inside the filter, which was a tight fit, and then clamped it down also.
I used zip ties to keep the filter from moving around while driving. My concern is that eventually these zip ties will break from tension, or becoming brittle from heat.
I was hoping to secure it in a more permanent way using some metal rods. (Thanks for the rod idea TRDxD)
I have had this setup for about 1 day now, have been checking it a lot, drove a pretty good amount today, and everything is staying in place,
nothing broke, or even slipped/moved the slightest amount.
Hoping to get a Fujita CAI one day, but this setup will do just fine for now on my budget!


Last edited by imageex; 09-15-2011 at 04:11 PM.
#2
Forgot to add, after I installed it all, I unhooked the battery, let it sit for awhile, and it was ALL good.
I wanted to make sure the computer picked up the new airflow, and it did just fine.
Reset all of my settings on my radio, clock, trip A/B, avg speed/mph.
Only thing it didn't reset was the odometer.
I don't think this is even necessary, but I did it anyways
Thanks for reminding me of that
I wanted to make sure the computer picked up the new airflow, and it did just fine.
Reset all of my settings on my radio, clock, trip A/B, avg speed/mph.
Only thing it didn't reset was the odometer.
I don't think this is even necessary, but I did it anyways
Thanks for reminding me of that
Last edited by imageex; 01-06-2010 at 02:29 AM.
#3
dang...very nice pics! haha hopefully i can get mine back and and put the rods on...i really have to stop being lazy and get over to my friends place and work on it! (can't work on the streets where i live and i have no driveway hahah)
glad that i could be of help!! if i finish the rods before you get em on ill post some pics here (if you dont mind) as a DIY
glad that i could be of help!! if i finish the rods before you get em on ill post some pics here (if you dont mind) as a DIY
#4
Please do with the pictures! I have a feeling that you will get to it first.
"I made a mounting bracket with a 5/16" rod of all thread, used nylon lock nuts and washers.
took out the rubber grommit on the lower mounting bracket for the air box, bent the all thread so that it lined up with the mounting points for the air box on the back side,
ran rod thru lower mount and put washer and lock nut on bottom,
ran another washer and nut down to secure the bottom to the bracket then put another nut and washer on it and put the intake pipe on the all thread and secured the top, no movement.
One 12" pc of 5/16 all thread, four nuts and washers. cut off excess so that I didn't have the rod sticking out anywhere.
You can do the same for the front, but 5/16 won't fit thru the hole.
If you can find the right metric thread for the front, you could screw it into the front lower mount for the airbox and sandwich the upper mount point between two washers and nuts.
I just finished doing this to mine the other night at work, I'll try to get pics so you know what I'm talking about." Thanks robbiej from Cafe xD
I'm sure that will help you TRD
#5
actually thats EXACTLY what i have equipment wise, and exactly what i was going to do to secure everything. thanks for lookin out for me man! I'll try to get it worked out this weekend. im getting an ITCH to work on a car.
#9
mmm i like the stubby :D haha i wanted to go with a dome filter for the hell of it but..couldn't find anything worth the money..(in other words...it was expensive as hell) nor did they come in the diameter necessary
i believe the diameter is 3"...im not sure as to why the 3" didn't work for imageex? but i was pretty certain that it was 3...maybe im mistaken :\
i believe the diameter is 3"...im not sure as to why the 3" didn't work for imageex? but i was pretty certain that it was 3...maybe im mistaken :\
#10
I thought it was a 3" also. The package for the filter said "for 3" intake systems" put when I went to put it on,
it matched right up with the MAF, and did not slid over top of it like it should have.
So maybe the packaging for my filter is wrong, but my guessing is a 3.5" would slip right on, the correct way.
I kind of like the red coupler that it has, and the filter makes a nice, deep tone,
For short, my guess is 3.5"
Last edited by imageex; 01-06-2010 at 02:27 AM.
#11
my filter is 3" nd i had to do lil slit cut to attach it to the stock pipe. btw dont invest with making your own custom short ram or cold air . not that they are bad but you wont get a good fit with the air fuel adapter and will just cause your car to not start or throw a code. 80 bucks down the drain 
#14
Originally Posted by imageex
Cutting your intake is probably the last resort, chance of leakage.. not good
#20
I am really not sure, i bought a 3" and it would not fit at all, lined up with the MAF,
didn't slide over it, so im guessing that a 3.5" would fit perfectly,
wait till some others respond though, because I am am honestly not sure
didn't slide over it, so im guessing that a 3.5" would fit perfectly,
wait till some others respond though, because I am am honestly not sure


