
Dome Assembly (Hard Wire)
 01-25-2013 | 02:10 AM
#1

Thread Starter
Junior Member
Joined: Jan 2013
Posts: 18
Hey Guys,
I'm new to the forum, But I was wondering if anyone could help me with my new Radar Detector install.
I just bought a Valentine v1 and a BlendMount, I want to Hard Wire the v1 into a Switched Wire up in the Dome Assembly. But I don't want to break/crack anything. Has anyone done this successfully? I've seen two DIY: Hard Wire Instructions with pictures for the original tC but they're defiantly not the same.
If I could just get inside the Dome Assembly I could do the rest, or unless someone wants to make my life easier and just help me out, I would greatly appreciate it.
If anyone could help me or has any pictures or links to a DIY that was done on a tC Second Gen. That would be great.
Thanks Guys
01-25-2013 | 12:07 PM
#3
Thread Starter
Junior Member
Joined: Jan 2013
Posts: 18
Does the Dome assembly use clips or plastic push in screws?
You wouldn't happen to know which wire is a switched wire would you?
You'd make my day and make the job that much easier, as I don't have a multimeter anymore - Kinda Sorta ran over it in my old Mitsubishi and never bought a new one.
If you don't thats ok, I can just get a new Multimeter.
01-25-2013 | 06:39 PM
#4

Senior Member


SoCal tC Club
SL Member
Team N.V.S.
Scinergy
Scion Evolution
Joined: Oct 2004
Posts: 15,699
they're the typical plastic panel clips.. you can yank the assembly downward and it'll come off. no real need for a screwdriver or anything, you can just use your fingers and get under the panel to get leverage to just yank it down.
as far as which wires? i'd have to look that up.
as far as which wires? i'd have to look that up.
01-25-2013 | 07:02 PM
#5
Thread Starter
Junior Member
Joined: Jan 2013
Posts: 18
Thanks Guys I appreciate it.
If you do happen to remember or figure out which wire I should tap -
If not don't worry about it I'll just get a multimeter and start poking around up there.
Thanks Again guys, I am going for a very clean and neat v1 setup and i'd hate to have to look at an ugly crack in the Dome Assembly. I just really didn't want to break that.
01-30-2013 | 03:16 AM
#6
Thread Starter
Junior Member
Joined: Jan 2013
Posts: 18
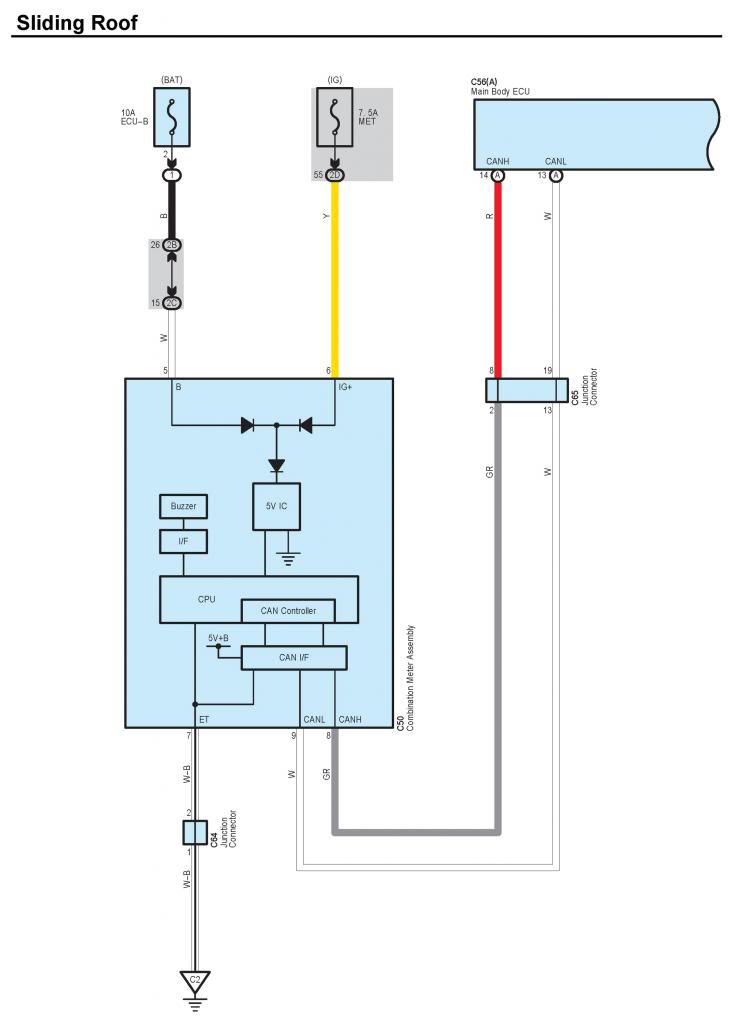
SOLVED:
Just installed the Valentine 1 using the Hard wire T-Tap.
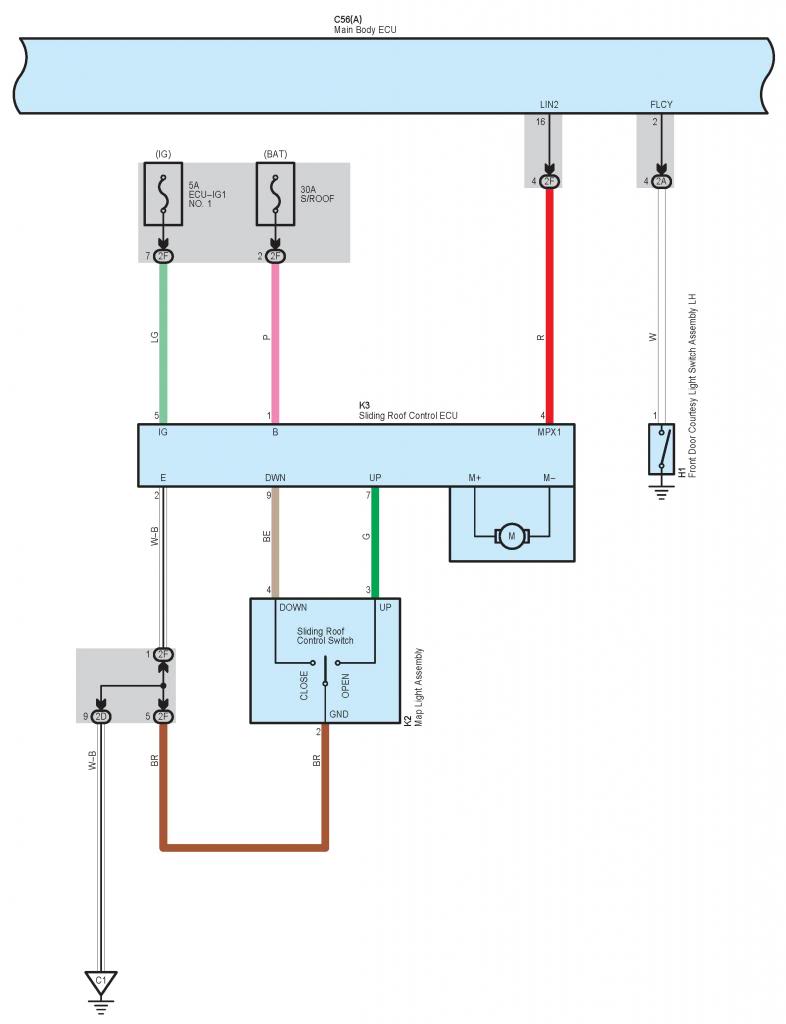
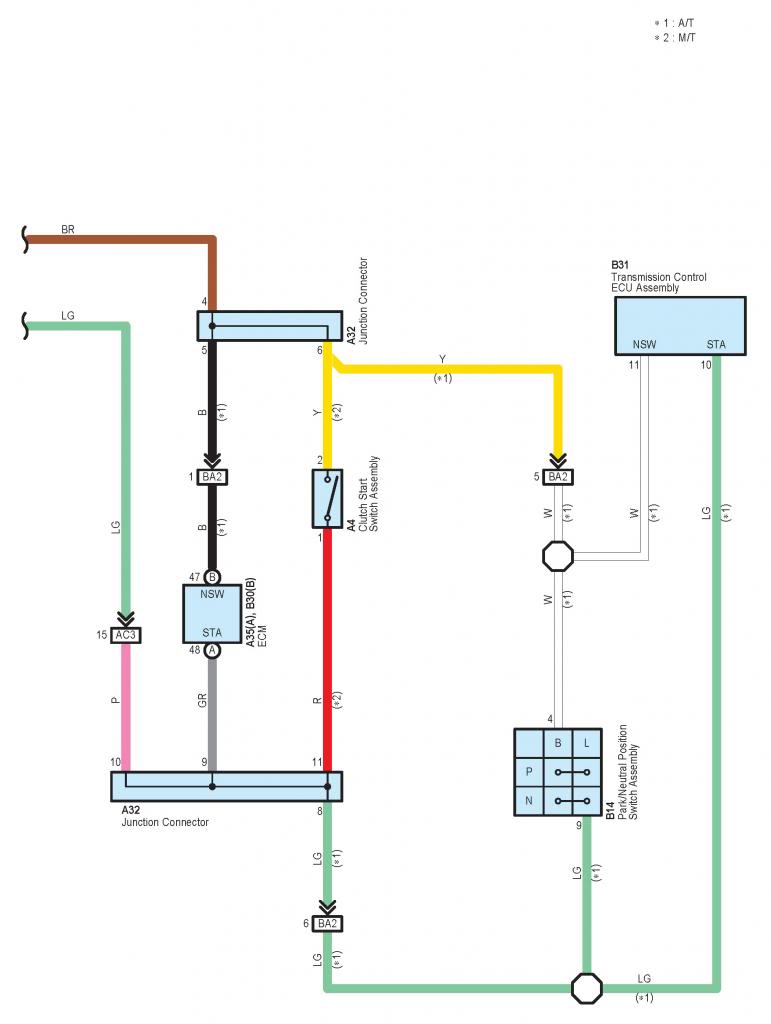
For anyone else looking for the Switched wire to tap to, it's the Greenish wire, located right above or below the thick Pink wire - Depending on how you're looking at the Sunroof Harness. Just tap into it about an inch before the Harness right where the off colored rings are. For the ground I bent the ground clip out and attached it to the bolt for the Sunroof Motor I guess? To take that off it's a 10mm bolt.
I was going to make a 2012 Scion Tc - DIY Radar Hardwire .. But I'm sick and just wanted to do it before I had to go to bed. I have to say, Connecting the T-Tap was much easier than setting up the Blendmount. That thing was a pain in the ****' to get on and pointed the right way and tightened up!
As seen here in this Diagram :

If you need anymore Diagrams I have everything for the 2012 Scion Tc.
Just installed the Valentine 1 using the Hard wire T-Tap.
For anyone else looking for the Switched wire to tap to, it's the Greenish wire, located right above or below the thick Pink wire - Depending on how you're looking at the Sunroof Harness. Just tap into it about an inch before the Harness right where the off colored rings are. For the ground I bent the ground clip out and attached it to the bolt for the Sunroof Motor I guess? To take that off it's a 10mm bolt.
I was going to make a 2012 Scion Tc - DIY Radar Hardwire .. But I'm sick and just wanted to do it before I had to go to bed. I have to say, Connecting the T-Tap was much easier than setting up the Blendmount. That thing was a pain in the ****' to get on and pointed the right way and tightened up!
As seen here in this Diagram :
If you need anymore Diagrams I have everything for the 2012 Scion Tc.
Last edited by kcurran907; 01-30-2013 at 10:51 PM.
01-30-2013 | 07:06 AM
#7

Junior Member
Joined: May 2009
Posts: 16
From: CHESTERFIELD, VA
I have to ask why did you get the valentine?
I have to say in my opinion the Magnum STI R is the best remote unit i've gotten 6 miles out on my tC with the non remote unit.
You should go look up radar roy as well.
And also I do need diagrams for the lighting systems and Sunroof of the 2012 also an ignition diagram would be great have some great stuff planned and need those diagrams. can i ask where you got them?
01-30-2013 | 10:35 PM
#8
Thread Starter
Junior Member
Joined: Jan 2013
Posts: 18
I have to ask why did you get the valentine?
I have to say in my opinion the Magnum STI R is the best remote unit i've gotten 6 miles out on my tC with the non remote unit.
You should go look up radar roy as well.
And also I do need diagrams for the lighting systems and Sunroof of the 2012 also an ignition diagram would be great have some great stuff planned and need those diagrams. can i ask where you got them?
I have to say in my opinion the Magnum STI R is the best remote unit i've gotten 6 miles out on my tC with the non remote unit.
You should go look up radar roy as well.
And also I do need diagrams for the lighting systems and Sunroof of the 2012 also an ignition diagram would be great have some great stuff planned and need those diagrams. can i ask where you got them?
The diagrams come from AllData.. Bought the package a few days ago.
Sunroof:

Last edited by kcurran907; 01-30-2013 at 10:56 PM.
01-30-2013 | 10:40 PM
#9
Thread Starter
Junior Member
Joined: Jan 2013
Posts: 18
Ignition w/o Smart Key:
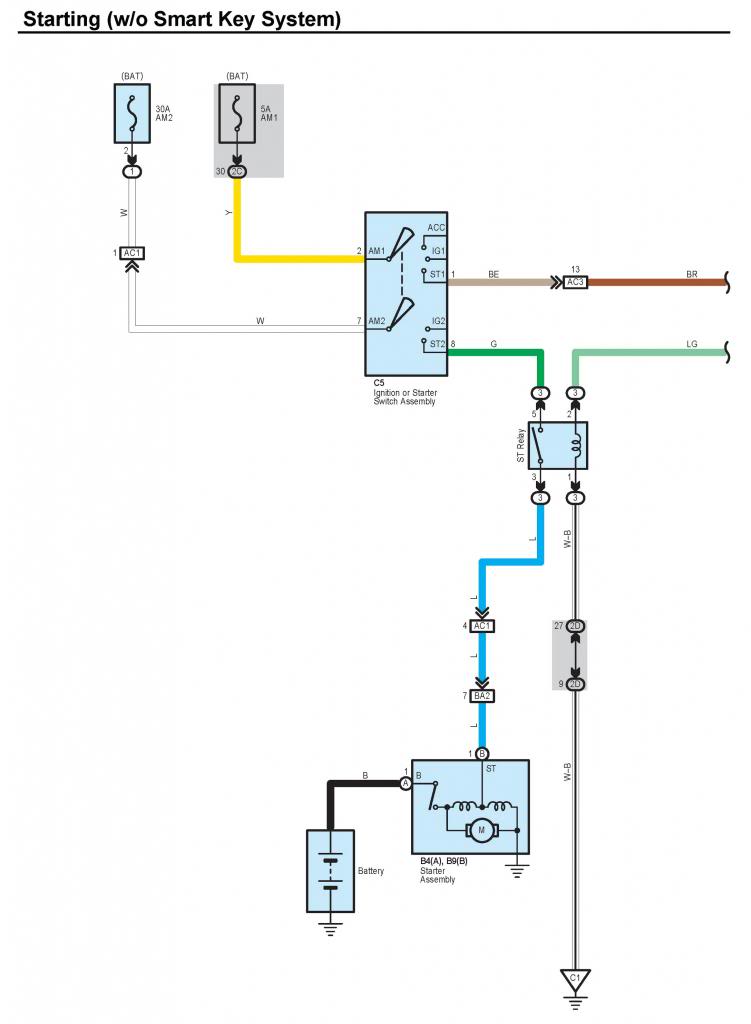
If you've the smart key let me know I'll post that.
Also not sure if you wanted the Lighting Diag. for the dome assembly or something else. Let me know. Happy to share.
If you've the smart key let me know I'll post that.
Also not sure if you wanted the Lighting Diag. for the dome assembly or something else. Let me know. Happy to share.
Last edited by kcurran907; 01-30-2013 at 10:55 PM.
01-31-2013 | 12:27 PM
#11
Thread Starter
Junior Member
Joined: Jan 2013
Posts: 18
HaHa uploading all of that data is something best saved for a weeklong vacation there's link after link with sub links and sub links for sub links. It's he\_\_ to try and find something. I'll try and find a way to download the entire site, all photos and links with it, then compile it into a single PDF.
For now, This is easier for me Just visit my Photo Bucket account that I made for these postings. If there's something else you want, Look under Directory Folder and find what you want. Then I'll post the contents.
http://s1293.beta.photobucket.com/us...an907/library/
Make sure to click on Sub folder listings on the side then you'll see the listings.
Maybe the name of this Thread should be changed...?
P.S I added the Smart Key Diagrams as well.
Last edited by kcurran907; 01-31-2013 at 03:13 PM.
02-01-2013 | 08:33 AM
#12
Junior Member
Joined: May 2009
Posts: 16
From: CHESTERFIELD, VA
lol i think it should. or create another thread specificly for this. and you are awesome. Also I need the alarms keyless entry antenna, the airbag i'm going to see if i cant disable the lights somehow and not trigger a CEL, Automatic lighting,clutch switch and the keyless start all of those would be awesome!!
02-01-2013 | 12:56 PM
#13
Thread Starter
Junior Member
Joined: Jan 2013
Posts: 18
lol i think it should. or create another thread specificly for this. and you are awesome. Also I need the alarms keyless entry antenna, the airbag i'm going to see if i cant disable the lights somehow and not trigger a CEL, Automatic lighting,clutch switch and the keyless start all of those would be awesome!!
Keyless Entry is what I'm stuck on. There's so much information, I'm going to need you to explain what you need - Then I can help you from there. Like wiring harness connectors, how to install / remove, locations, Wiring Diagrams (This is looped in with the keyless entry diagram), etc. Look under the Keyless start album for a list of stuff that you can choose from.
Sorry I would upload more, but I'm trying to do this while I am also working. As I'm to tired when I get home. Although I have this weekend off so I can probably get a good amount uploaded. But I do need to put a new pair of brake pads on and do a oil change.
02-01-2013 | 04:11 PM
#14
Junior Member
Joined: May 2009
Posts: 16
From: CHESTERFIELD, VA
Alright so most of it is in there, my Photobucket that's.
Keyless Entry is what I'm stuck on. There's so much information, I'm going to need you to explain what you need - Then I can help you from there. Like wiring harness connectors, how to install / remove, locations, Wiring Diagrams (This is looped in with the keyless entry diagram), etc. Look under the Keyless start album for a list of stuff that you can choose from.
Sorry I would upload more, but I'm trying to do this while I am also working. As I'm to tired when I get home. Although I have this weekend off so I can probably get a good amount uploaded. But I do need to put a new pair of brake pads on and do a oil change.
02-01-2013 | 04:24 PM
#15
Thread Starter
Junior Member
Joined: Jan 2013
Posts: 18
Hey Thanks so much man you do what you have to do first i think it's great that you did that for me but if your tired and have other stuff to do I'm pretty sure that everyone would understand. so no worries if it takes you a while to get them uploaded and all just take your time and do it when you feel like it. No worries man.
If you have any more...
02-02-2013 | 10:05 AM
#16
Junior Member
Joined: May 2009
Posts: 16
From: CHESTERFIELD, VA
lol if your really bored you could create a new thread and call it "wiring diagrams for 2012 tC2" and then post the intital link for the photobuket and then over time add theminto posts and update the OP with links to the post with the sections photos
02-02-2013 | 05:50 PM
#17
Thread Starter
Junior Member
Joined: Jan 2013
Posts: 18
01-29-2014 | 02:08 PM
#18

Junior Member
Joined: Nov 2013
Posts: 6
SOLVED:
Just installed the Valentine 1 using the Hard wire T-Tap.
For anyone else looking for the Switched wire to tap to, it's the Greenish wire, located right above or below the thick Pink wire - Depending on how you're looking at the Sunroof Harness. Just tap into it about an inch before the Harness right where the off colored rings are. For the ground I bent the ground clip out and attached it to the bolt for the Sunroof Motor I guess? To take that off it's a 10mm bolt.
I was going to make a 2012 Scion Tc - DIY Radar Hardwire .. But I'm sick and just wanted to do it before I had to go to bed. I have to say, Connecting the T-Tap was much easier than setting up the Blendmount. That thing was a pain in the ****' to get on and pointed the right way and tightened up!
As seen here in this Diagram :

If you need anymore Diagrams I have everything for the 2012 Scion Tc.
Just installed the Valentine 1 using the Hard wire T-Tap.
For anyone else looking for the Switched wire to tap to, it's the Greenish wire, located right above or below the thick Pink wire - Depending on how you're looking at the Sunroof Harness. Just tap into it about an inch before the Harness right where the off colored rings are. For the ground I bent the ground clip out and attached it to the bolt for the Sunroof Motor I guess? To take that off it's a 10mm bolt.
I was going to make a 2012 Scion Tc - DIY Radar Hardwire .. But I'm sick and just wanted to do it before I had to go to bed. I have to say, Connecting the T-Tap was much easier than setting up the Blendmount. That thing was a pain in the ****' to get on and pointed the right way and tightened up!
As seen here in this Diagram :
If you need anymore Diagrams I have everything for the 2012 Scion Tc.
01-29-2014 | 02:40 PM
#19
Thread Starter
Junior Member
Joined: Jan 2013
Posts: 18
All I did was take a semi thick flat head screwdriver, wrap the head in
electric tape a few times (any tape will do) this is just to protect the
plastic. Go in the middle front of the dome assembly (end closest to
you) stick the screwdriver between the "cloth" covered card board
and the dome assembly and pry down gently until you hear the clips
snap. Then do the same on the left side of the dome and the right side,
note: on the sides you're better off prying from the left and right sides
of the side of the dome assembly, if that makes sense. You should be
able to pop the assembly off now, although be careful because there
are wiring harnesses attached to the assembly.
Note: you can push the hardwire between the cloth in the windshield as
an exit point, makes it look neater.
Also make sure you really secure the box (if you're using a V1 power kit)
to something, as I only used the included velcro and mine came loose after
a while, and on the highway it vibrated up a storm.
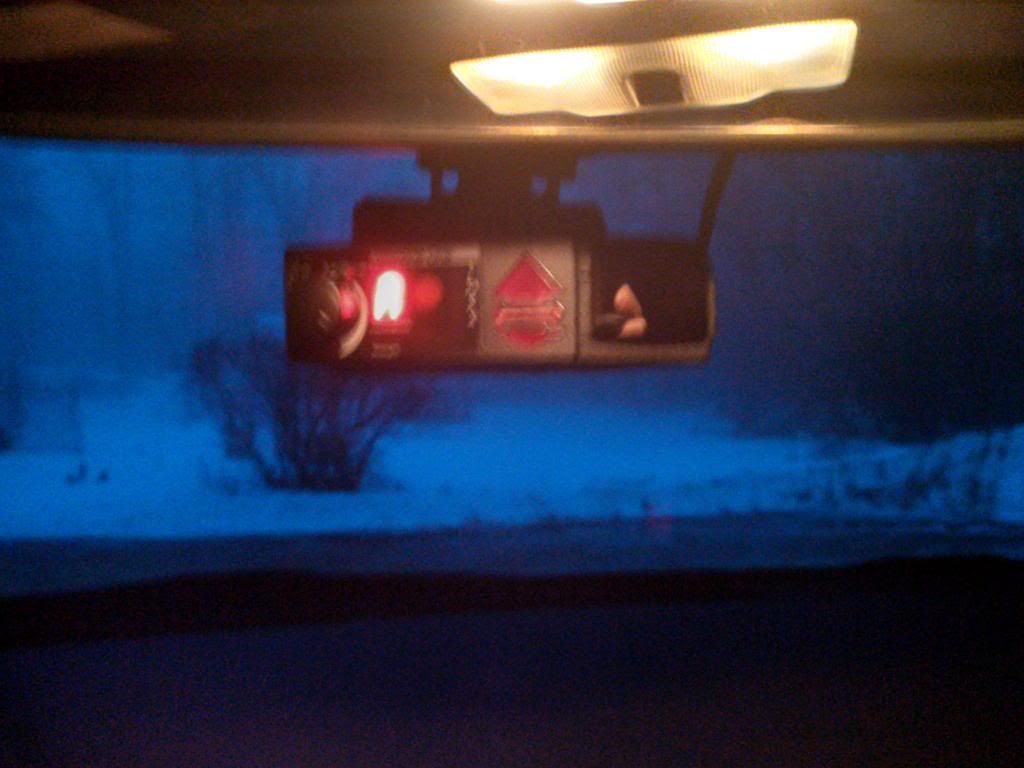
This is what it looked like after, (I have really shaky hands so the photo quality is bad)
 01-30-2014 | 02:24 PM
#20
Junior Member
Joined: Nov 2013
Posts: 6
You're welcome, it wasn't quite as bad as I thought it was going to be.
All I did was take a semi thick flat head screwdriver, wrap the head in
electric tape a few times (any tape will do) this is just to protect the
plastic. Go in the middle front of the dome assembly (end closest to
you) stick the screwdriver between the "cloth" covered card board
and the dome assembly and pry down gently until you hear the clips
snap. Then do the same on the left side of the dome and the right side,
note: on the sides you're better off prying from the left and right sides
of the side of the dome assembly, if that makes sense. You should be
able to pop the assembly off now, although be careful because there
are wiring harnesses attached to the assembly.
Note: you can push the hardwire between the cloth in the windshield as
an exit point, makes it look neater.
Also make sure you really secure the box (if you're using a V1 power kit)
to something, as I only used the included velcro and mine came loose after
a while, and on the highway it vibrated up a storm.
This is what it looked like after, (I have really shaky hands so the photo quality is bad)
Thanks again!