
Dome Lighting Install
 10-22-2006, 12:31 PM
#301
Senior Member
tC squad

SL Member
Join Date: Aug 2006
Location: Bronx, NY
Posts: 763
ok problemsolved i went back to my car found the dome fuse which is 7.5 and yes it was blown since i didnt have a 7.5 fuse available i replaced it with a 10 fuse....hopefully this wont be a problem.....everything seem to be working fine.....all lights light up!....will post pics tonit.....i got my door light superwhite my map lights and my rear dome are UV to match my underdash UV cathodes.....


 they look pretty cool..one of these nights ill take some pics and post them up. it only took me 10 min to put them in
10-23-2006, 09:11 AM
they look pretty cool..one of these nights ill take some pics and post them up. it only took me 10 min to put them in
10-23-2006, 09:11 AM
#304
Senior Member


SoCal tC Club
SL Member
Team N.V.S.
Scinergy
Scion Evolution

Originally Posted by eLpReSiDeNtE
ok problemsolved i went back to my car found the dome fuse which is 7.5 and yes it was blown since i didnt have a 7.5 fuse available i replaced it with a 10 fuse....hopefully this wont be a problem.....everything seem to be working fine.....all lights light up!....will post pics tonit.....i got my door light superwhite my map lights and my rear dome are UV to match my underdash UV cathodes.....
unsafe to use higher rating.
10-23-2006, 08:43 PM
#305
I know everyone was holding their breath, but my correct festoon bulb just arrived from superbrightleds.com, so my dome lighting makeover is complete! Now I have a spare white festoon bulb... is there anywhere else in/on my car I can put this?
10-23-2006, 09:20 PM
#306
Senior Member
tC squad
SL Member
Join Date: Aug 2006
Location: Bronx, NY
Posts: 763
Originally Posted by SquallLHeart
Originally Posted by eLpReSiDeNtE
ok problemsolved i went back to my car found the dome fuse which is 7.5 and yes it was blown since i didnt have a 7.5 fuse available i replaced it with a 10 fuse....hopefully this wont be a problem.....everything seem to be working fine.....all lights light up!....will post pics tonit.....i got my door light superwhite my map lights and my rear dome are UV to match my underdash UV cathodes.....
unsafe to use higher rating.
10-23-2006, 10:28 PM
#307
Senior Member
SoCal tC Club
SL Member
Team N.V.S.
Scinergy
Scion Evolution
the wires that are put into the car are rated to handle a certain amount of amperage.. when the fuse blows.. it prevents damage to that wire and then possibly starting a fire.
having that wire still continue to handle a lot of current without a fuse blowing (because the fuse is higher)... is yea... risky.
most auto stores carry mini-fuses, however most if not all are not the low profile ones like the stock ones (i think you can only buy them at the dealership, online or the company directly)
but.. the higher profile fuses will still fit in the slot and will stick out. it's fine if the fuses are in the engine bay fuse box, but if one of the fuses blow out in the dash one, with that higher profile fuse.. the cover's not gonna go back on.
yea.. i know it's just 2.5 more amps... but whatever... i'm picky..
10-23-2006, 10:31 PM
#308
Senior Member
tC squad
SL Member
Join Date: Aug 2006
Location: Bronx, NY
Posts: 763
^^^^^lol....yeah i know your picky.....the dome fuse is in the engine bay.....ill change it when i can get my hands on a 7.5 mini fuse.....i asked my parts department and they had no idea wat i was talkin about....goes to show!!!
10-24-2006, 08:55 PM
#309
I installed my festoon bulb in the rear trunk light mounted on the driver's side of the compartment. Here's my no-picture mini walkthrough:
1. Grab a small flathead screwdriver, like you used for the dome lights. Use it to pry at the edges of the light cover, again like you did with the dome. The entire light assembly will pop out rather suddenly.
2. Release the wire connector deal and you should have the light assembly free in your hands. There is a long, grey, C-shaped kind of cover held in by two little tiny tabs on each of its long sides. Once again, use the screwdriver to sneak under and pop it up. It comes off quite easily.
3. You should now be able to see the bulb and the connectors. I don't know the technical names, but the two metal connectors are thin, pretty flexible tabs with 3-4mm diameter holes in them that allow the pointed ends of the bulb to sit in them. At this point, you can remove the old bulb.
4. Comparing the old bulb with the new (mine was the same size as the rear dome light), you'll see that there is a pretty obvious size difference. The LED is longer. Studying the switch mechanism, you will find that turning on the light actually rotates an entire tab, moving the bulb with it. For this reason, you will not be bending the switch-connected tab.
5. Instead, simply push the tab on the opposite end of the switch backward, bending it away from the other tab. You should be able to sneak the LED into that side first, then fit it pretty well into the switch-linked tab.
6. Test the new bulb by turning the switch. If it looks good, pop your grey C-piece back in place and reconnect the wires. Pop the whole assembly back into place and you're done!
Overall a lengthy guide for what I was able to figure out without much effort, but hey. Just doing what I can.
11-01-2006, 09:53 PM
#310
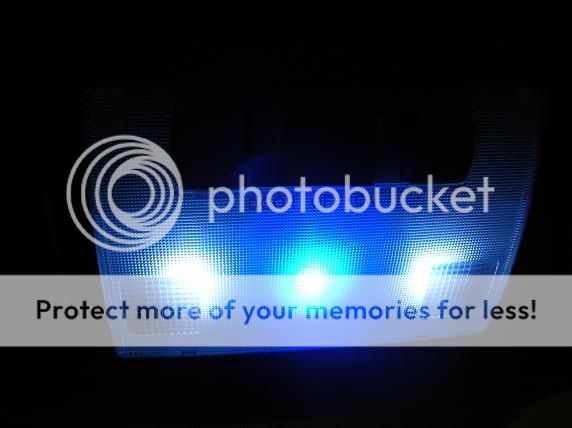
Finally got my digicam to work again, so here are a few pictures.
Comparison of stock map light and LED (guess which is which):
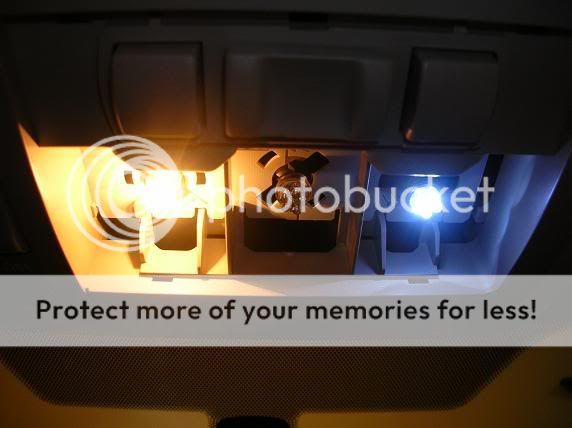
All three LEDs installed:

Map lights, with cover:
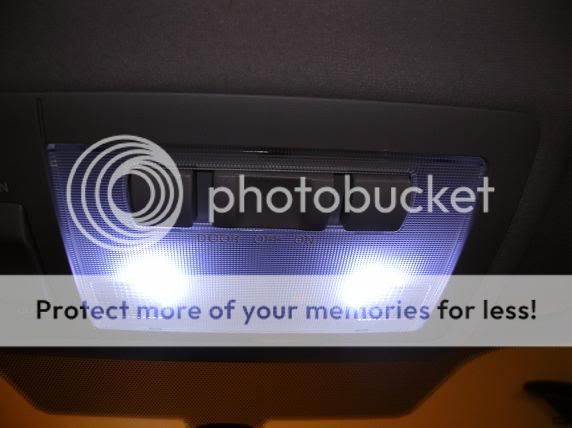
All three, with cover:
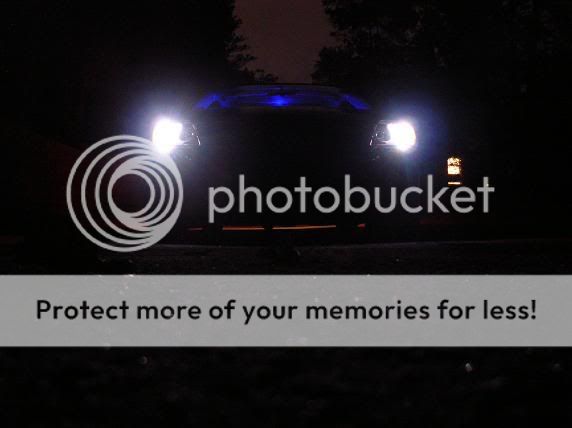
View from the front of my car, PIAA Xtreme White parking bulbs as well.
Comparison of stock map light and LED (guess which is which):
All three LEDs installed:
Map lights, with cover:
All three, with cover:
View from the front of my car, PIAA Xtreme White parking bulbs as well.

 11-02-2006, 12:22 AM
#313
Originally Posted by JaN_MiChAeL_07
whered you get those parking lights from ??
http://www.cardomain.com/item/PIA19172
11-05-2006, 06:59 PM
#320
Senior Member
SoCal tC Club
SL Member
Team N.V.S.
Scinergy
Scion Evolution
don't twist....
and people wonder why they made a "how to" on replacing a light bulb in a car....
this is about the only time where my "twist, remove, replace" does NOT come into play.
just remove and replace for the front and rear domes... and maybe the trunk light too.. sure.. and yea..
and people wonder why they made a "how to" on replacing a light bulb in a car....
this is about the only time where my "twist, remove, replace" does NOT come into play.
just remove and replace for the front and rear domes... and maybe the trunk light too.. sure.. and yea..