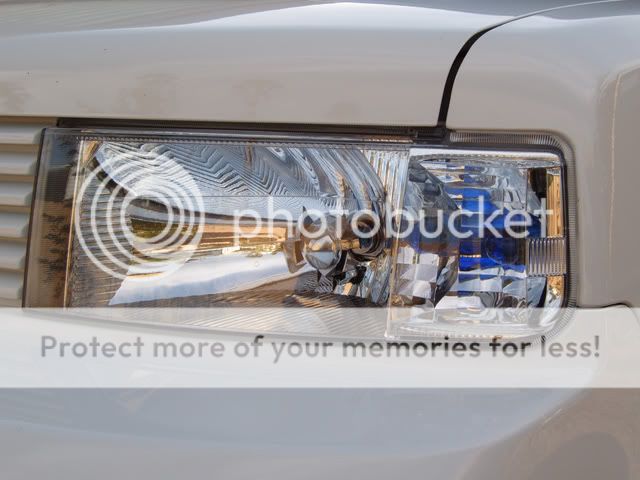
Clear Corner Headlights


 04-27-2005, 03:37 AM
#62
Member

Join Date: Jan 2005
Location: Gloucester, VA
Posts: 35
ya, same here, i can't figure how to get the pieces out of that groove. The light causes it to refract all throughout the encasing. Doesn't look too hot. Also have moisture in my driver side one, though it started raining when i was putting them back on. Will this likely go away? I may just buy projectors.
04-29-2005, 12:13 AM
#63
Member
SL Member
Join Date: Sep 2004
Location: Minnesota
Posts: 99
The Projectors are awesome. Plus www.scionsport.com has some and they are cheaper than when I bought them.
The last of the amber lens is a biotch to get out I had to use a needle nose pliers to get mine out. A little patience and a lot of manuevering and you should be able to get them out.
The last of the amber lens is a biotch to get out I had to use a needle nose pliers to get mine out. A little patience and a lot of manuevering and you should be able to get them out.
04-29-2005, 10:10 PM
#64
Member
Join Date: Jan 2005
Location: Gloucester, VA
Posts: 35
Well, i ordered the anzo projectors. hope they look good. I'll prolly try to get the extra reflector pieces out of the groove even though im not using the lights anymore. Never know, might wanna reinstall them one day. problem is though, i really dont have anything to pry out. its broken off down in the crevase with very very little sticking out to get leverage from. Oh well, we'll see.
 07-18-2005, 01:35 AM
#66
Member
SL Member
Join Date: Sep 2004
Location: Minnesota
Posts: 99
Depending on how the amber glass shatters it might be impossible to get all the pieces out. I had a helva time trying to pry the little suckers out. I suggest finding a thin flat head screw driver and a few hours and going to town. Just don't scratch the inner lense because it won't be worth the time and effort if its all scratched up.


 10-04-2005, 07:09 PM
#69
Junior Member
OhioScions

Join Date: Apr 2005
Location: Hilliard Ohio
Posts: 11
Originally Posted by xBbmxer
I just got done doing mine. I used an awl instead of a screwdriver, worked out really good. Broke apart in four pieces.
Now all i have to do is buy different bulbs.
Now all i have to do is buy different bulbs.
10-29-2005, 04:25 AM
#70
Senior Member
SL Member

Join Date: Sep 2005
Location: Mesa, Arizona
Posts: 137
Yeah, I was going to say the same thing. The 1157 is one of the most popular dual fillament bulbs out there. They are used on almost every ford that I know of. I have found blue ones at walmart for 4 bucks. They are blue when they are off and white when they are lit.
11-16-2005, 03:37 PM
#71
Senior Member
SL Member

Join Date: Oct 2005
Location: Kitchen Stadium
Posts: 616
I did this headlight clearcorner thingy yesterday. Took about an hour. The hardest part is definitely getting all of the busted pieces of reflector out, but I was too scared of the oven method- and I know the silicone seal would get all gummy and stringy when heated. ...Anyways they sell amber glow bulbs that look silver when not on at pepboys. They're made by APC- called "titanium" size 1157, and they're $6.99 each.

 01-09-2006, 02:06 AM
#76
Senior Member
SL Member

Join Date: Oct 2005
Location: JAX, FL
Posts: 570
just did mine last night, took only about 30 min or so..got lucky with the reflector breaking nicely
did end up with a couple small scratches but you cant see it unless you put your head right in front of the light lol
i'm happy with it!
did end up with a couple small scratches but you cant see it unless you put your head right in front of the light lol
i'm happy with it!


 03-09-2006, 05:35 AM
#80
Junior Member

Join Date: Mar 2006
Posts: 2
How do you install the light in the emblem.
I used the crush reflector method.
Took 2 hours INCLUDING wiring in my light up Grill Emblem.
No hangups, easy, easy easy.
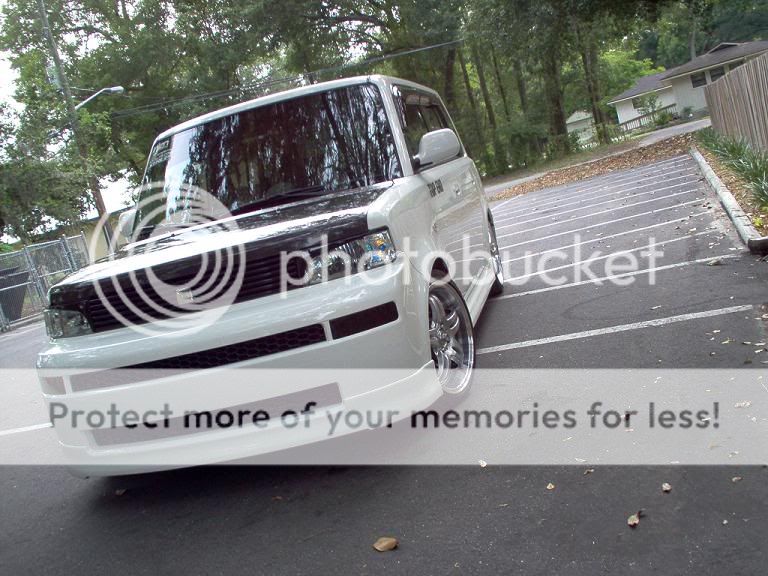
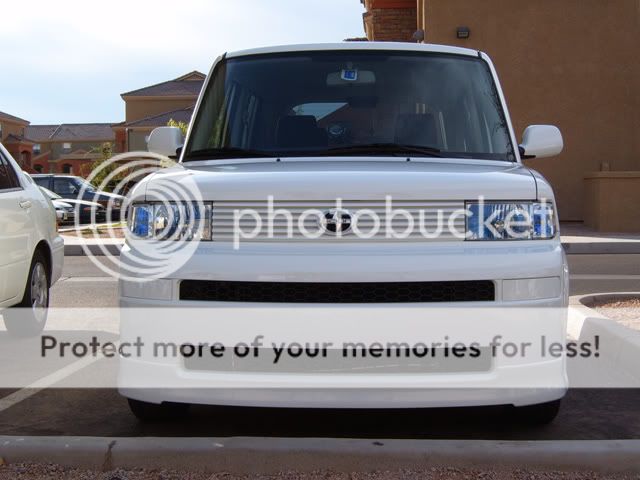
I have 38 pics in all, I will post a few here, but go to this link for a complete picture sequence of events.
http://www.sfbavw.net/gallery/Scion
You will need to remove Grill:
There are 3 pop up plastic pressure snap style fasteners. simply pry inner circle up, using a thin flathead screwdriver, and then pull plastic screws out. Lift Grill straight up. VIOLA, your done.
Remove Bumper
The Bumper Consists of 2 - 10mm Bolts, under where grill was, and 1 more plastic pop up pressure fasteners. Remove all 3.

There are 2 -10mm bolt on each side of the fender wheel well, that are right next to each other. You will only need to remove the bolt closest to the ground, this one is attached to the bumper, the upper one is attached to the fender. Repeat on each side.


Now you will have 8 more 10mm bolts on the undercarriage of the car. Remove all 8. There is 1 Each Side just at the bottom of the fender well, and 6 more from the outside in.


Once you have bumper bolts all off, you can either pull the bumper off all the way and set somewhere. ALWAYS lay FACE DOWN on a SOFT BLANKET or TOWEL, make sure the Soft Article is BIG ENOUGH to extend the whole length and width of the bumper.
OR you can simply let the bumper hang on the bumper rebar, as you only need to pull it out about 3 inches total.

Remove The Headlight Housings
There are 4 -10mm bolts for each light housing, unbolt them. wiggle light housing loose, and once you have it away from the bumper Pull Headlight Bulb harness off, and Twist Blinker light out


Break The Amber Reflector Out
Set light down, take a look. You will notice the amber reflector inside is just a thin sheet of plastic.

Simply take a longer, thin flathead screwdriver, insert it into the Blinker hole.


The ridges on the inside of the amber reflector allow you to rest the flathead screwdriver firmly on it without it slipping into the housing. Firmly rest flathead in about the middle of the amber reflector. Take a hammer and tap it, relatively hard until the inner pieces shatter. You will guage how much force to use after you experimaent hitting it too soft.
Now take a look, it should be cracked into a few pieces.


The littler pieces will fall out of the hole easily, if you have bigger peices simply take needle nose cutters, or in my case tin snips with thin long noses, and cut the remaining bigger pieces smaller until they all come out. You will notice when you try to cut bigger pieces it tends to shatter as you cut, making it easier to get pieces out.
Shake all the pieces out. Use a can of air for computers and electronics to make sure you jar all the small pieces loose, and shake out.
After you have all the small particles out, wrap some tissue on the end of your flathead screwdriver, and tape it on. Use the tissue to clean out all the microscopic pieces on the inside of the hosuing thoroughly!! This will help ensure a CLEAN inside housing.
You are done with your first light. Repeat for your second light. Reinstall Housing, being sure to hook up turn signals, and Light Harness.
Now on my lights I kept the Stock Amber Bulbs for right now. I will be getting some daydium style silver coated bulbs soon, that illuminate Amber. That way when the lights are off, you dont get the amber glare from the bulb as seen in my pics.
Reinstall Bumper, Be sure to pay attention to what bolts go where, some are different lengths, etc.
Reinstall Grill. You are done!


And my Cool Light Up Emblem, See my other thread on that!


 [/quote]
I used the crush reflector method.
Took 2 hours INCLUDING wiring in my light up Grill Emblem.
No hangups, easy, easy easy.
I have 38 pics in all, I will post a few here, but go to this link for a complete picture sequence of events.
http://www.sfbavw.net/gallery/Scion
You will need to remove Grill:
There are 3 pop up plastic pressure snap style fasteners. simply pry inner circle up, using a thin flathead screwdriver, and then pull plastic screws out. Lift Grill straight up. VIOLA, your done.
Remove Bumper
The Bumper Consists of 2 - 10mm Bolts, under where grill was, and 1 more plastic pop up pressure fasteners. Remove all 3.
There are 2 -10mm bolt on each side of the fender wheel well, that are right next to each other. You will only need to remove the bolt closest to the ground, this one is attached to the bumper, the upper one is attached to the fender. Repeat on each side.
Now you will have 8 more 10mm bolts on the undercarriage of the car. Remove all 8. There is 1 Each Side just at the bottom of the fender well, and 6 more from the outside in.
Once you have bumper bolts all off, you can either pull the bumper off all the way and set somewhere. ALWAYS lay FACE DOWN on a SOFT BLANKET or TOWEL, make sure the Soft Article is BIG ENOUGH to extend the whole length and width of the bumper.
OR you can simply let the bumper hang on the bumper rebar, as you only need to pull it out about 3 inches total.
Remove The Headlight Housings
There are 4 -10mm bolts for each light housing, unbolt them. wiggle light housing loose, and once you have it away from the bumper Pull Headlight Bulb harness off, and Twist Blinker light out
Break The Amber Reflector Out
Set light down, take a look. You will notice the amber reflector inside is just a thin sheet of plastic.
Simply take a longer, thin flathead screwdriver, insert it into the Blinker hole.
The ridges on the inside of the amber reflector allow you to rest the flathead screwdriver firmly on it without it slipping into the housing. Firmly rest flathead in about the middle of the amber reflector. Take a hammer and tap it, relatively hard until the inner pieces shatter. You will guage how much force to use after you experimaent hitting it too soft.
Now take a look, it should be cracked into a few pieces.
The littler pieces will fall out of the hole easily, if you have bigger peices simply take needle nose cutters, or in my case tin snips with thin long noses, and cut the remaining bigger pieces smaller until they all come out. You will notice when you try to cut bigger pieces it tends to shatter as you cut, making it easier to get pieces out.
Shake all the pieces out. Use a can of air for computers and electronics to make sure you jar all the small pieces loose, and shake out.
After you have all the small particles out, wrap some tissue on the end of your flathead screwdriver, and tape it on. Use the tissue to clean out all the microscopic pieces on the inside of the hosuing thoroughly!! This will help ensure a CLEAN inside housing.
You are done with your first light. Repeat for your second light. Reinstall Housing, being sure to hook up turn signals, and Light Harness.
Now on my lights I kept the Stock Amber Bulbs for right now. I will be getting some daydium style silver coated bulbs soon, that illuminate Amber. That way when the lights are off, you dont get the amber glare from the bulb as seen in my pics.
Reinstall Bumper, Be sure to pay attention to what bolts go where, some are different lengths, etc.
Reinstall Grill. You are done!
And my Cool Light Up Emblem, See my other thread on that!
[/quote]